
I'd like to show you different ways how you can play with lights and shadows in your photo manipulation to create completely different light scene. I believe these skills are crucial for every photo manipulator. Let's get started!
Preview of Final Results
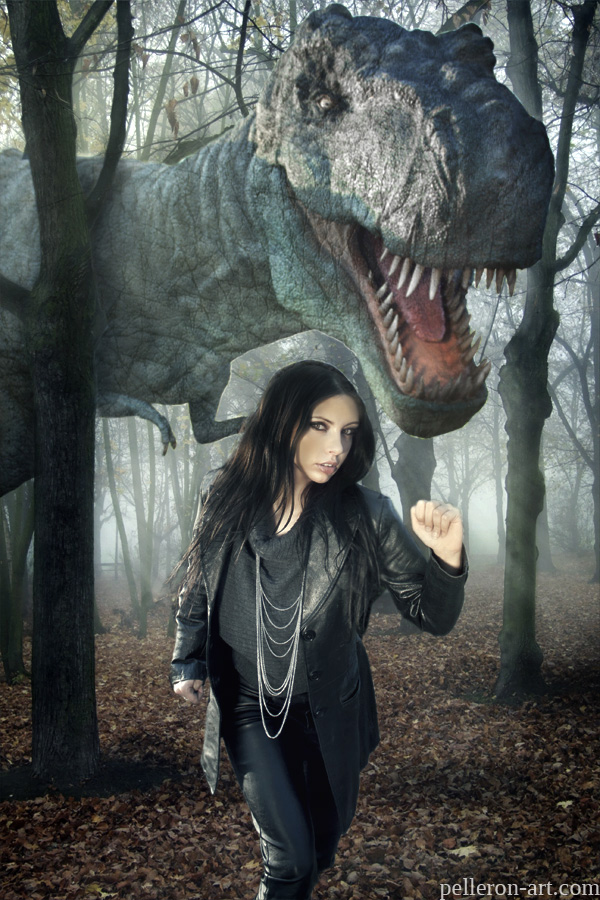
Download the PSD
Playing with Lights and Shadow to Create Dramatic Photo Manipulation.zip | 6.85 MB
Download from Website
Download from Website
Playing with Lights and Shadow to Create Dramatic Photo Manipulation
Resources
Step 1 - Preparing Background
Download picture of background from the list above and open it in Photoshop. Double click on the layer (if you don't see the palette Layers go to Window > Layers) and rename it on BACKGROUND. It's really useful habit to name all your layers because once your manips become more complicated it will be easier to navigate through them.Before you'll add woman and dinosaur let's focus on slight adjusting of the background. You'll desaturate it and make it bit lighter in this step.
Let's start with desaturating. Add new adjustment layer Hue/Saturation. You can find the button "Add new fill or adjustment layer" in the bottom part of the palette Layers.

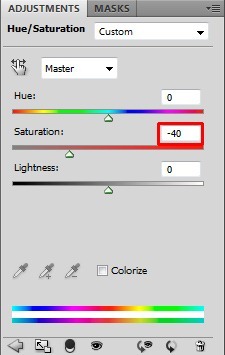
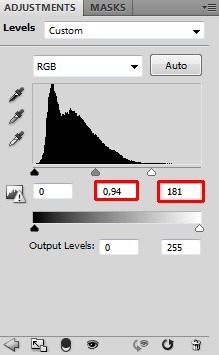
By the adjustment you've just done you've made midtones and highlights lighter while shadows (darks) remain untouched.
Below you can see how these three adjustments change the picture.
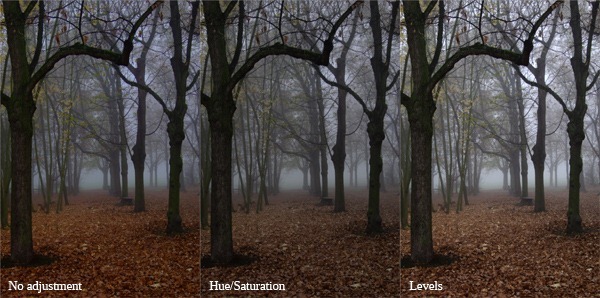
Step 2 - Adding Woman and Dinosaur
Download the photo of woman and dinosaur and drag it into your photo manipulation. Place it on the top of all layers and name it e.g. WOMAN (to keep it short). Below you can take a look at the order of layers so far.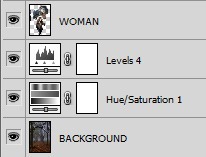
Before let's take a look at how the image looks right now.
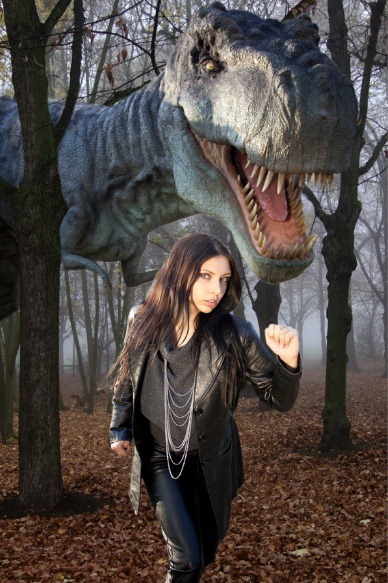
On the other hand the background image was shot when it was cloudy and foggy and light was very soft - you can barely see difference between lights and shadows.
On woman and dinosaur the light source comes from the left. You'll add this light source also to the background and create more visible difference between lights and shadows. You'll also soften transition between lights and shadows on woman and dinosaur.
You might think that I talk only about light scene but not cover the topic of color adjustments. Well, you'll make these kind of changes too, but I want to focus especially on changing lights and shadows in this tutorial because I think it's essential skill for photo manipulator, which is often ignored. I believe that many manips could be significantly better if author thinks more about lights and shadows.
Step 3 - Adding Sun Rays to the Background
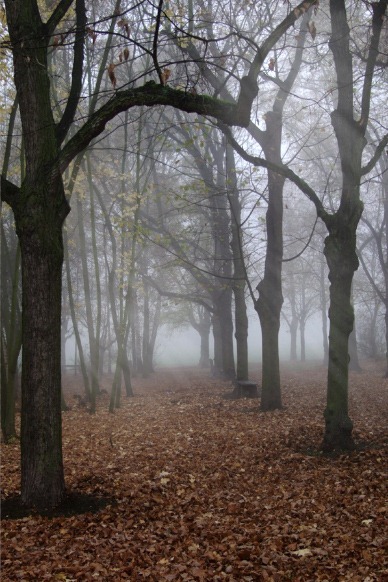
Let's start with changing the light scene of the background. As I said light source on woman and dinosaur comes from the left but there is no such thing on the background. You'll add some sun rays coming from that side in this step so the picture will make better sense.Add new layer under the layer WOMAN and name it SUN RAYS. Download the sun rays brush listed in the beginning of the tutorial and install it into Photoshop. If you don't know how to install custom brushes into Photoshop you can take a look at this tutorial.
On the picture below you can see the layer order.
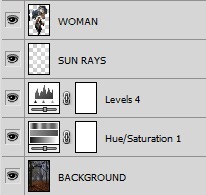
Hold Alt on your keyboard to activate the Eyedropper Tool (I) and pick some very light color from the background.
While doing manipulations (painting, making lights and shadows etc.) try to avoid using pure white and black color. They both are very harsh and very rarely look realistic. You can very rarely see pure black and white in real life. Even if you think something is black, it's more likely dark grey, dark green... The same with white color.
Make invisible the layer WOMAN. To do it click on the small icon of eye next to that layer.
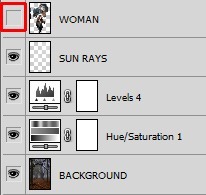
You can get the inspiration of what to paint on the picture below.
Step 4 - Adjusting Woman
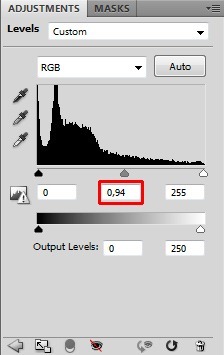
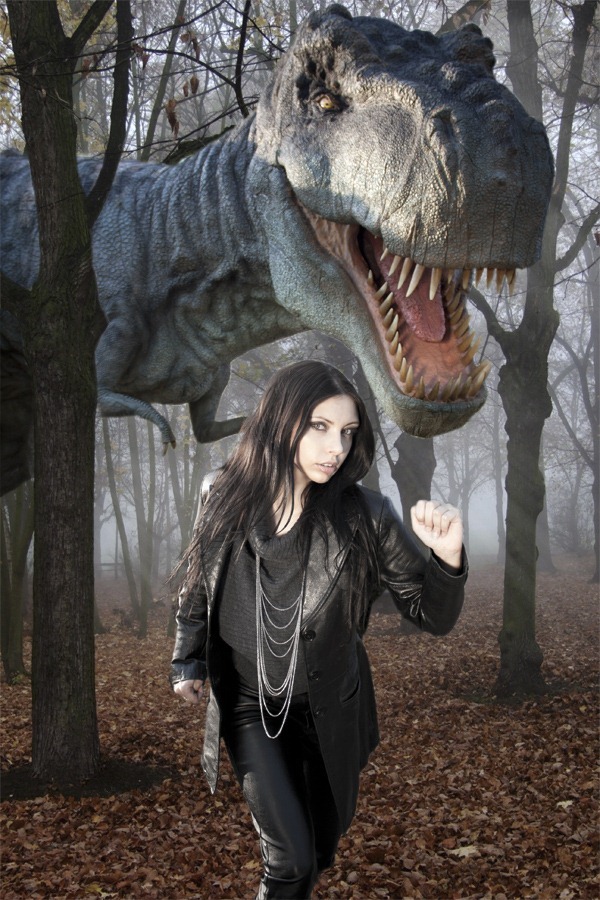
Let's make first adjustments on woman. Because of the light scene her stock photo was shot, her skin has yellowish tone, which doesn't fit to the color palette of the forest. To fix it you'll make her bit darker and less saturated.Create mask of the woman (e.g. with the Lasso Tool (L) or the Pen Tool (P)). With the mask still activated add new adjustment layer Levels on the top of all layers and set the Input Levels on 0; 0,94; 255.

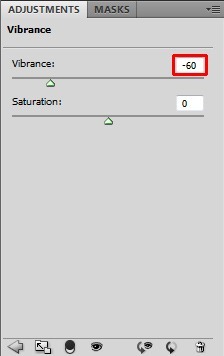
With mask activated add new adjustment layer Vibrancy and set the value Vibrancy on -60.
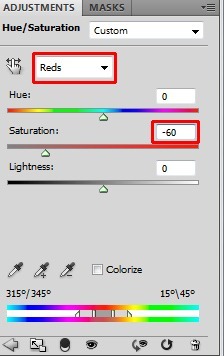
Let's take a look.
Step 5 - Adjusting Highlights
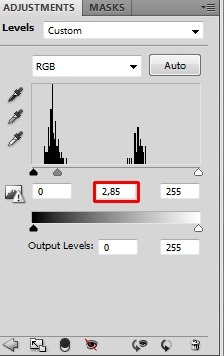
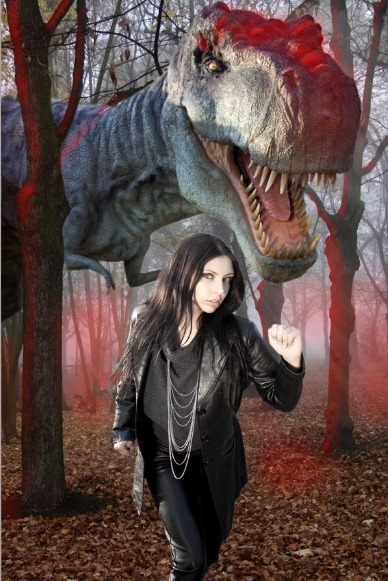
Let's move on adjusting highlights in the background and on the dinosaur.Add new adjustment layer Levels on the top of all layers and set the Input Levels on 0; 2,85; 255.
Below you can get inspiration where you should paint. These areas are highlighted with red color.
Step 6 - Adjusting Shadows
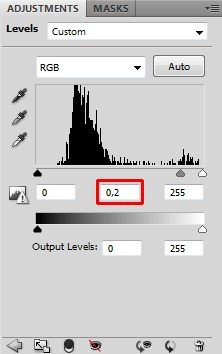
Now it's time to do the same with shadows. By doing these two steps you not only create more realistic scene but also add bit more drama to the picture because you'll increase contrast between lights and shadows.Add new adjustment layer Levels on the top of all layers and this time set the Input Levels on 0; 0,2; 255.
Let's take a look where to paint. That areas are highlighted with blue color.
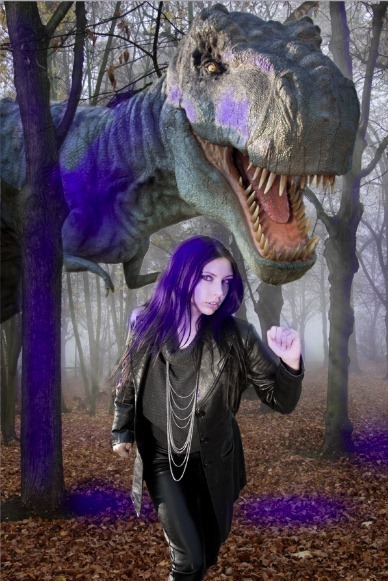
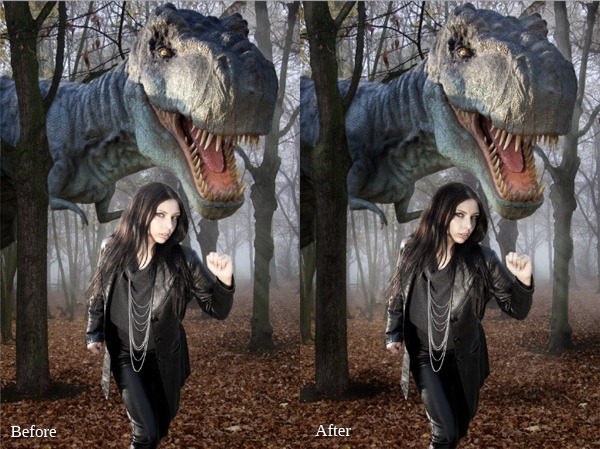
Step 7 - Adding More Light From Left
In this step you'll add more light coming from the left side of the image. Right now it's bit darker than the rest of the image and it doesn't create harmony and doesn't look balanced.You'll create light on two separate layers - one will be diffused light and second some more sun rays. Let's start with diffused light.
Add new layer on the top of all layers and name it e.g. DIFFUSED LIGHT. Grab the Lasso Tool (L) and carefully make selection of the tree. Be as careful as possible to get the best result. The better masking means better looking and more realistic images even if it's more time consuming.
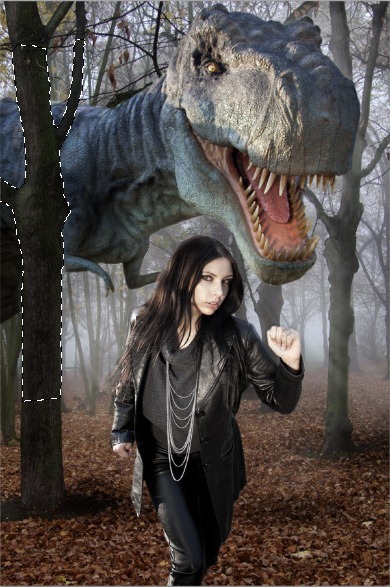
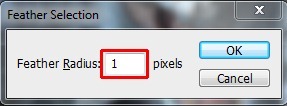
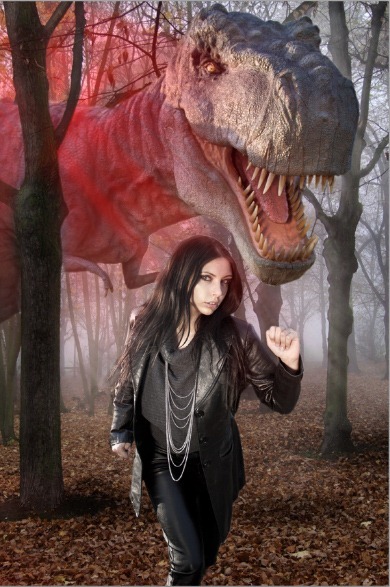
Grab the Brush Tool (B), select some soft round brush with big Master Diameter and lower its Opacity on about 15%. Pick some light yellow color (avoid white, remember what we said above?) and paint one or two dots on the left. Take a look on the following picture to get the example. I painted with red instead so you can see it better.
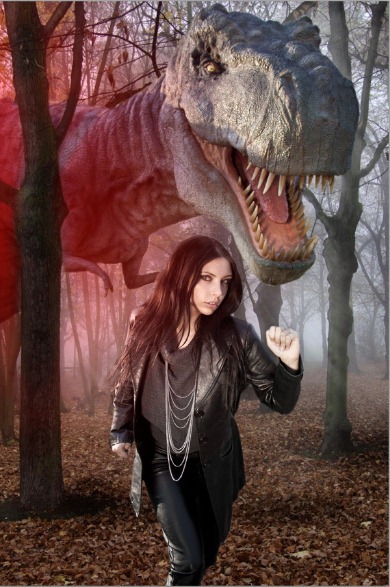
Below you can get the inspiration. I painted with red again so you can see better what I did.
Step 8 - First Color Adjustment
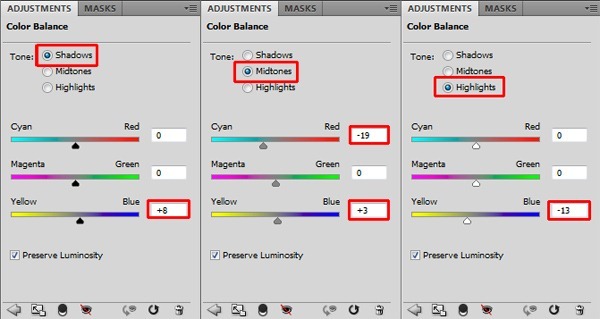
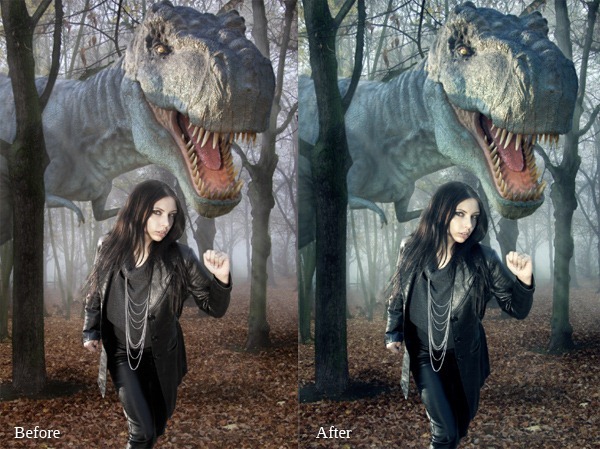
It's time to begin with setting the mood of the image. Because it's some calm, autumn morning I think that more colder color palette would suit better to the image.To do that add new adjustment layer Color Balance on the top of all layers and set the values as shown on the picture below.
Step 9 - Retouching Highlight on Jacket
I strongly believe that what makes the photo manipulation great is focusing on details. Which is why you'll remove some highlights on the woman's jacket. They're both disturbing and too bright given the overall light scene.Let's take a look at the highlights you are going to retouch in this step:
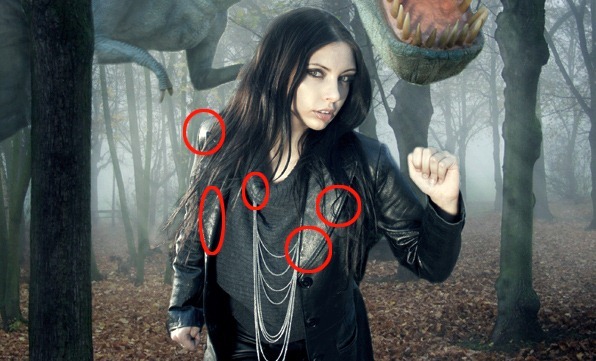
If you don't know how to use the Stamp Tool (S) I strongly recommend you to check out some tutorials about it because it's very useful Photoshop tool.
Change the source of cloning to avoid repetitive pattern which never looks realistic in pictures. Below you can compare how the jacket looks before and after using of the Stamp Tool (S).
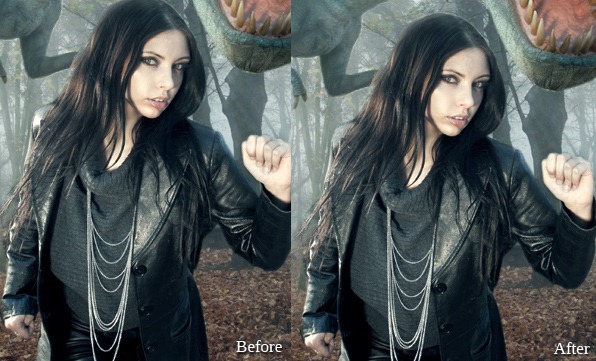
Step 10 - Darkening Trees and Hair
Right now trees look flat because there are no shadows on them. Also hair of woman should be bit darker to look better and more contrasted. You'll easily fix it in this step.Add new adjustment layer Levels on the top of all layers and set the Input Levels on 0; 0,75; 255.
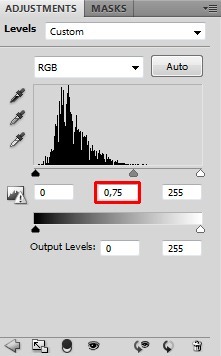
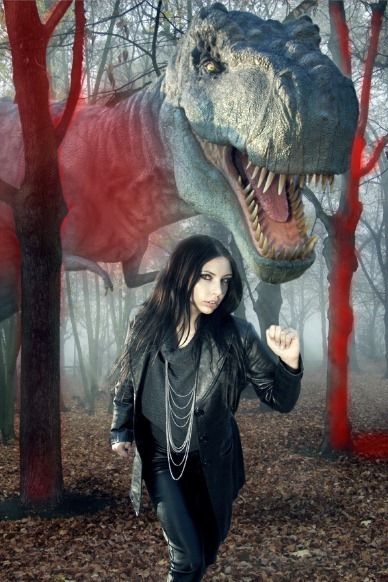
Let's start with painting shadows on trees. Because light is coming from left there should be darker areas on the right side of trees.
There should also be some bounced shadow on the dinosaur. Let's paint it too.
You can get better idea below.
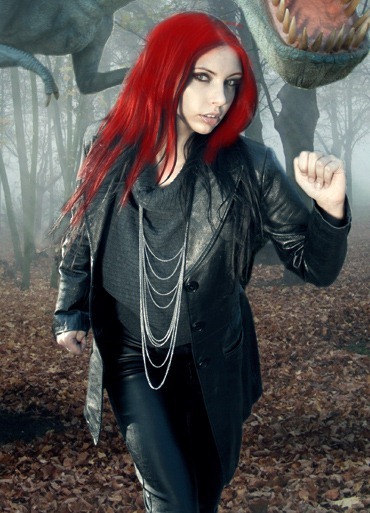
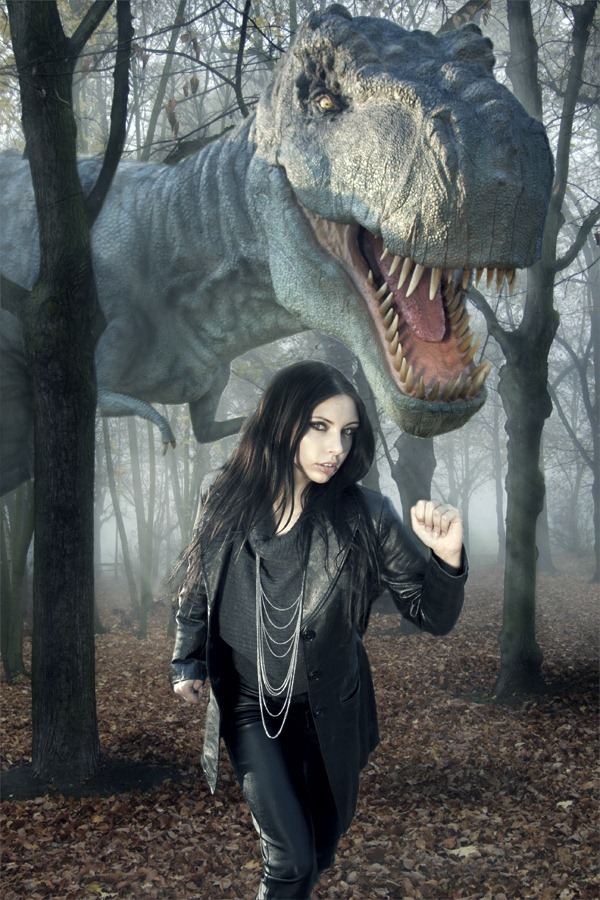
Step 11 - Texture on the Dinosaur
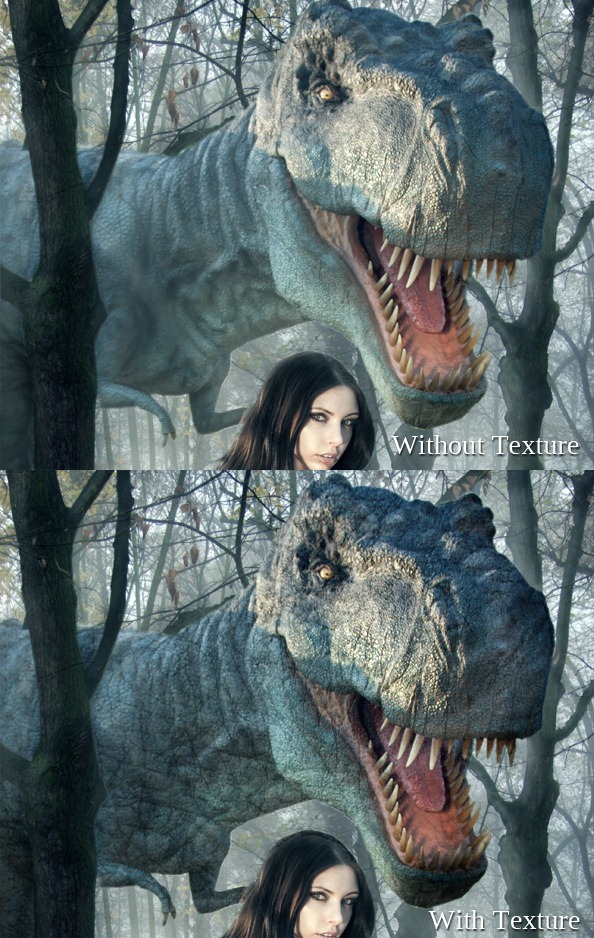
Right now the dinosaur looks too plastic. In this step you'll add texture over his skin to create more realistic result.Download the leather texture from the list in the beginning of the tutorial and drag it into your photo manipulation. Place it on the top of all layers and name it e.g. BETTER SKIN.
Right now the texture is not blended well. Blending modes are great way how you can get quickly very realistic blending results. If you're not familiar with them I recommend you to try experimenting with them and see what effect you can achieve. You can not only use them to blend textures, but also to create light effects, do color changes etc. Just experiment and you'll see. But back to the tutorial...
To blend the texture properly change its Blending Mode from Normal to Soft Light. You can find that option in the upper part of the palette Layers.
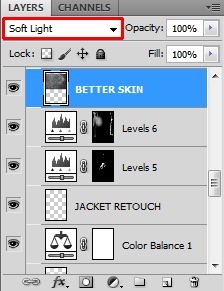
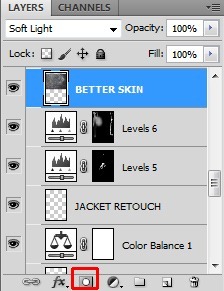
You can find the button Add layer mask in the bottom part of the palette Layers.
Below you can compare how the photo looks with and without texture.
Step 12 - Adjusting Dinosaur's Head I
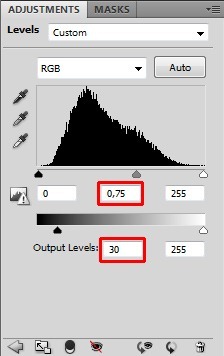
If you look carefully on dinosaur's head you may notice that it doesn't fit properly to the rest of the image because it's too contrasted and also bit darker because of the light scene it was originally shot in. You'll take care about in this step.Add new adjustment layer Levels on the top of all layers and set the Input Levels on 0; 0,75; 255. Then set the Output Levels on 30; 255.
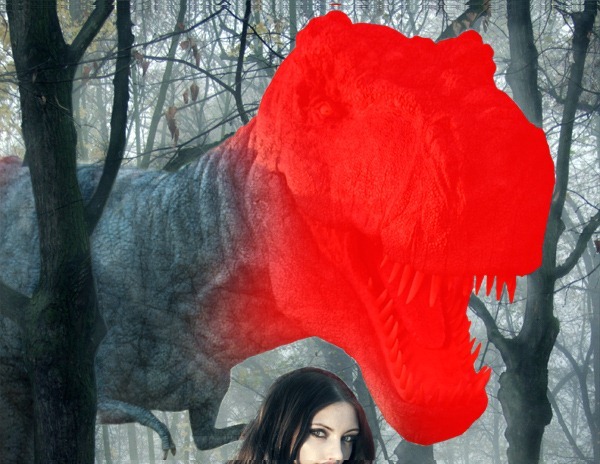
Grab the Lasso Tool (L) and create selection of dinosaurs head. Paint inside the selection with the white brush. Then cancel the selection (press Ctrl + D on your keyboard or go to Select > Deselect). Lower the Opacity of the brush on about 40% and create nice soft transition between adjusted and non-adjusted part of the dinosaur's neck.
On the following image you can see better what I mean. Mask is highlighted with red color. Notice the soft transition on the neck.
Step 13 - Quick Background Cleaning
Do you see the branch which leads directly into dinosaur's mouth? It looks really weird, isn't it? You'll retouch it away in this step.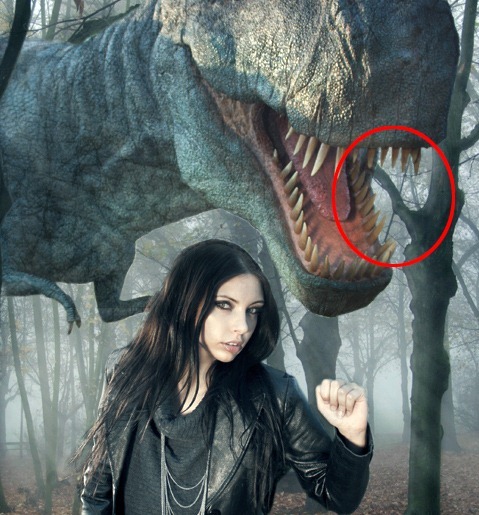
You should get something like on the following picture.
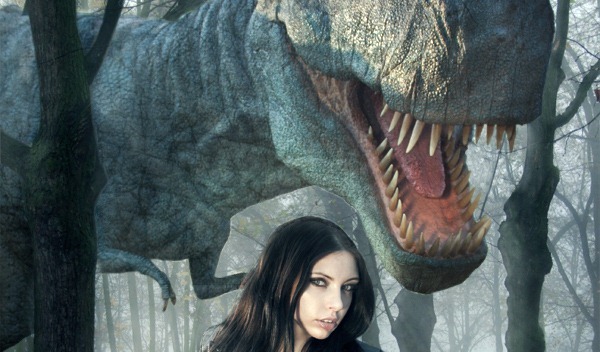
Step 14 - Adjusting Dinosaur's Head II
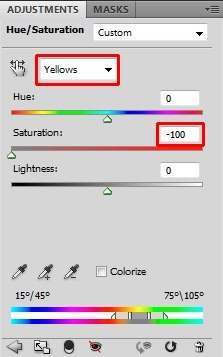
Dinosaur needs some more adjustments to actually look like it's part of the scene, especially its head. To achieve that you desaturate yellow light on the head.To get rid off the yellow light add new layer Hue/Saturation on the top of all layers. Choose Yellows as color and set the value Saturation on -100.
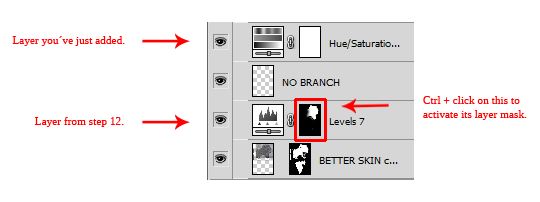
You can simply activate the mask by clicking on the thumbnail of the previous Levels adjustment layer. Let me show it to you on the graphic below.
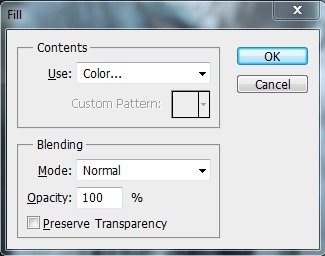
Now go to Edit > Fill ... or press Ctrl + F5 on your keyboard to activate the Fill dialogue window. As Use select the option Color.. and pick pure black color.
Press Ctrl + D on your keyboard to deselect the mask.
Step 15 - Whiter Teeth
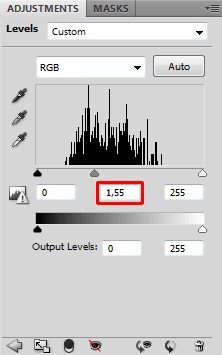
To bring bit more contrast to the upper right side of the image you'll make dinosaur's teeth slightly lighter in this step.Add new adjustment layer Levels on the top of all layers and set the Input Levels on 0; 1,55; 255.
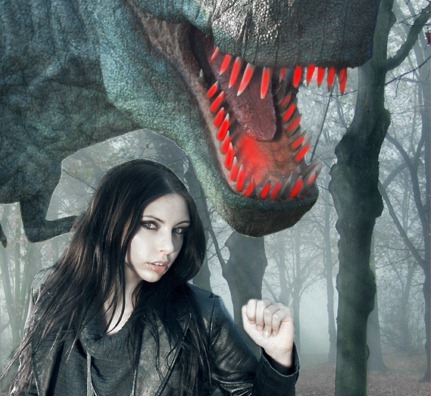
If you're not sure you can take a look at the following picture where to paint. That areas are highlighted with red color.
Step 16 - More Diffused Light
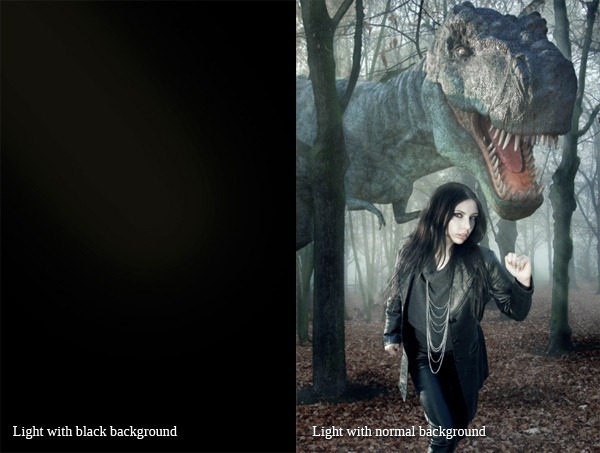
The picture would have stronger, more magical atmosphere if there is more light coming from the left through the trees and mist. You'll add it in this step.Add new layer on the top of all layers and name it DIFFUSED LIGHT. Grab the Brush Tool (B), set the Master Diameter on about 500 pixels and set the Opacity on 5% - 10%. Pick some very light color and paint a strip coming from the upper left corner to woman's head.
On the following photos you can see the stripe with black background (don't make that black background!) and with the real background of the photo manipulation.
Step 14 - Adjusting Dinosaur's Head II
Dinosaur needs some more adjustments to actually look like it's part of the scene, especially its head. To achieve that you desaturate yellow light on the head.To get rid off the yellow light add new layer Hue/Saturation on the top of all layers. Choose Yellows as color and set the value Saturation on -100.

You can simply activate the mask by clicking on the thumbnail of the previous Levels adjustment layer. Let me show it to you on the graphic below.

Now go to Edit > Fill ... or press Ctrl + F5 on your keyboard to activate the Fill dialogue window. As Use select the option Color.. and pick pure black color.

Press Ctrl + D on your keyboard to deselect the mask.
Step 15 - Whiter Teeth
To bring bit more contrast to the upper right side of the image you'll make dinosaur's teeth slightly lighter in this step.Add new adjustment layer Levels on the top of all layers and set the Input Levels on 0; 1,55; 255.

If you're not sure you can take a look at the following picture where to paint. That areas are highlighted with red color.

Step 16 - More Diffused Light
The picture would have stronger, more magical atmosphere if there is more light coming from the left through the trees and mist. You'll add it in this step.Add new layer on the top of all layers and name it DIFFUSED LIGHT. Grab the Brush Tool (B), set the Master Diameter on about 500 pixels and set the Opacity on 5% - 10%. Pick some very light color and paint a strip coming from the upper left corner to woman's head.
On the following photos you can see the stripe with black background (don't make that black background!) and with the real background of the photo manipulation.

Step 17 - Toning of Woman's Face
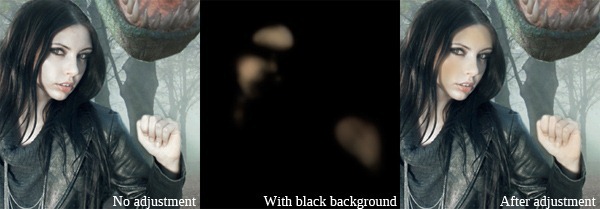
As I mentioned in one of the first steps woman's face is very bright, right now she looks more like a vampire than a human. So in this step you'll add some colors on the skin.Add new layer on the top of all layers and name it e.g. SKIN TONING. Grab the Brush Tool (B), set the Master Diameter on 30 pixels and the Opacity on 20%. Pick light orange/brown color (e.g. #e0c7aa) and gently paint over the woman's forehead, left cheek and right hand.
Let's take a look at the following images. The first one shows woman's face without any retouching. On the second you can see what and where to paint, there is black background put under so you can see it better. On the third image there is woman's face after this step.
Step 18 - Adding Depth
In this step you'll create depth by adding vignette to your picture and by darkening woman's hair even bit more and part of dinosaur's head.Add new adjustment layer Levels on the top of all layers and set the Input Levels on 0; 0,7; 255.
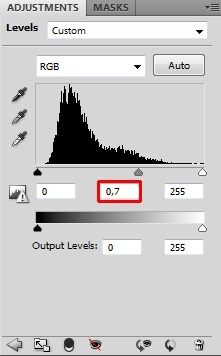
After that make the Master Diameter smaller (60 pixels) and paint over woman's hair and left part of dinosaur's head.
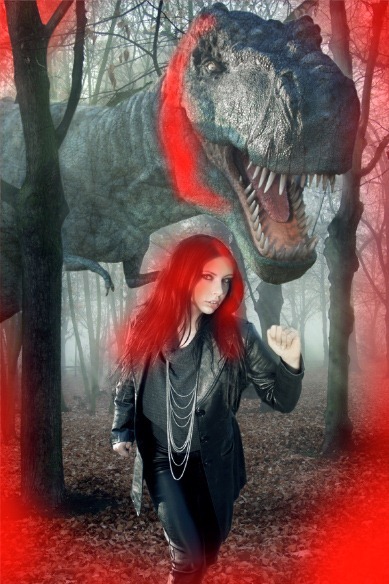
Let's take a look at the following photo where is highlighted with red color where you should paint.
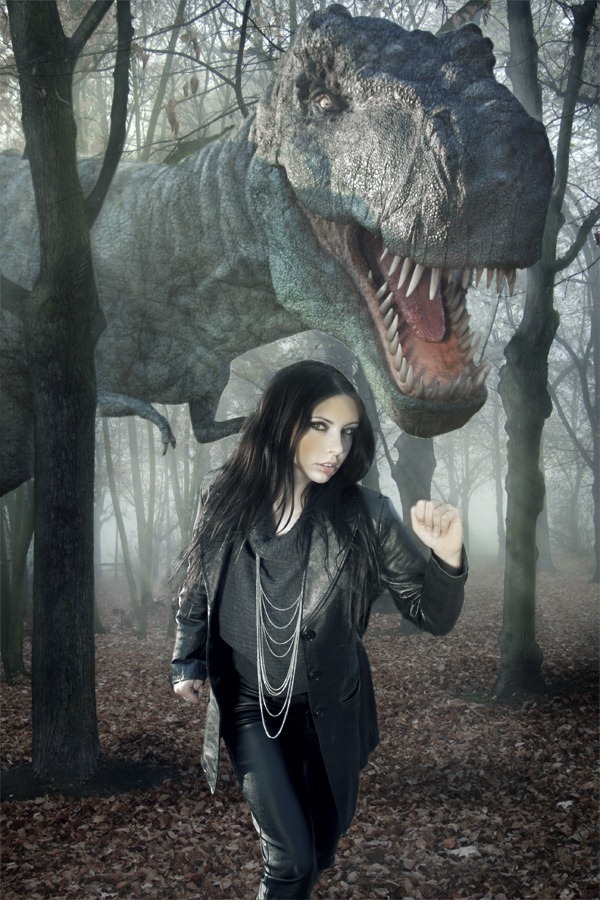
Step 19 - Contrast of the Background
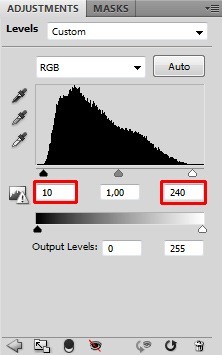
You're slowly coming to the end of the tutorial. There is only few more steps left. One of them is to create the background bit more contrasted. Right now contrast of the woman is higher than the contrast of the rest of the image.Add new adjustment layer Levels on the top of all layers and set the Input Levels on 10; 1,00; 240.
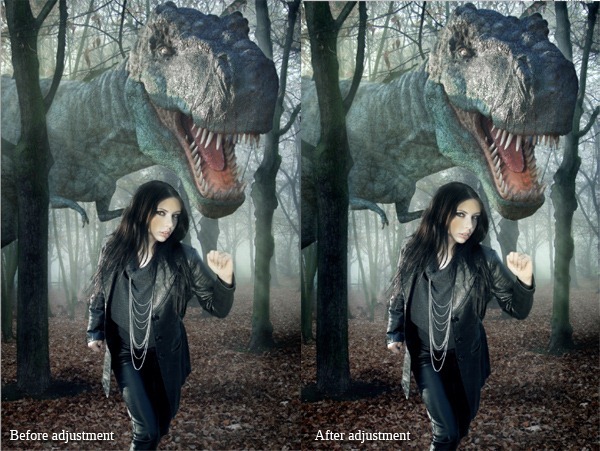
Step 20 - Shadow on the Dinosaur
There is one important thing missing - bounced shadow from the tree on dinosaur's body. You'll add it in this step.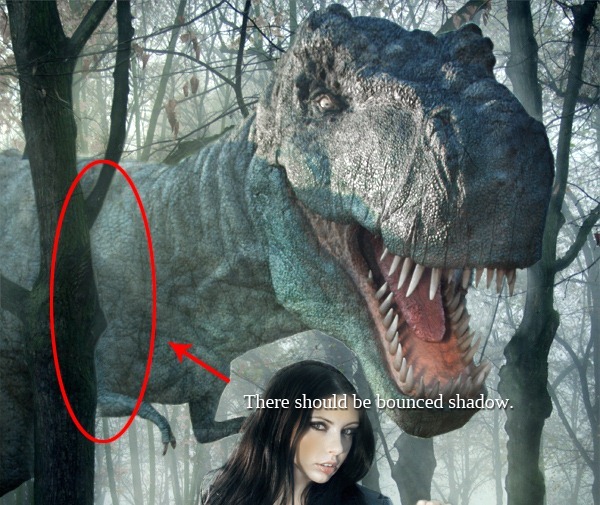
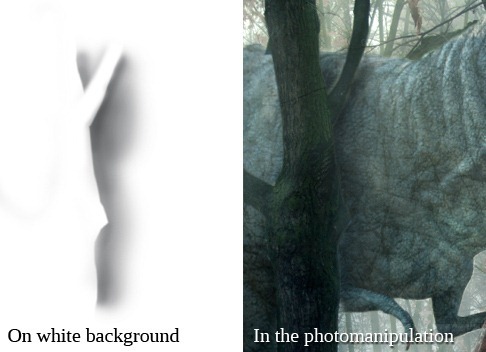
Grab the Brush Tool (B), select some soft round brush, set the Master Diameter on about 60 pixels and lower the Opacity on 20%. Pick some dark cyan color and paint some gentle shadow on dinosaur's body. Below you can get the idea.
On the first photo there is only shadow on white background. On the second photo there is the same shadow on the real background.
Step 21 - Final Adjustment
One last thing before you finish this tutorial and photo manipulation. The picture should be little bit darker. To do that add new adjustment layer Levels on the top of all layers and set the Input Levels on 0; 0,90; 255. Quick and easy.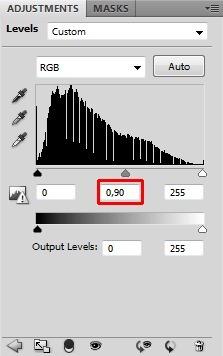
Step 22 - Sharpening
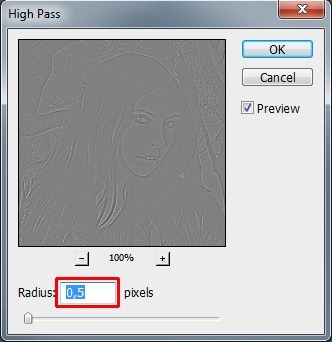
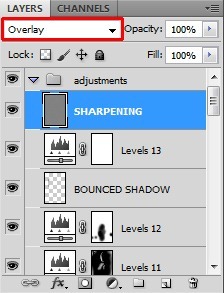
This step is optional. If you like sharp images you'll sharpen it in this step. Otherwise you're finished.Grab the Marquee Tool and select the whole image. Go to Edit > Copy Merged or press Shift + Ctrl + C on your keyboard to copy the merged image. Press Ctrl + V to paste it. Place this new layer on the top of all layers and name it SHARPENING.
Go to Filter > Other > High Pass and set the value Radius on 0,5 pixels. Press OK.
Final Results
![final-results[1] final-results[1]](http://photoshoptutorials.ws/images/stories/ca4339385ae3_F5CF/final-results1.png)
Keine Kommentare:
Kommentar veröffentlichen