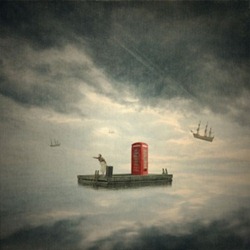
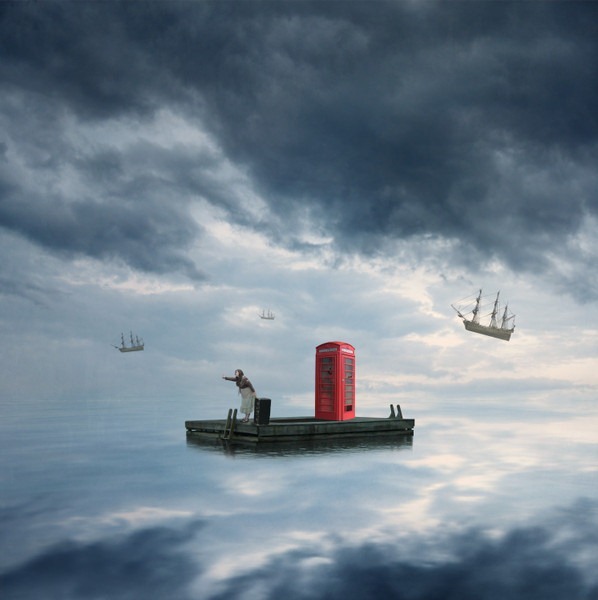
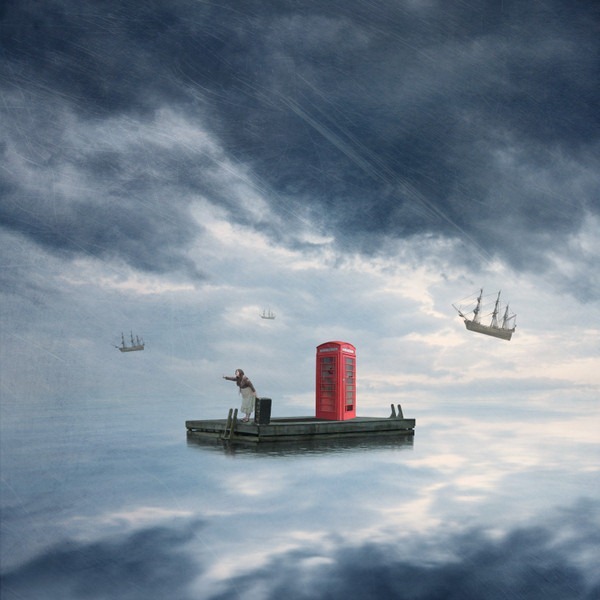
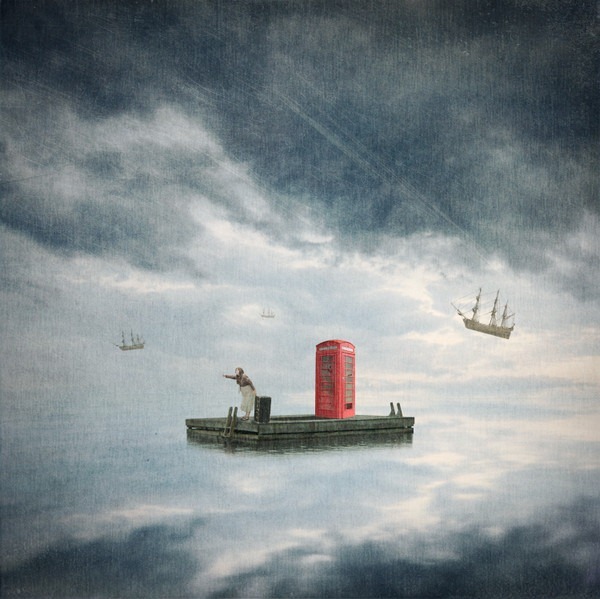
 In this tutorial, we are going to learn how to create a surreal image that has the look and feel of a traditional image. We are going to learn how to blend images seamlessly together. We are going to learn how to create reflections, shadows and light using only the images themselves, a few brush strokes and some Photoshop adjustment layers. We are also going to learn how to blend textures together to enhance the feel of the image and finally we are going to learn how to make the image look like a traditional painting.
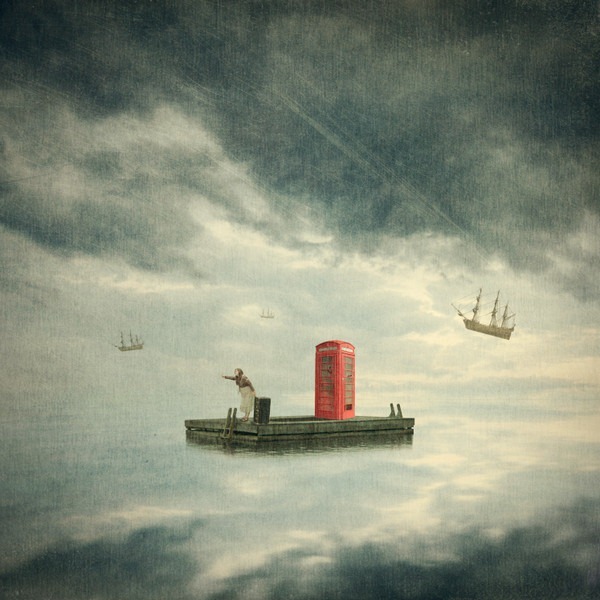
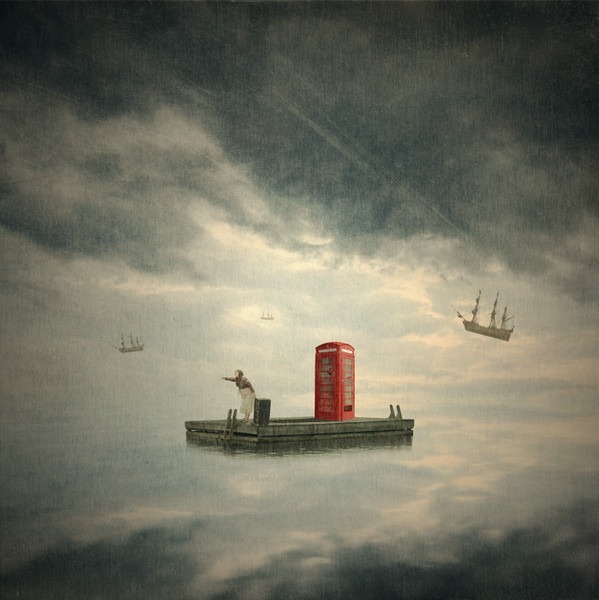
Preview of Final Results
Traditional Painting-Like Surreal Image Photoshop Tutorial
Resources
Step 1: Create a New Photoshop File
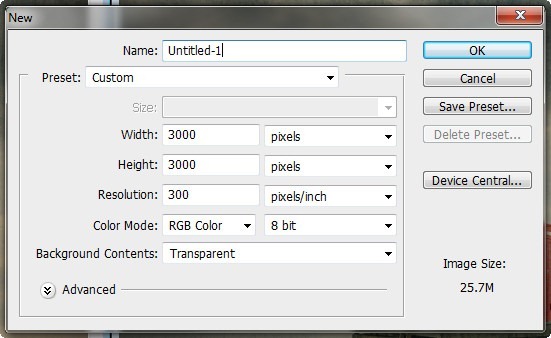
Let's start by creating a new Photoshop file, go to the Menu bar and click File > New, and then input the following values on their respective fields:
- Width: 3000px
- Height: 3000px
- Resolution: 300pixels/inch
- Color Mode: RGB Color; 8 bit
- Background Contents: Transparent
Step 2: Create the Afternoon Sky and its Reflection
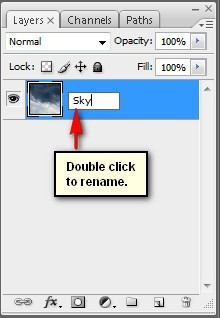
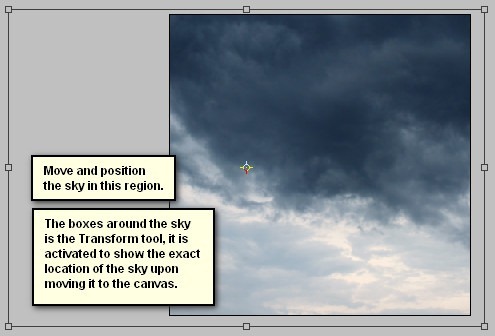
In this step, we will be creating the sky and its reflection which will serve as the background of our picture. To start, open the image "sky 17" by sacral stock. Once you have it open, simply activate the Move tool by pressing V on your keyboard and left-click on this image and drag it to our canvas. Once on the canvas, rename this new layer to "Sky". To rename a layer, simply double-click on the words: "layer 1" (which is our layer - clouds) to prompt a text box to appear. Once that appears, you may now rename the layer.
See sample below:
Move it and position as shown on the image below:
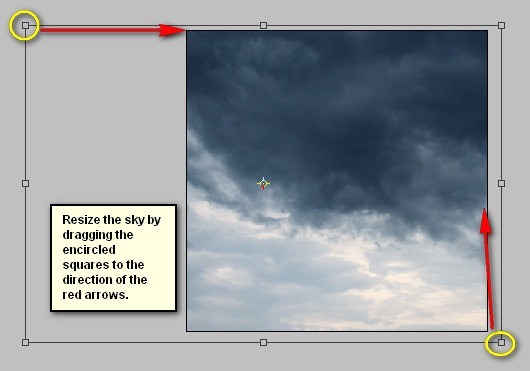
Next, activate the Transform tool by pressing Ctrl/Cmd + T and resize it as shown on the image below:
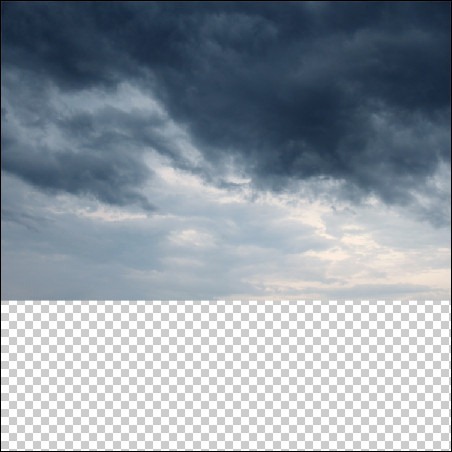
The result should be similar to this:
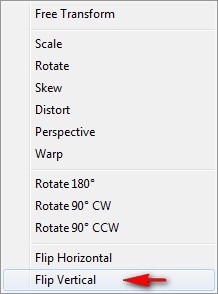
Now, that the sky is done, we will now create its reflection on the sea, but first we will have to duplicate it by pressing Ctrl/Cmd + J. Once duplicated, activate the Transform tool (Ctrl/Cmd + T) and then right click on the canvas to bring up the Transform tool's contextual menu and once the menu is active, click on Flip Vertical. See image below:
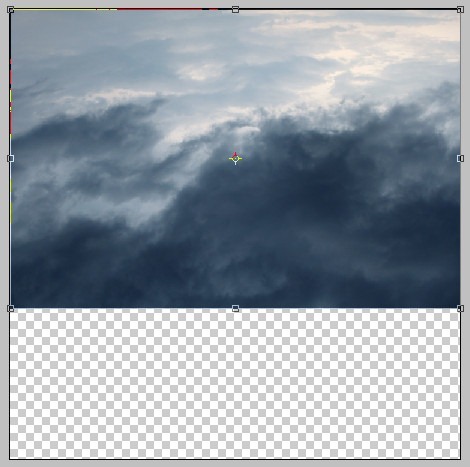
After you click on Flip Vertical, the result would be like this:
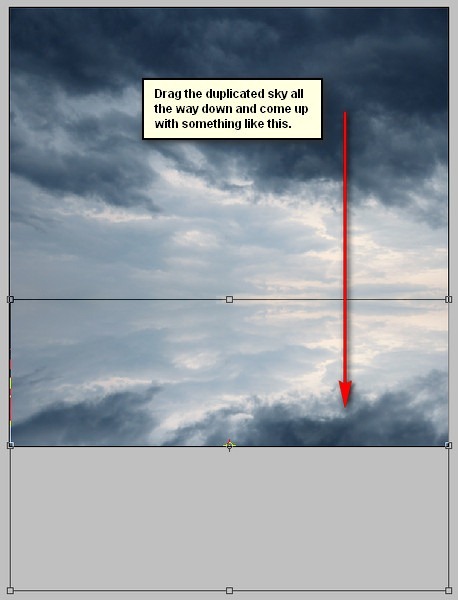
Now, activate the Move tool (V) and drag the image as shown below:
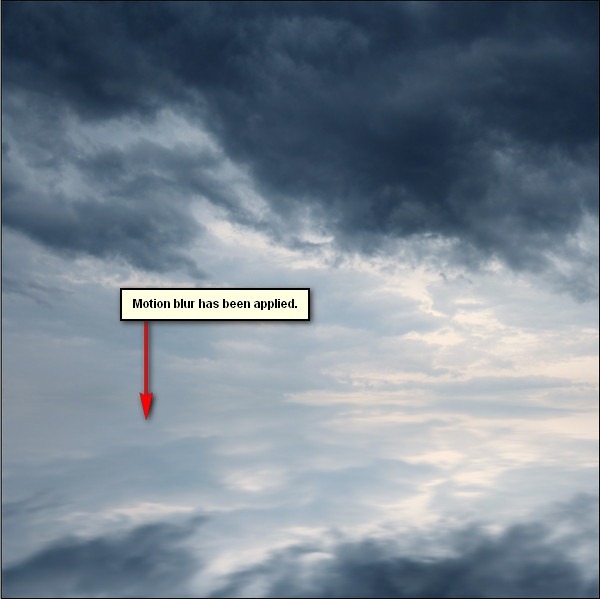
Next, we will make this reflection on the sea more realistic by adding a little Motion Blur. To do that, first make sure that the duplicated layer is active and then go to Filter > Blur > Motion Blur and then input the following:
- Angle: 0'
- Distance: 50pixels
The result:
Step 3: Add a Sea Texture
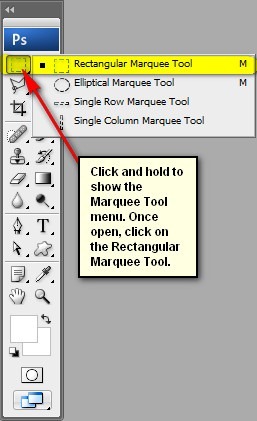
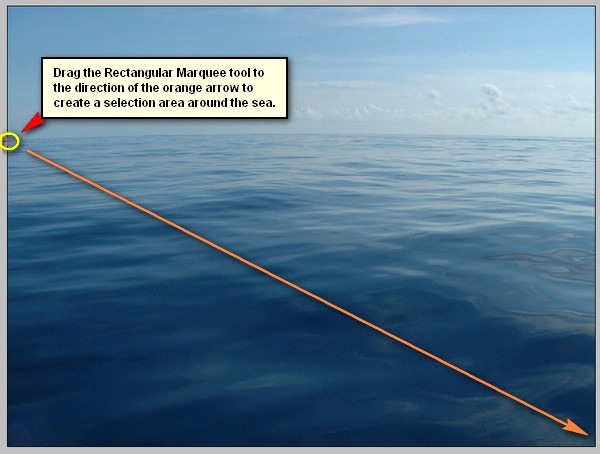
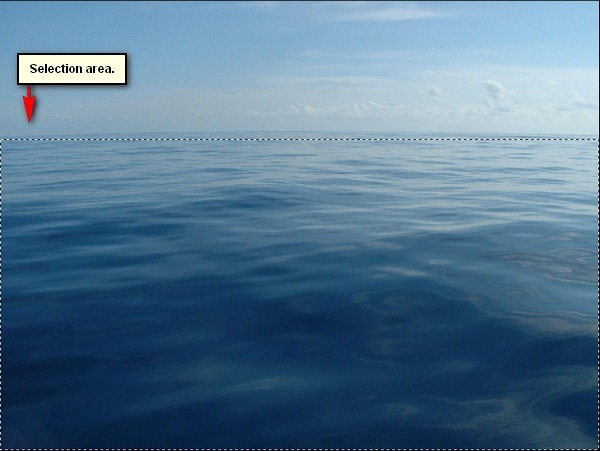
Now, we will be making the reflection on the sea more realistic by blending an image of the sea to it. To start, open "Calm water" by strwberrystk. Once open, activate the Rectangular Marquee tool (M) and create a selection area around the water in the stock image. See image below:
The result:
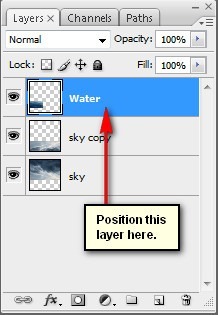
Now, when you're done, activate the Move tool (V) and drag the selected area (sea) to our canvas. Rename the layer to "Water". Make sure that this layer is above the two layers that we've already created.
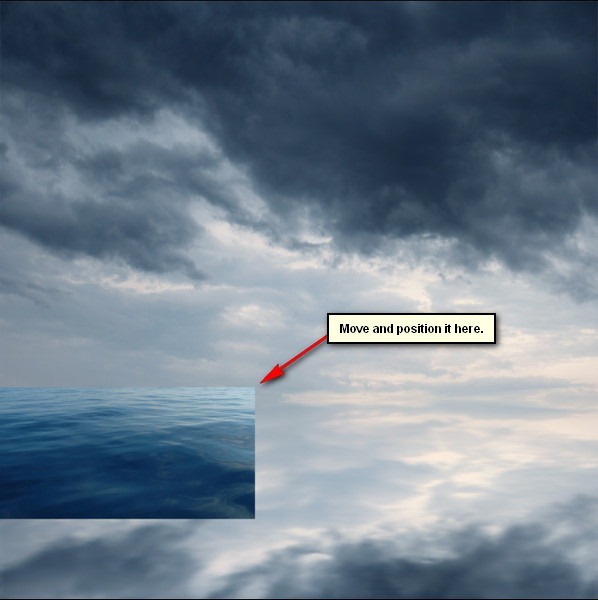
Next, move it to the position shown on the image below:
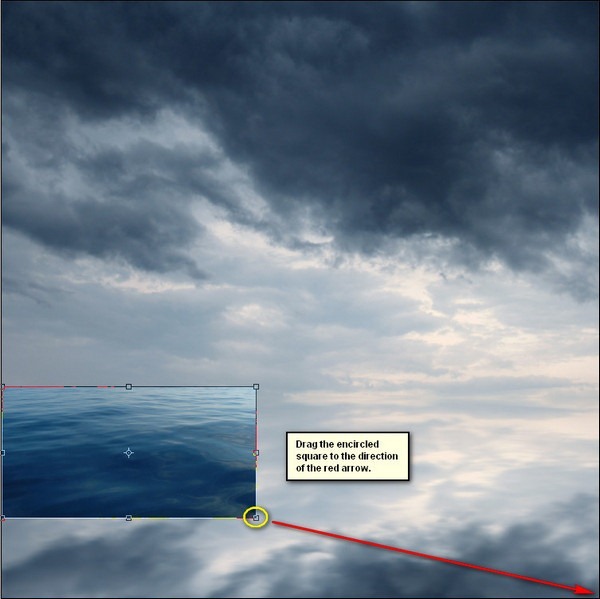
After that, activate the Transform tool (Ctrl/Cmd + T) and resize the image as shown below:
The result:
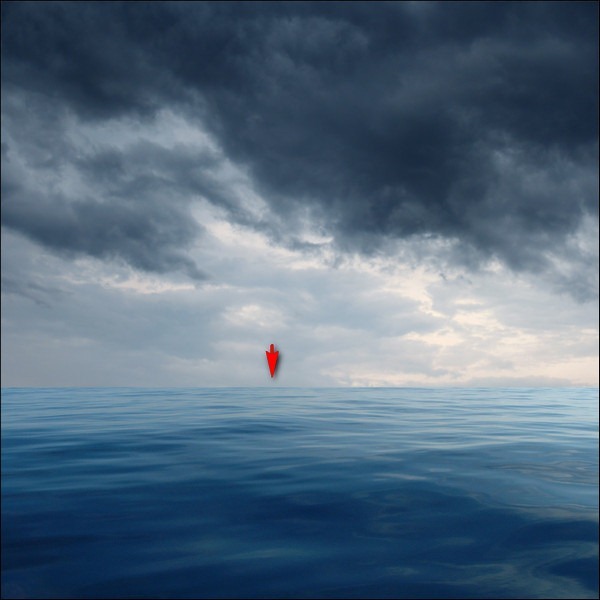
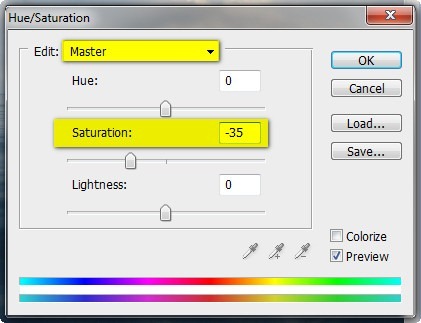
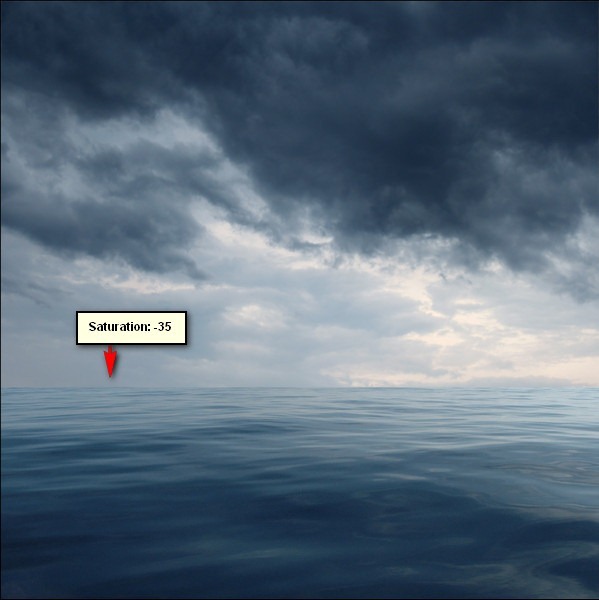
Now, let's desaturate the water's color a bit to make it blend nicely with our sky and its reflection. To do that, make sure that the "water" layer is selected and then go to Image > Adjustments > Hue/Saturation and input the following:
The result would be similar to this:
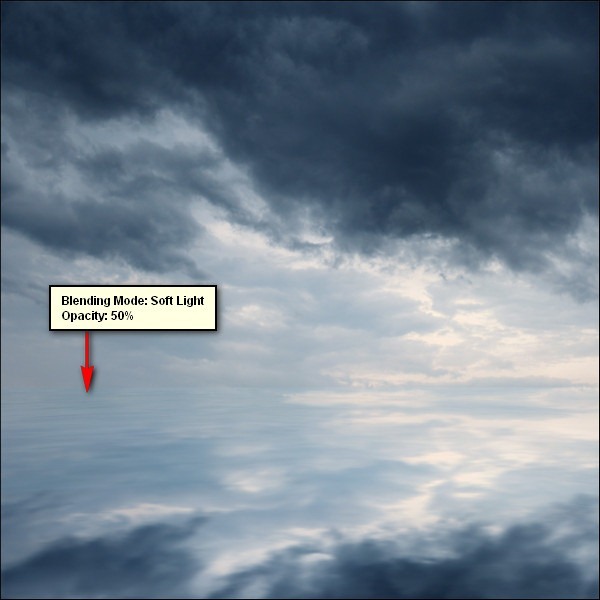
Next, let's change the "water" layer's Blending mode to Soft Light and its Opacity to 50%. To change that, simply click on "Normal" on the Layer window to show the list of Blending modes and once open, click on Soft Light. To the right is the Opacity level, so set it to 50%. See image below:
The Blended layer will look like this:
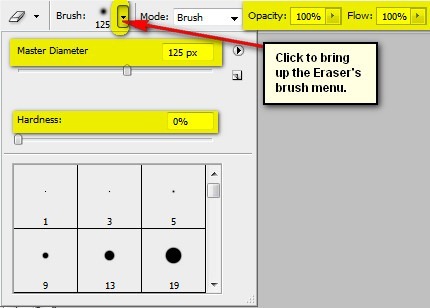
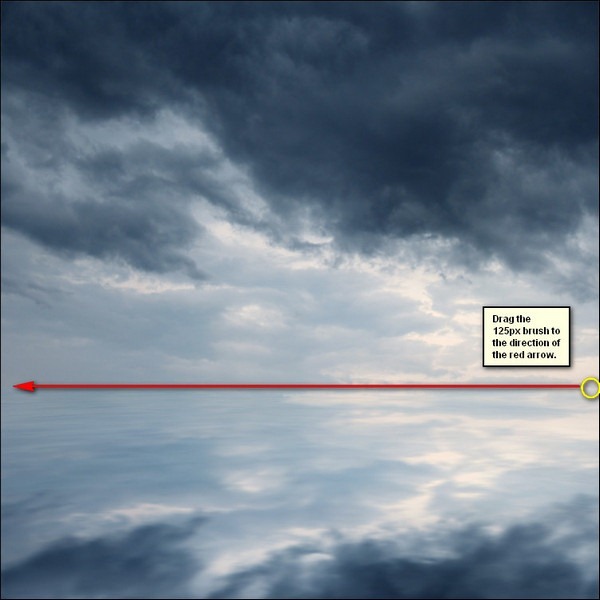
Now, we will make the horizon in this image look seamless. To do that, we will need the help of the Eraser tool (E). Activate that and set the following:
- Brush size: 125px
- Hardness: 0%
- Opacity: 100%
- Flow: 100%
Now, we're all set to erase!
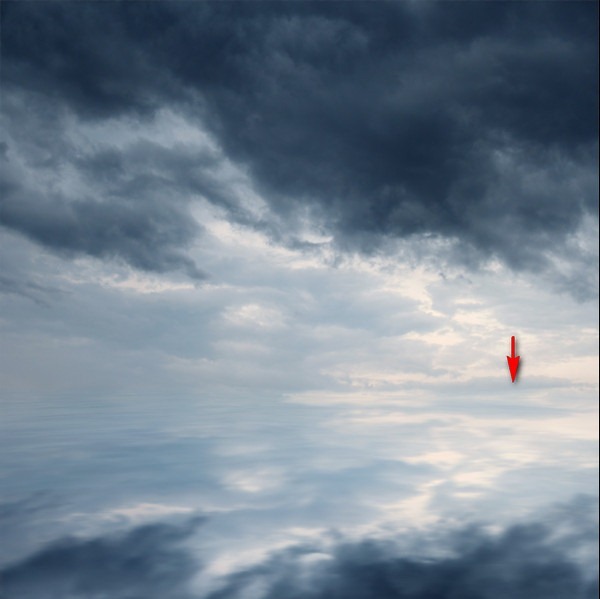
The result:
Now, select ALL the layers that we've made and press Ctrl/Cmd + G to put them all in one group. Now, name the group to "Background".
Note: Renaming a group is similar to renaming a layer.
Step 4: Add the Platform
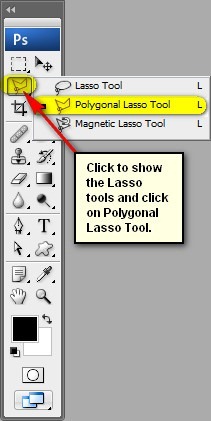
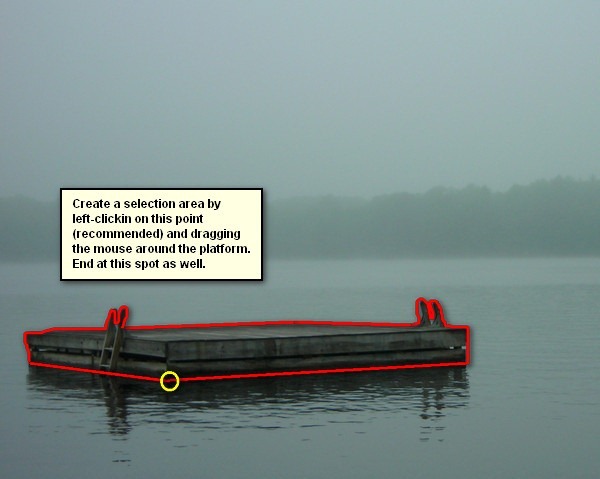
In this step, we will be adding the platform to where the phone booth and the lost woman will be situated. To start, open "57" by annerireSTOCK. Next, activate the Polygonal Lasso tool (L) and create a selection area around the platform. See images below:
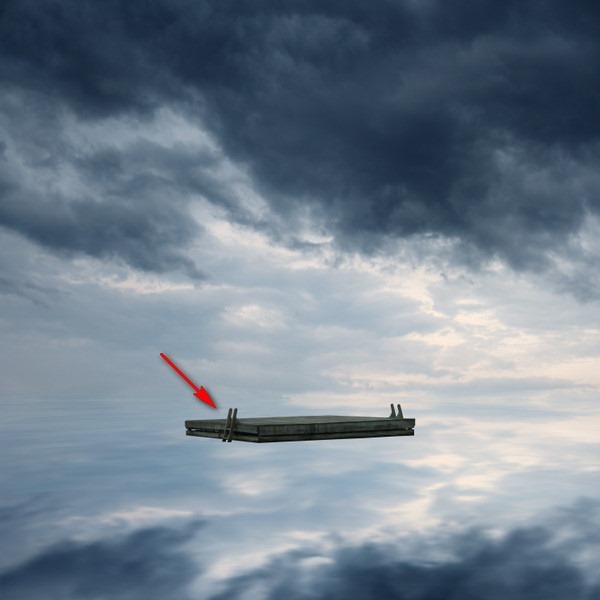
Now that you're done, activate the Move tool (V) and drag the selected area to the canvas. Rename this layer to "platform". Position it on this region:
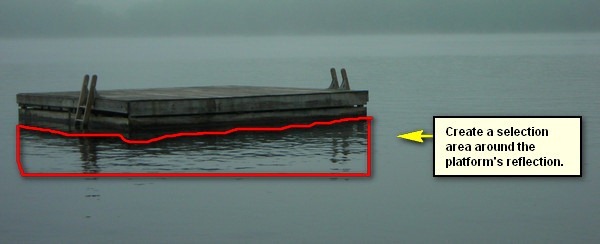
Next, let's create its reflection on the water. To start, open "57" by annerireSTOCK again and activate the Polygonal Lasso Tool (L) and create a selection area as shown on the image below:
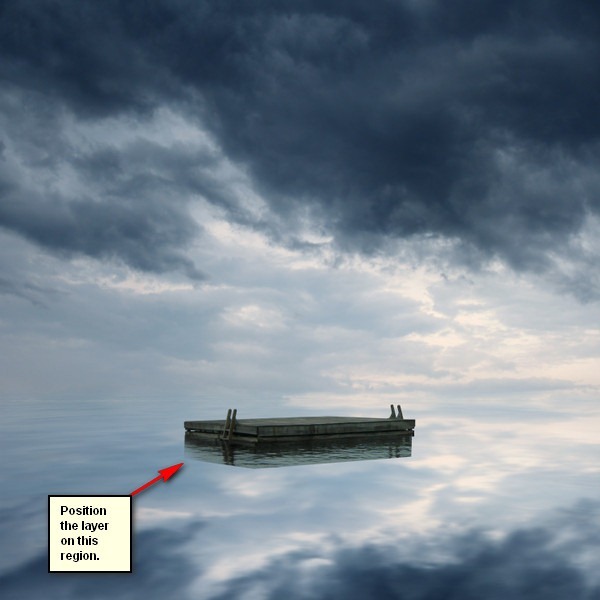
Activate the Move tool (V) and drag the selected area to the canvas. Rename it to "platform reflection". Position it as shown on the image below:
Note: Make sure that that layer is on top of the "platform" layer.
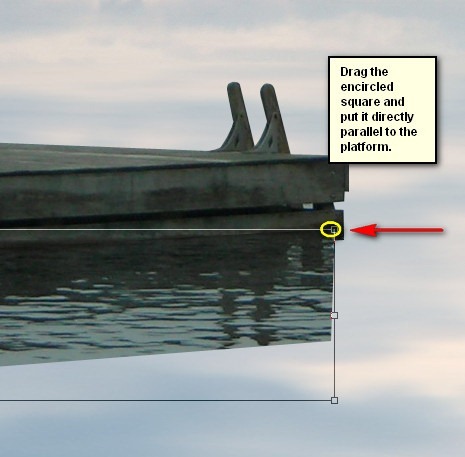
Activate the Transform tool (Ctrl/Cmd + T) and resize the image. See image below:
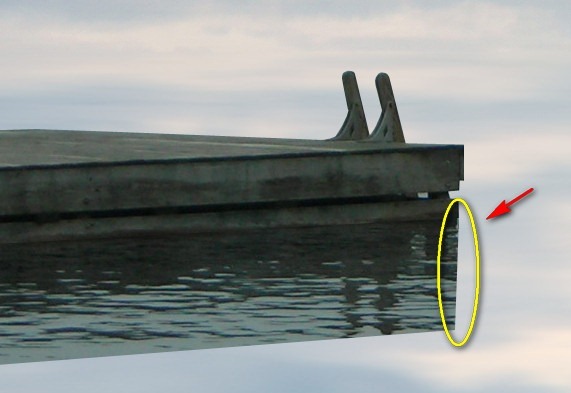
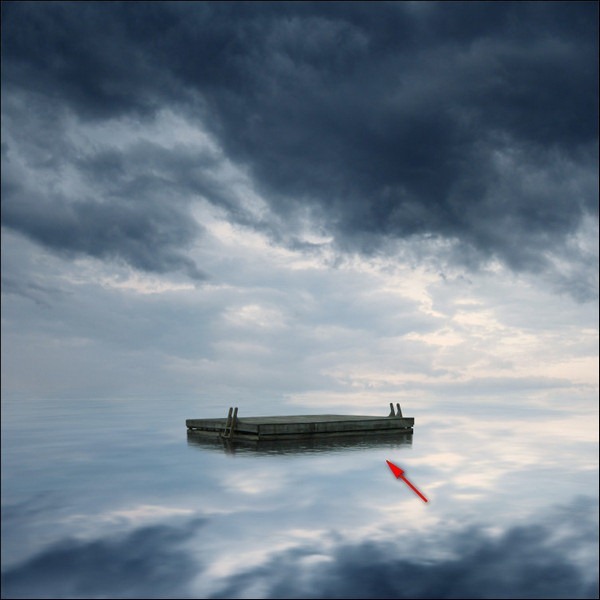
The result:
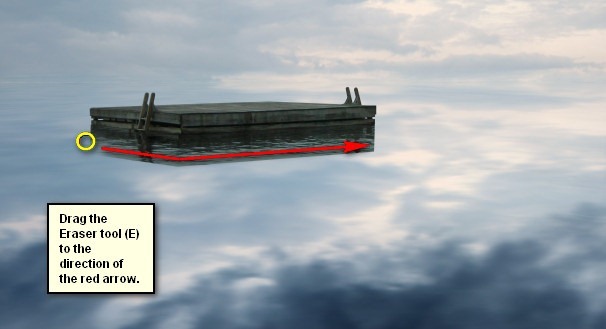
Now, we will blend this reflection to the water to make it seamless. Activate the Eraser tool (E) and input the following:
- Brush size: 70px
- Hardness: 0%
- Opacity: 100%
- Flow: 100%
Now, let's erase!
After erasing, reduce the "Platform" layer's Opacity to 95%.
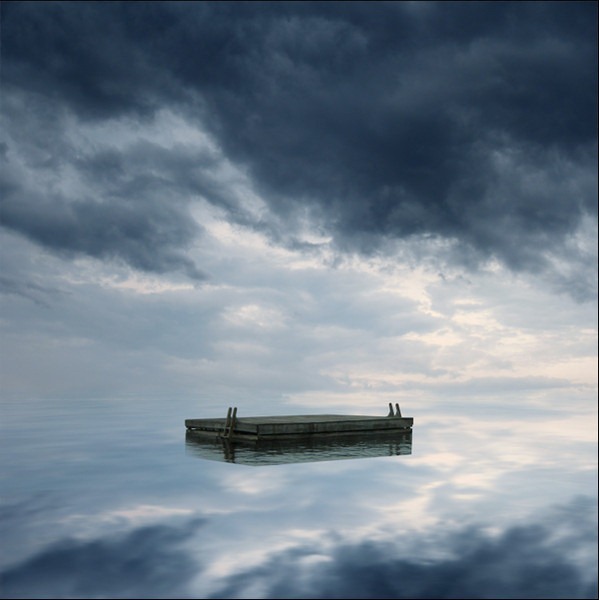
The result of erasing and reducing the Opacity:
Select all the layers we handled in this step and group them. Rename this group to "Platforn".
Step 5: Add the Phone Booth
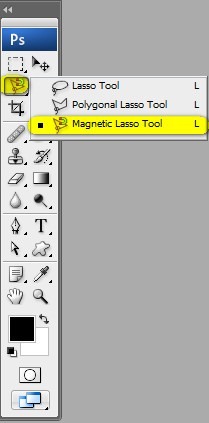
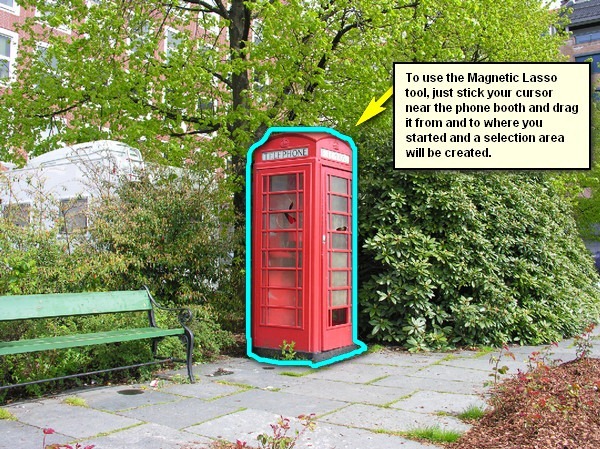
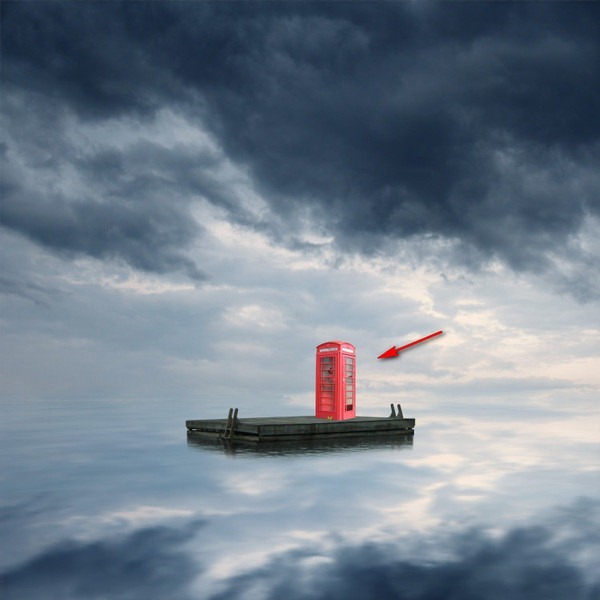
Now, in this step, we will be adding a phone booth on the platform. Now, let's get started - open "phone booth" by digital amphetamine and create a selection area using the Magnetic Lasso Tool (L).
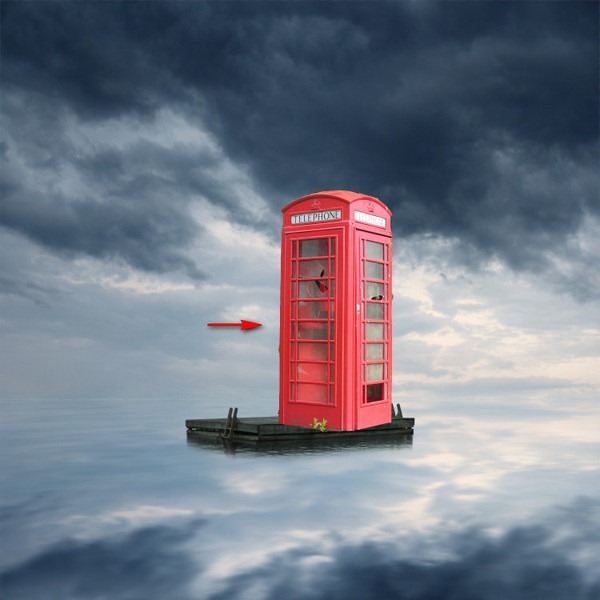
When you're done, activate the Move tool (V) and move this layer to our canvas. Once on the canvas, rename this layer to "phone booth". Position the phone booth on this area:
Now, activate the Transform tool (Ctrl/Cmd + T) and resize the phone booth as shown on the image below:
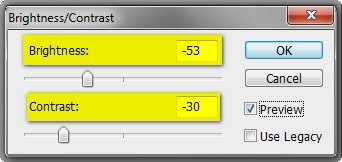
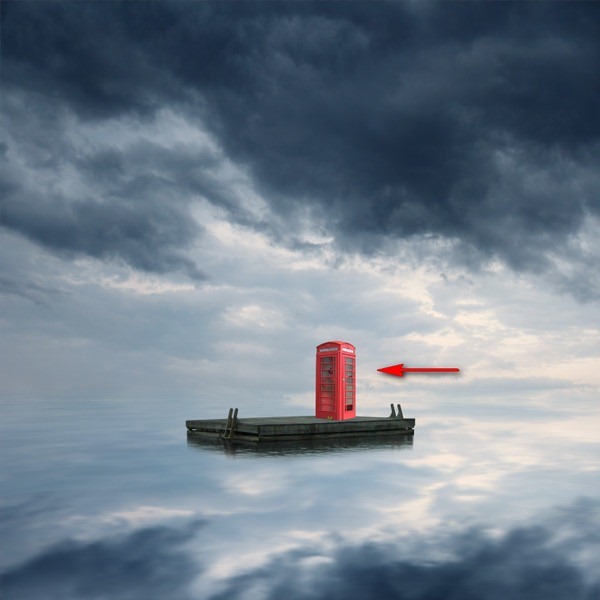
Next, let's adjust the Brightness/Contrast of this layer. Make sure this layer is active and then go to Image > Adjustments > Brightness/Contrast and input the following:
- Brightness: -53
- Contrast: -30
- Use Legacy: Uncheck
The result:
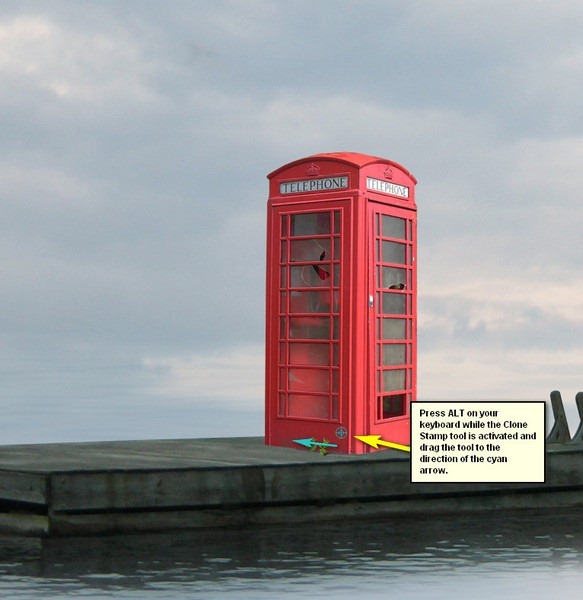
Now, we will remove that distracting plant on the booth's lower area. To do that, we will need to activate the Clone Stamp tool (S). Once activated, input the following:
- Brush size: 20px
- Hardness: 0%
- Opacity: 100%
- Flow: 100%
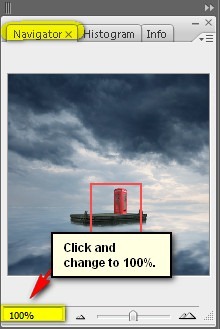
Now, in order for us to clone properly, we'll need to zoom in to the image, zoom in by pressing Z on your keyboard and left-clicking on the canvas or you could set the zoom level to 100% on the Navigator window. See image below:
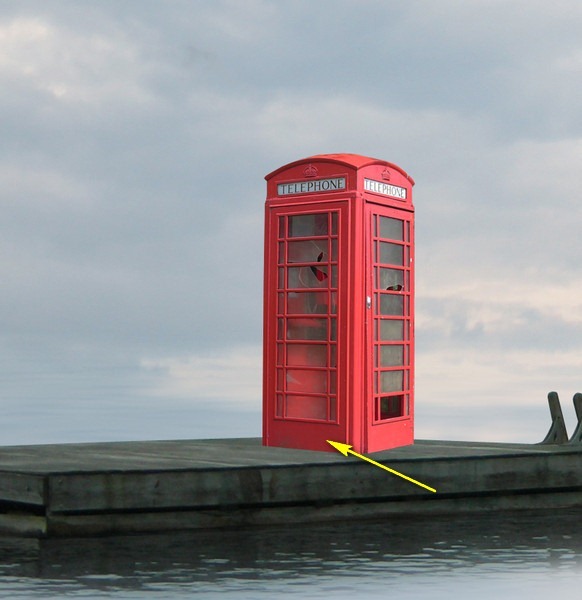
The result of that should be similar to this:
After that, let's now darken the phone booth to make it blend well with the rest of the images. To start, create a new layer (Ctrl/Cmd + Shift + N) and name it "Darken". Put this layer above the "phone booth" layer.
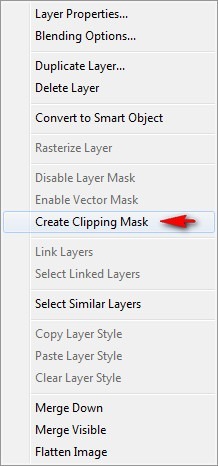
Now, click on the "Darken" layer and right click on it to show the contextual menu. Once the menu is shown, click on "Create Clipping Mask".
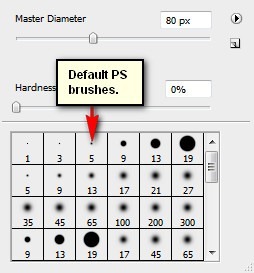
Now, activate the Brush tool (B) but before we proceed on setting the right settings, make sure that your brushes are the default brushes.
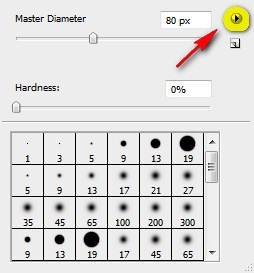
To make sure that you're using that, simply right click the canvas while a layer is selected and while the Brush tool (B) is activated and then click on the button highlighted below:
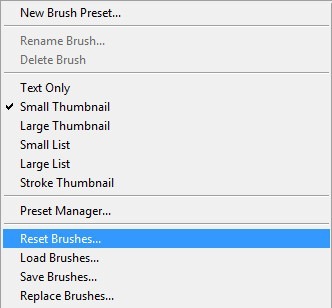
Then click on "Reset Brushes" from the contextual menu.
Now that the brushes are the default ones, input the following:
- Brush size: 250px
- Hardness: 0%
- Opacity: 25%
- Flow: 100%
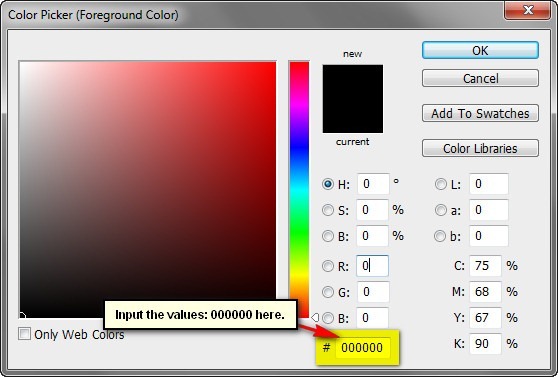
- #: 000000
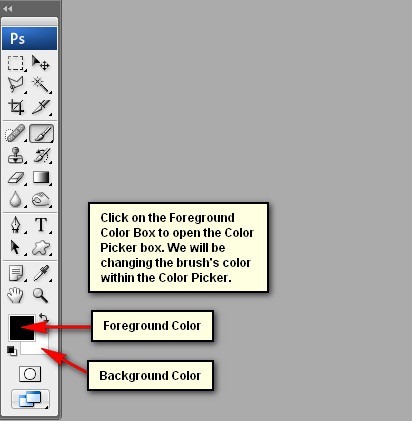
Note: #: 000000 is the Brush's color. To set that, simply follow the instructions below:
The #: 000000 is the color of the Brush tool (B), so this means it is colored black. To set the brush color, follow the instructions below:
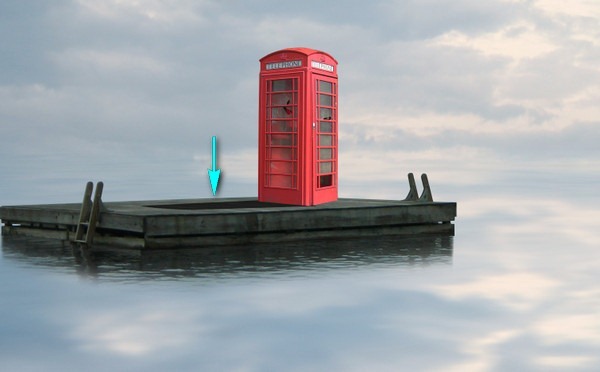
When you're ready apply black paint through the "Darken" layer as shown on the image below:
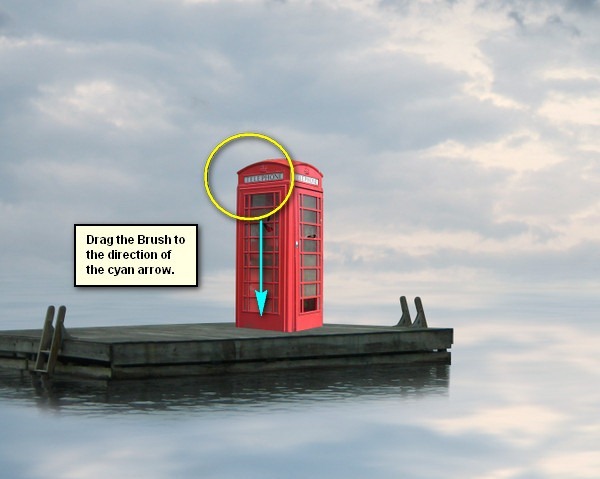
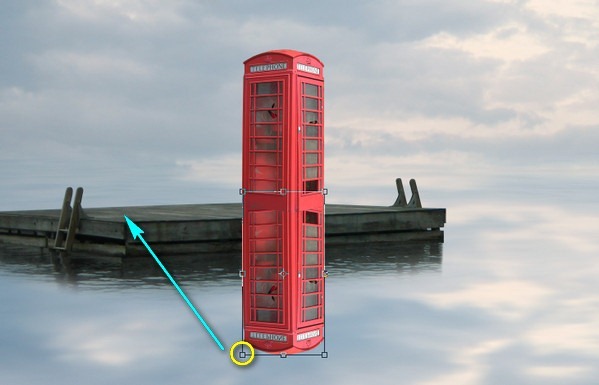
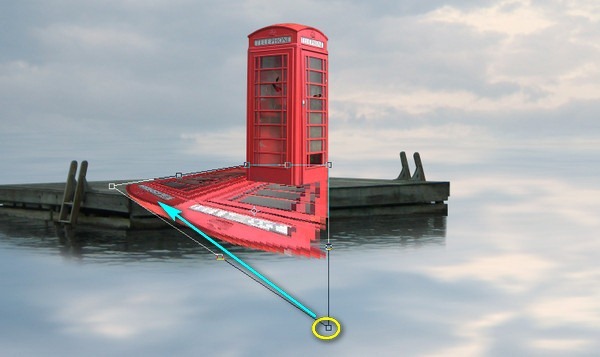
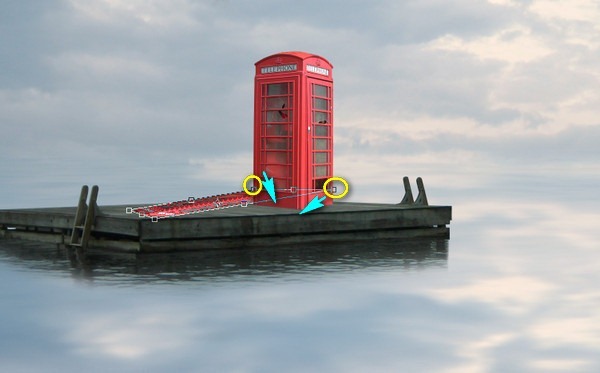
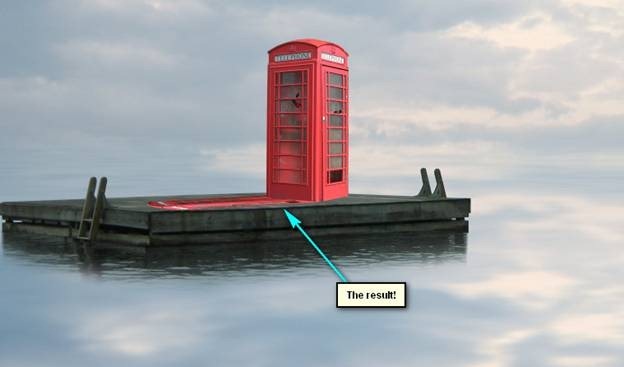
Now, let's make the phone booth look more realistic by adding a shadow. Start by selecting the "phone booth" layer and duplicate it (Ctrl/Cmd + J) and then activate the Transform tool (Ctrl/Cmd + T) and the right click on the canvas and then click on Flip Vertical. When you're done, activate the Transform tool (Ctrl/Cmd + T) once again and right click on the canvas and then click on Distort and then just follow the instructions below:
Drag the encircled squares to the direction of the cyan arrows:
Now, let's convert this distorted phone booth to a shadow! Click on this duplicated layer and go to Image > Adjustments > Brightness/Contrast and input the following:
- Brightness/Contrast:
- Brightness: -100
- Contrast: -100
- Use Legacy: Check
Change the opacity of the duplicated phone booth's layer to 95%.
The result should be like this:
Now that we're done, group all the layers and name the group - "Phone Booth".
Step 6: Add the Woman with an Old Trunk
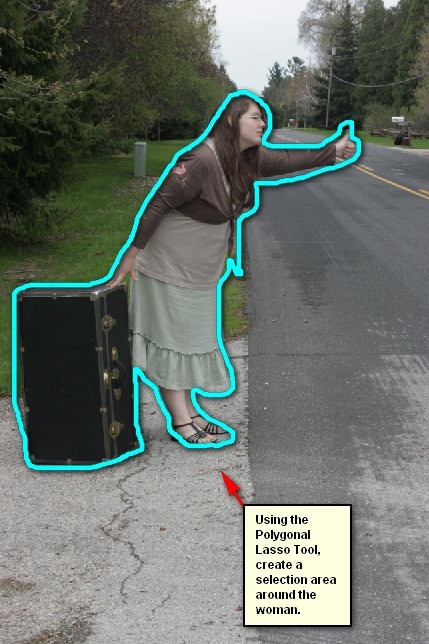
In this step, we will be adding the woman who in our image is trying to get a ride from the flying boats. To start, open "Old trunk17" by sd_stock, once open activate the Polygonal Lasso Tool (L) and create a selection area around the woman. See image below:
Activate the Move tool (V) and drag the woman to our canvas. Once on the canvas, rename this layer to "woman". Now, activate the Transform tool (Ctrl/Cmd + T) and right click the canvas and then click on Flip Horizontal. After that, resize the woman as shown on the image below:
Next, let's create her shadow. To start, create a new layer and name it "Shadow". Put this layer below the "woman" layer.
Activate the Brush tool (B) and input the following:
- Brush size: 30px
- Hardness: 0%
- Opacity: 15%
- Flow: 100%
- #: 000000
Let's start painting!
The result is:
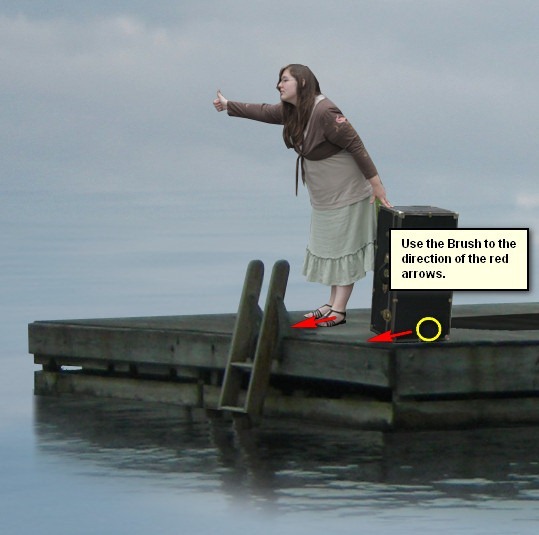
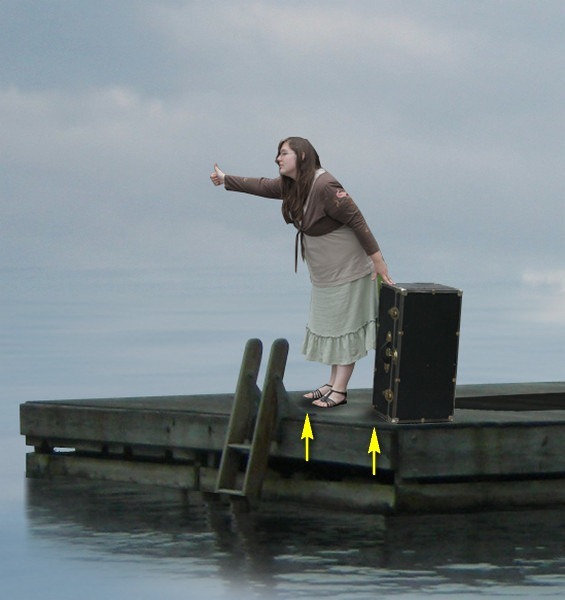
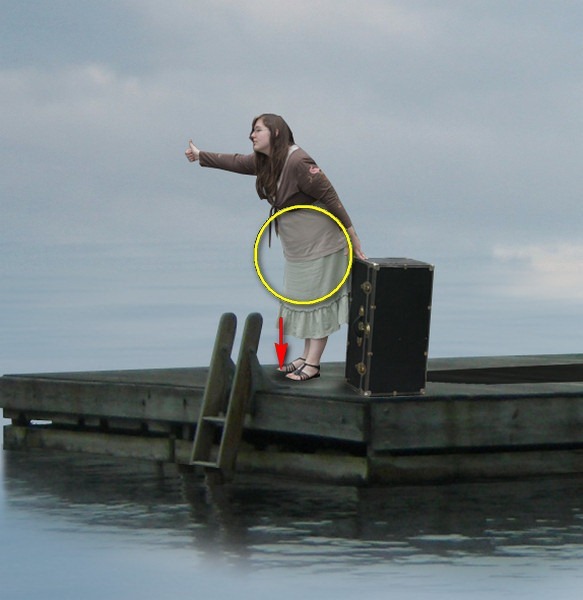
Now let's adjust the brightness some parts of the woman. To do that, first create a new layer (Ctrl/Cmd + Shift + N) and then name it to "Darken". Make sure that this layer is on top of the "woman" layer. Now, right click on "Darken" and click on Create clipping mask.
After that, activate the Brush tool (B) and input the following:
- Brush size: 125px
- Hardness: 0%
- Opacity: 15%
- Flow: 100%
- #: 000000
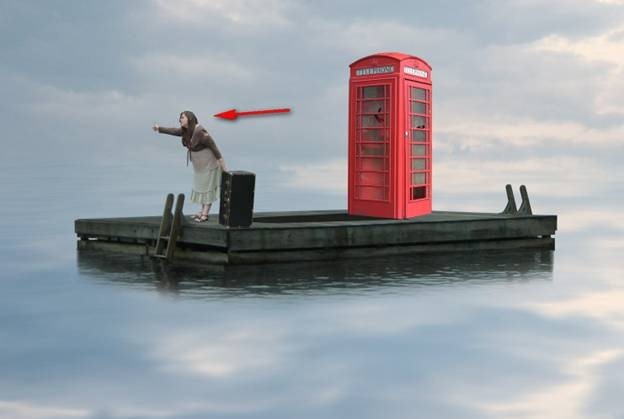
Now let's start painting - Use the Brush to the direction of the red arrow:
Now that we're finished, group these layers and name it "Woman".
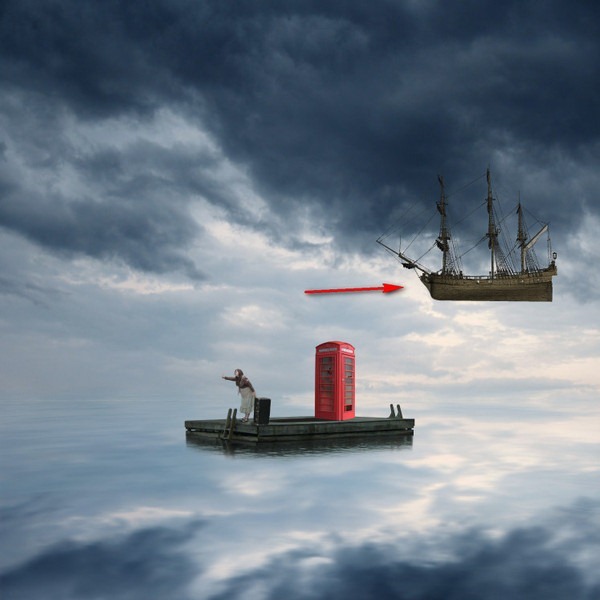
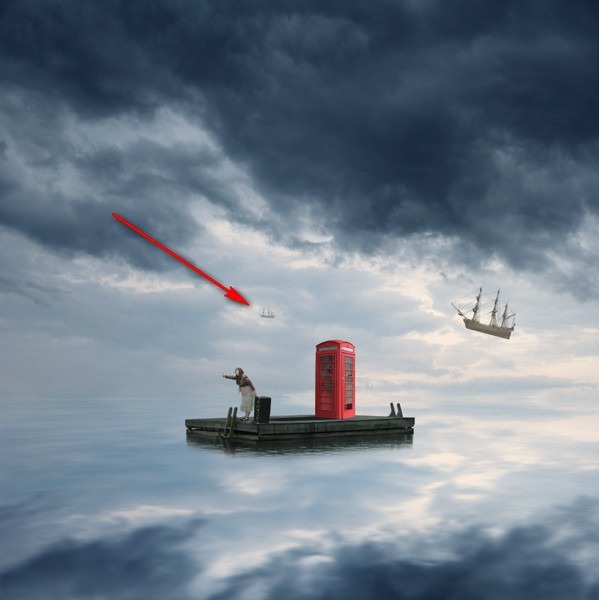
Step 7: Add the Flying Ships
In this step, we will be adding some ships that instead of treading through sea, they will be flying in the sky. To start, open "Ship 13" by Alegion-stock (this is included in the Tall Ship PNG stock).
Activate the Move tool (V) and drag this ship to our canvas. This is a PNG file, and its background is transparent, that means it has no background - just the ship. So after moving it to our canvas, you'd only see the ship. Rename this layer to "Ship 1".
Position "Ship 1" on this location:
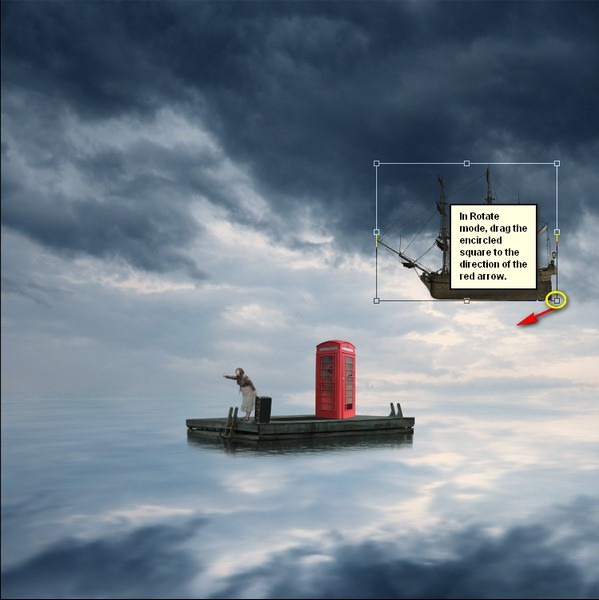
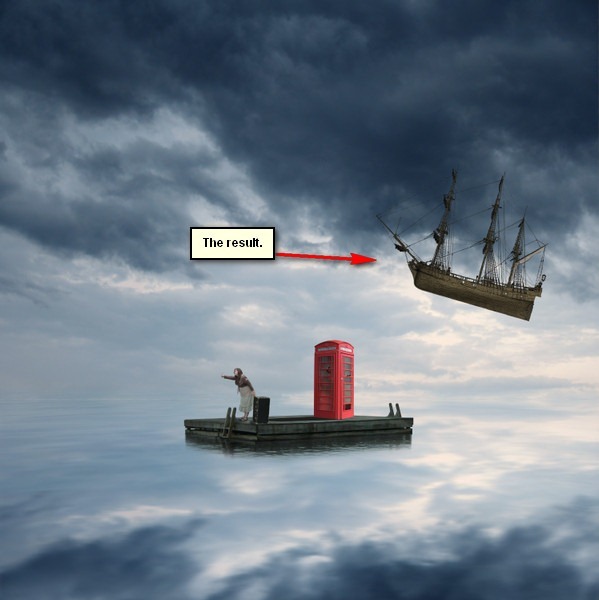
Next, activate the Transform tool (Ctrl/Cmd + T), right click on the canvas and click on rotate. Rotate as shown below:
Next, activate the Transform tool (Ctrl/Cmd + T) once again and resize it as shown below:
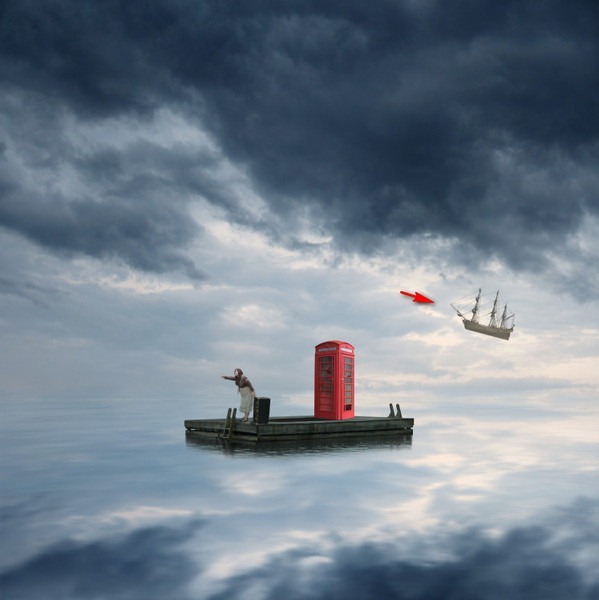
Next, to give the illusion that this ship is far away from our subject, reduce its Opacity to:
The result:
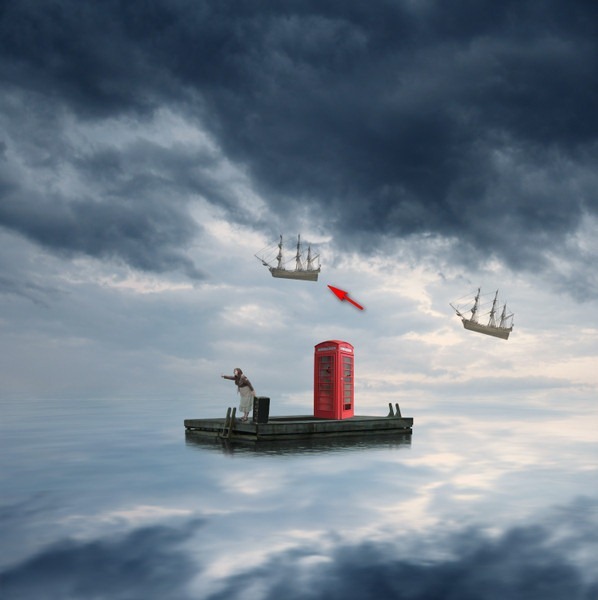
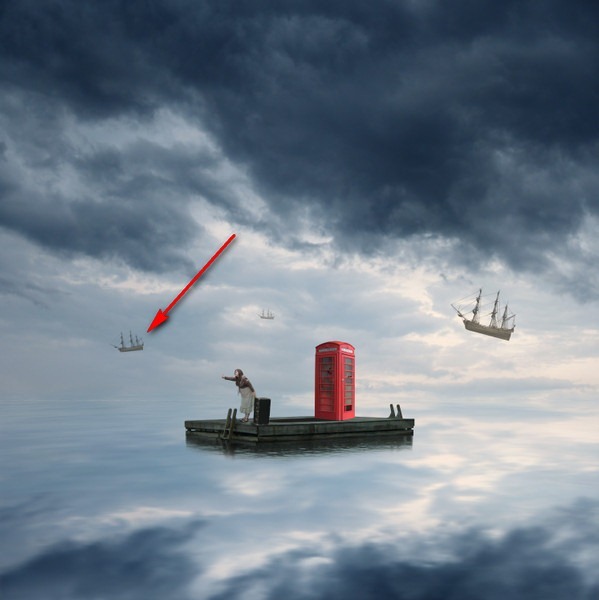
Now, let's create ship # 2. Click on "ship 1" and hit Ctrl/Cmd + J to duplicate it. Rename it to "ship 2". Once duplicated, activate the Move tool (V) and drag it to the position shown on the image below:
Next, activate the Transform tool (Ctrl/Cmd + T) and rotate and resize it as shown below:
Reduce the Opacity of the "ship 2" layer to:
The result:
Now, for ship # 3 - select "ship 1" and duplicate it (Ctrl/Cmd + J). Once duplicated, activate the Move tool (V) and drag it to the area shown on the image below:
Now, activate the Transform tool (Ctrl/Cmd + T) and then rotate and resize the image as shown below:
Now, reduce this layer's Opacity to:
The result:
When you're done, select all these layers and then group them. Name the group to "Ships".
Step 8: Add Textures
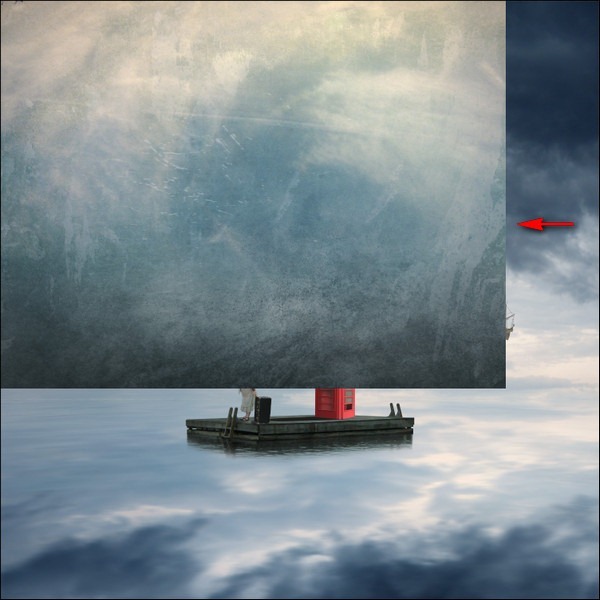
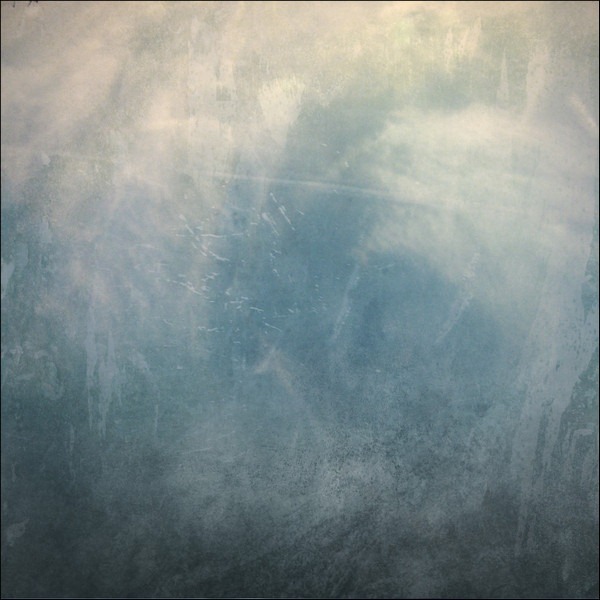
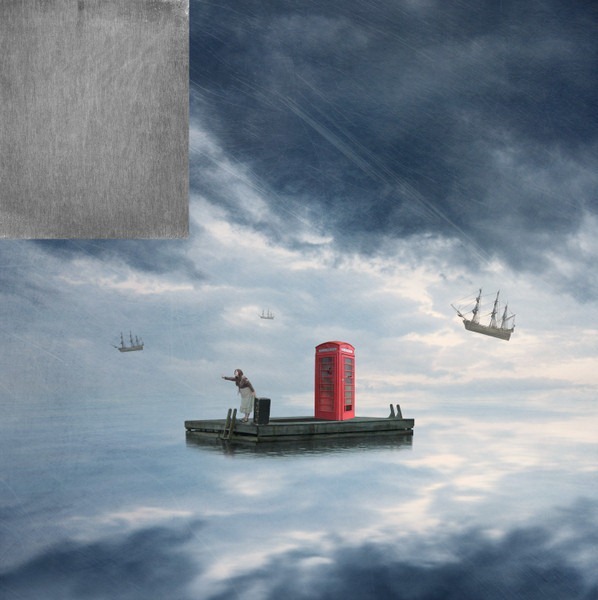
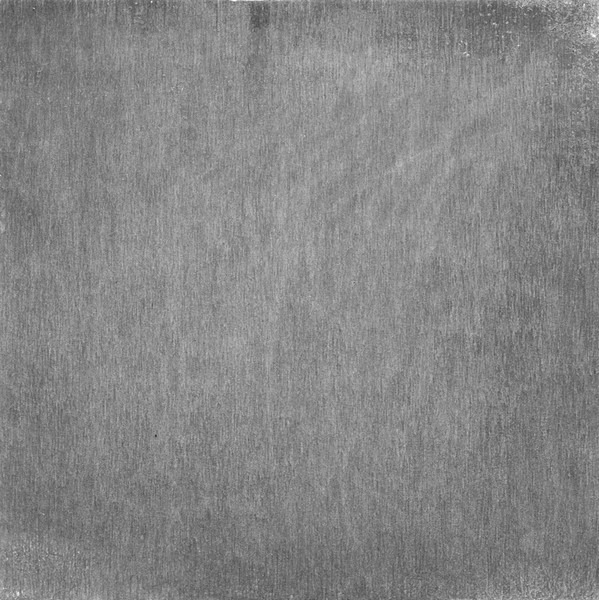
Now, let's add some textures to our image to give it a grungy feel. To start, let's open "Texture 119" by Sirius_sdz. Activate the Move tool (V) and drag this to our canvas. Make sure you put it on top of the "Ships" group. Rename this layer to "Texture 1".
Position it as shown on the image below:
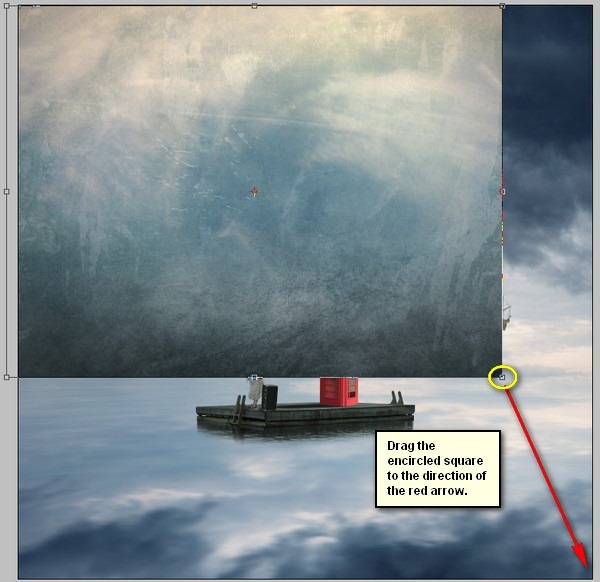
Now, activate the Transform tool (Ctrl/Cmd + T) and resize it as shown below:
The result:
Next, let's change the Blending mode and Opacity of this texture:
- Blending Mode: Soft Light
- Opacity: 40%
The result:
Let's now add the next texture - open "Texture 54" by night-fate-stock. Activate the Move tool (V) and drag it to our canvas. Rename to "Texture 2". Position it here:
Next, activate the Transform tool (Ctrl/Cmd + T) and resize it as shown below:
Now, change Blending mode and Opacity of this texture:
- Blending Mode: Soft Light
- Opacity: 40%
The result:
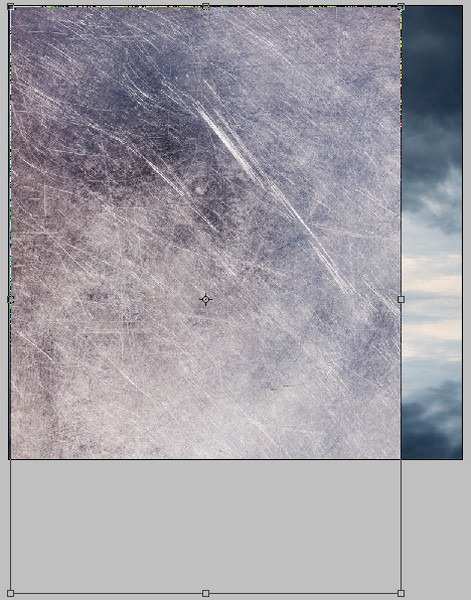
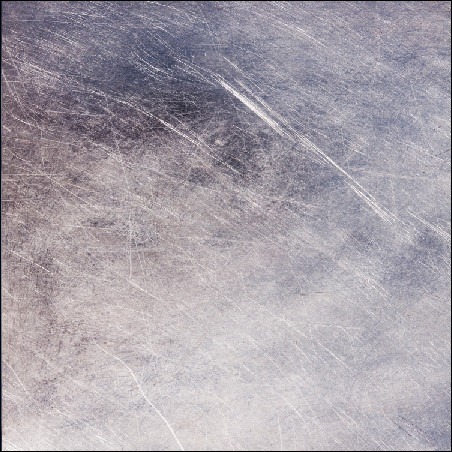
Next, open "Metal Texture 15" by wojtar stock. Move it to the canvas using the Move tool (V). Once there, rename it to: "Texture 3". Position it as shown below:
Activate the Transform tool (Ctrl/Cmd + T) and resize it as shown below:
Now, change Blending mode and Opacity of this texture:
- Blending Mode: Soft Light
- Opacity: 100%
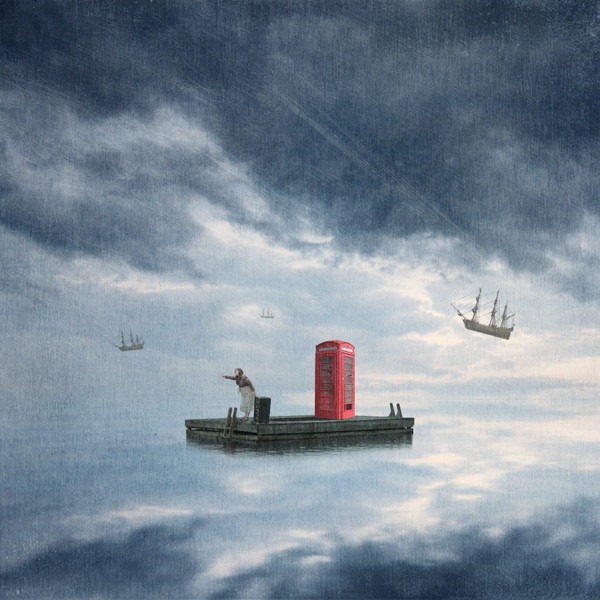
The result:
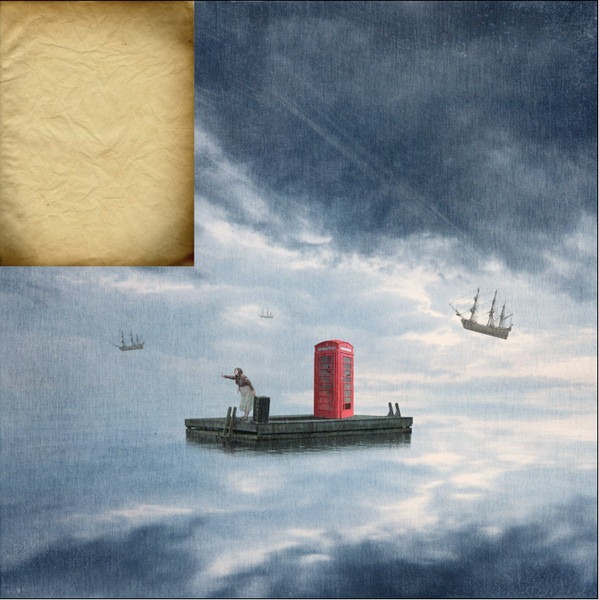
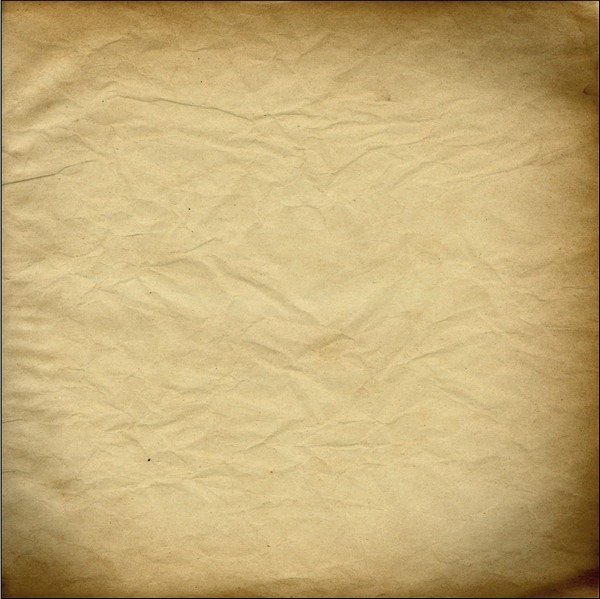
Next, open "Paper Texture 1" by Wojtar Stock. Move it to the canvas using the Move tool (V). Once there, rename it to: "Texture 4". Position it as shown below:
Resize it using the Transform tool (Ctrl/Cmd + T) as shown below:
Now, let's change the Blending mode and Opacity of this texture:
- Blending Mode: Overlay
- Opacity: 40%
- Fill: 70%
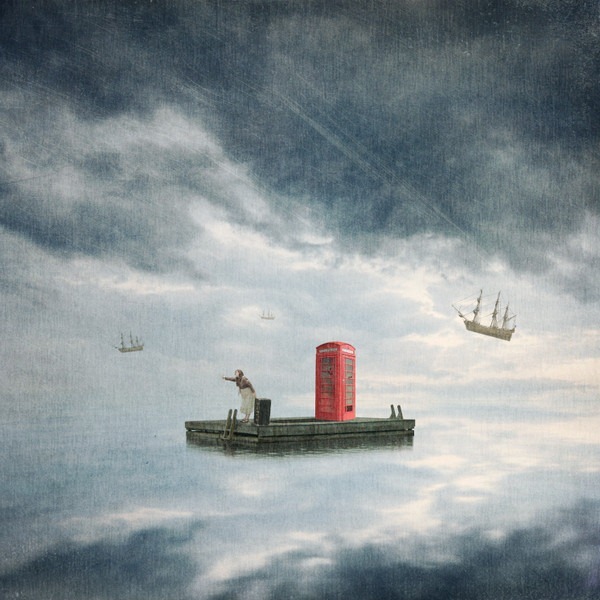
The result:
Group all those layers, and rename the group to "Textures".
Step 9: Create a Vignette
In this step, we will learn how to create a vignette which will help enhance the focus on our subject.
To start, go to the Menu bar and click on File > New and use the same settings we used to create our canvas. (Refer to Step 1).
Take note, the background contents should be: WHITE
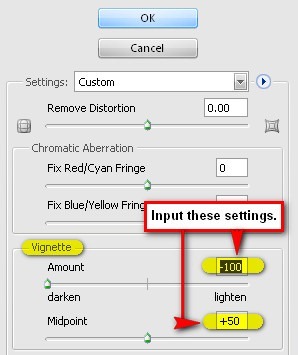
Once it has been created, go to Filter > Distort > Lens Correction. Find the tab Vignette and use these settings:
- Vignette amount: -100
- Midpoint: +50
Now that that's done drag the vignette to our canvas using the Move tool (V) and put it on top of all the layers that we've created, and then set the following:
- Blending mode: Multiply
- Opacity to 40%
To set the blending mode, simply click on the drop-down menu beside the word "Normal" on the top part of the Layer window. The Opacity is located just beside that drop-down menu as well. See image below:
The unblended Vignette will look like this:
Once the blending mode is set to "Multiply" it would look like this:
Step 10: Retouch the Image
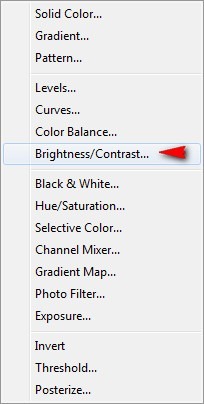
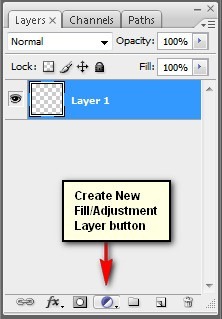
Now let's retouch the colors of our image to give it a more painting-like feel! For starters, we're going to create a Solid Color adjustment layer. To do that, simply click on the button shown on the image below:
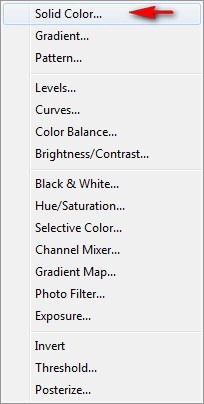
When it opens, click on the following:
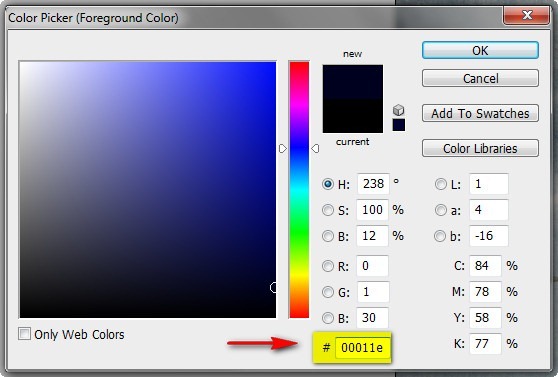
Once you've clicked on Solid Color, the Color Picker menu would open. When it opens, input the following color:
Now, you're canvas is covered in dark blue, so let's change its Blending mode and Opacity to the following:
- Blending Mode: Exclusion
- Opacity: 80%
Let's create another Solid Color adjustment layer, this time input the following:
Then change the Blending mode and Opacity to the following:
- Blending Mode: Soft Light
- Opacity: 40%
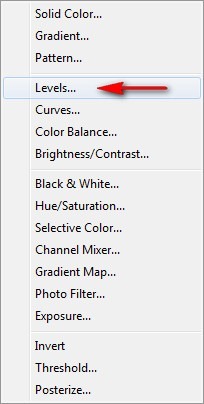
Now, from the Create New Fill/Adjustment layer button, let's create a Levels adjustment layer.
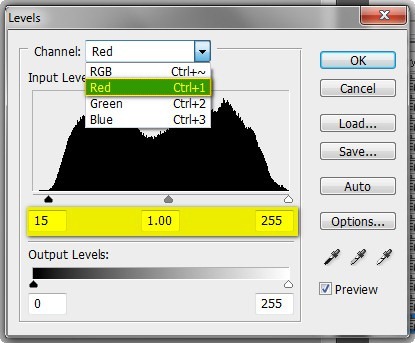
Once it opens, input the following for the Red Channel:
- Input Levels: 15, 1.00, 255
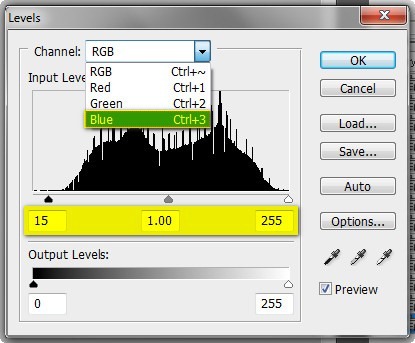
Don't close the Levels menu yet, click on the drop down button again and input the following for the Blue Channel:
- Input Levels: 15, 1.00, 255
Now the result of that would be like this:
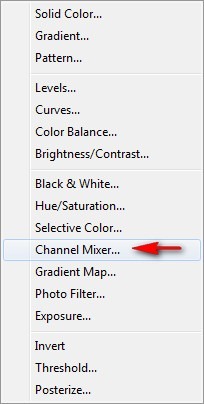
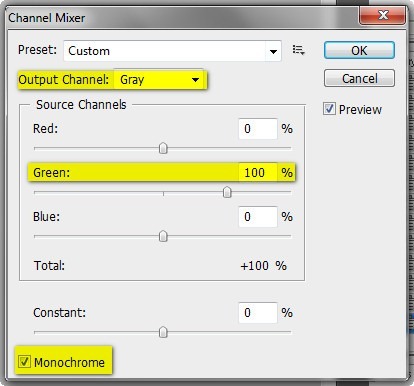
Next, let's create a Channel Mixer adjustment layer.
When it opens, input the following:
- Output Channel: Gray
- Source Channels:
- Red: 0%
- Green: 100%
- Blue: 0%
- Constant: 0%
- Monochrome: Check
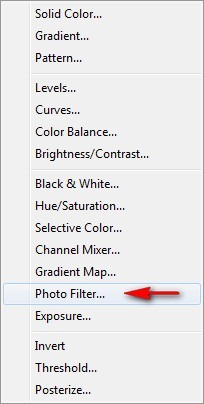
Next, let's create a Photo Filter adjustment layer:
When it opens, use the following:
- Deep Blue
- Density: 25%
- Preserve Luminosity
- Layer Opacity: 50%
Next, create another Photo Filter adjustment layer and use the following:
- Photo Filter
- Warming Filter (81)
- Density: 25%
- Preserve Luminosity
Finally, create a Brightness/Contrast adjustment layer:
When it opens, input the following:
- Brightness/Contrast
- Brightness: -15
- Contrast: 0
Step 11: Make it look like a painting
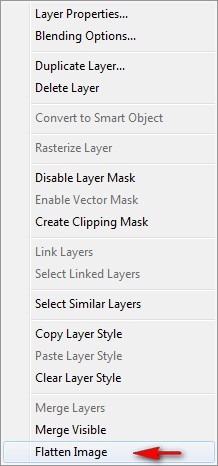
In this step, we're going to make our photo-manipulation look like a painting using some Photoshop Filters. To start, select any layer in our image and right click on it to bring out the contextual menu. Once the menu is shown, click on Flatten Image.
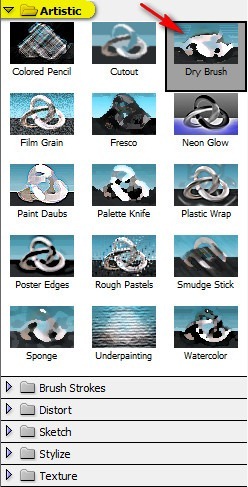
Once flattened, duplicate this layer (Ctrl/Cmd + J) and go to Filter > Filter Gallery. Once the Filter Gallery opens, click on the Artistic Folder and then click on Dry Brush.
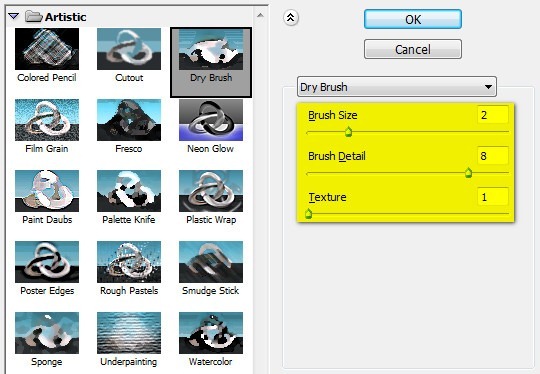
Once you've clicked on Dry Brush, input the following settings located on the right:
- Brush size: 2
- Brush Detail: 8
- Texture: 1
The result of that will be like this:
But that doesn't look too good because the details are lost so we should reduce its Opacity to:
The result:
Select both layers and right click on any of them and click Flatten Image.
Step 12: Add some Lighting Effects
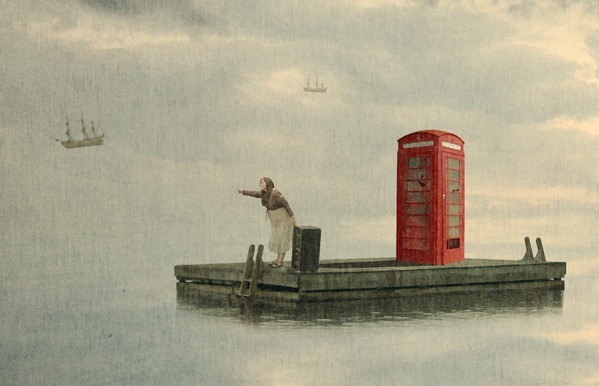
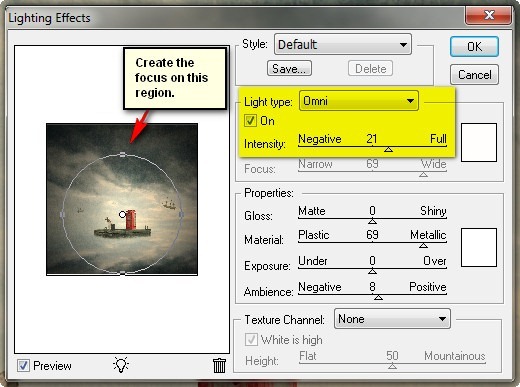
Now, for our final step, let's enhance the lighting of this image .We're going to put the focus of our viewers to the subjects of our image - the girl and the phone booth. To do that, first, duplicate the image (Ctrl/Cmd + J) and then go to Filter > Render > Lighting Effects. When it opens, input the following:
- Style: Default
- Light Type: Omni
- On: Check
- Intensity: 21
After that, reduce the Opacity of that layer to:
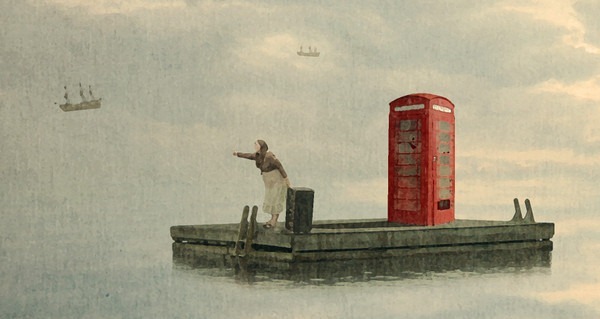
The result of that would be:


![image012[1] image012[1]](http://photoshoptutorials.ws/images/stories/c32ce6bb2693_CA6/image0121.jpg)









![image092[1] image092[1]](http://photoshoptutorials.ws/images/stories/c32ce6bb2693_CA6/image0921.jpg)
![image093[1] image093[1]](http://photoshoptutorials.ws/images/stories/c32ce6bb2693_CA6/image0931.jpg)
![image091[1] image091[1]](http://photoshoptutorials.ws/images/stories/c32ce6bb2693_CA6/image0911.jpg)
![image093[2] image093[2]](http://photoshoptutorials.ws/images/stories/c32ce6bb2693_CA6/image0932.jpg)
![image094[1] image094[1]](http://photoshoptutorials.ws/images/stories/c32ce6bb2693_CA6/image0941.jpg)
![image095[1] image095[1]](http://photoshoptutorials.ws/images/stories/c32ce6bb2693_CA6/image0951.jpg)
![image096[1] image096[1]](http://photoshoptutorials.ws/images/stories/c32ce6bb2693_CA6/image0961.jpg)
Keine Kommentare:
Kommentar veröffentlichen