In this tutorial, you will learn how to create this painting of a fox. This tutorial will show you techniques for coloring, shading, and outlining.
Preview of Final Results
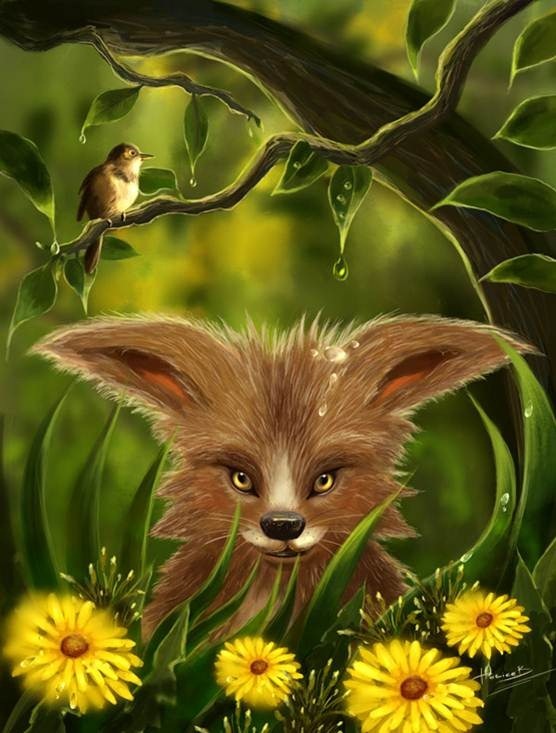
Fox Painting Photoshop Tutorial
Tools used
- Photoshop CS3
- Wacom Graphire4 4×5 USB (Blue)
Step 1:
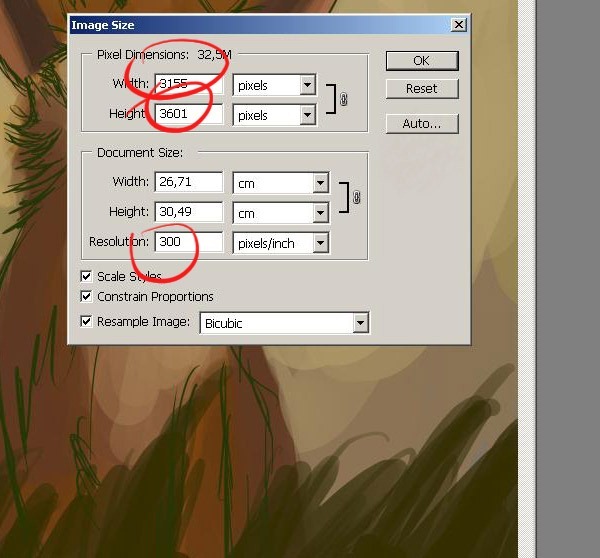
First of all Let's open a new document (approximately 900wide and 1386high, around 300 dpi) and make a preliminary sketch.(Ctrl+N or File > New). You can able to print it on A3 format in pretty good quality- Width: 3155px
- Height: 3601px
- Resolution: 300
Step 1
Now lets create a new layer (Ctrl/Cmd+Shift+N). You can create empty layer for your sketch. I'll show you how I open a new layer.To create empty layer, click on the create a new layer button.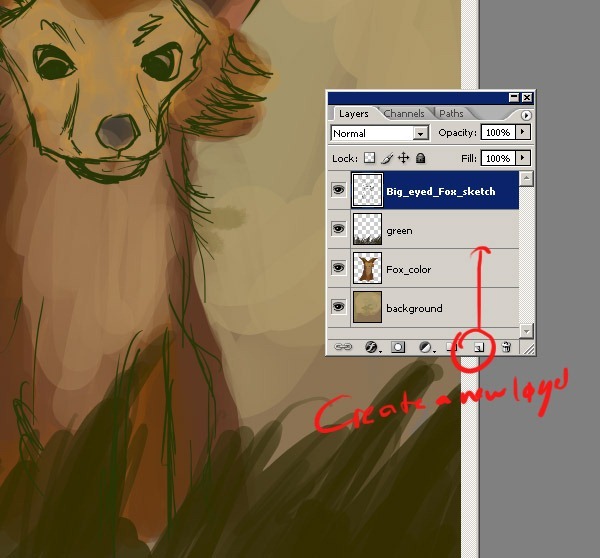
Step 2
And the first thing to do after you created the layer is give the layer a describing name. To give the layer a name, you double-click on the layer label, the label will then turn into text box for you to enter a new name. Ok, as you see my layer name is Big_eyed_Fox_sketch.Name your layer with a different name.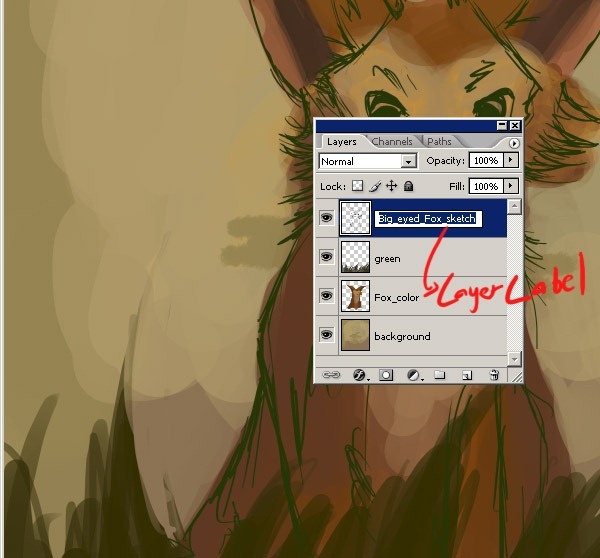
Step 3
Now after you have name the new layer . Sketch out the fox character on a new layer. Don,'t worry if the sketch is bad..this is just a guide for you colors and such. Here as you see, first I make a character sketch. I use a dark brown because it stands out..but you can use whatever you want of course :) Well, as you see these lines don't need to be perfect...I'll change the blend mode of the "sketch" layer from Normal to Multiply.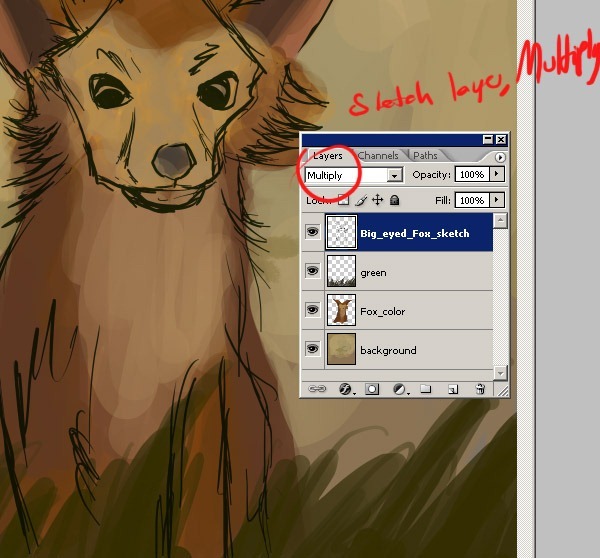
Step 4
Now after you have name the sketch layer draw your own sketch. Here these are my other layers for this illustration...surely on the next steps I'm going to create some more layers of course.... for now this three layer is sufficient. We cannot limited with only one layer for such detailed painting.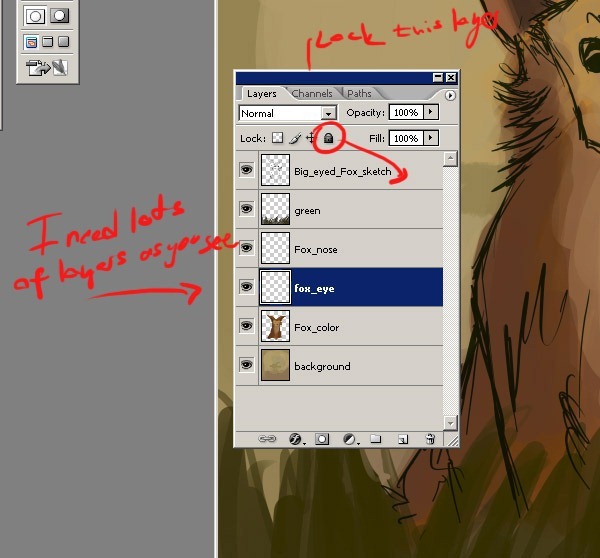
Step 5
I blocked in the colors with a large hard round brush and then roughly added detail with a smaller size of the same blocking brush. Here as you see, I started placing main colors, I simply took a smaller brush and added more colors.The reason for painting on such new layers because of you need to make corrections later in the painting. It is much easier to fix errors if the main elements of your painting are separate entities. This main step is really really very important.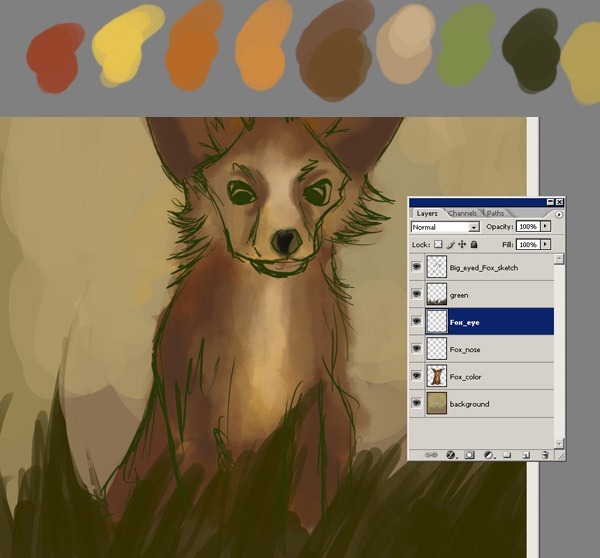
Step 6
And now choose the sketch layer. When you select the sketch layer it will be look like this. To select the sketch layer hold down the Ctrl (Win) / Command (Mac) key and and at the same time click on the Big_eyed_Fox_sketch Layer icon on the Layers palette.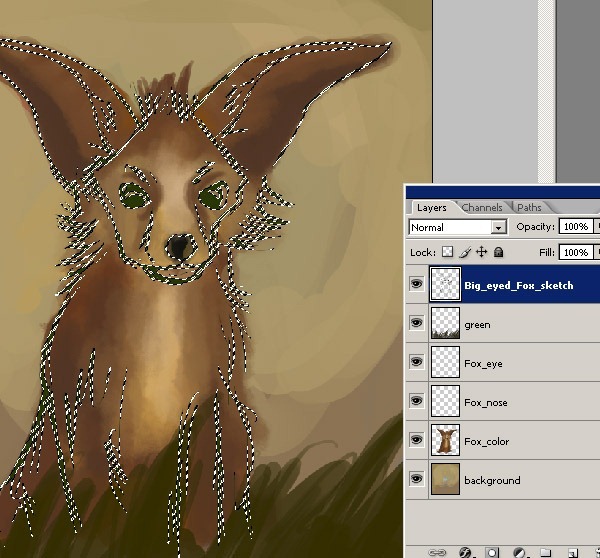
Step 7
Click on the New Layer icon at the bottom of the Layers palette, and after that open a new layer. And now choose the (#472918) color. This will be the new color for the character outline.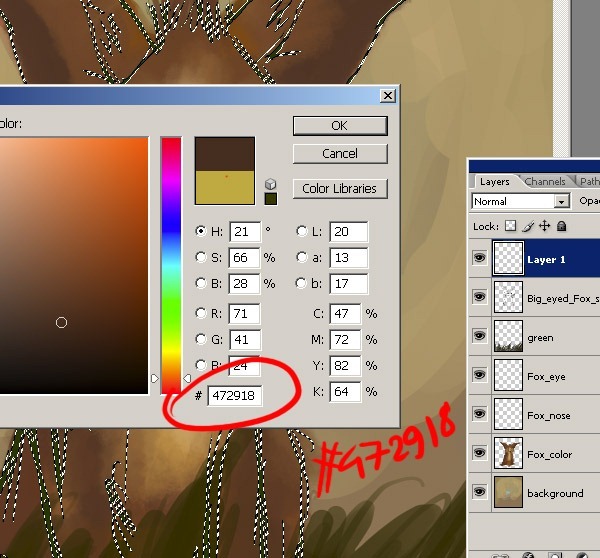
Step 8
Choose the Paint Bucket Tool (G)fill the new layer with this new color. This is a new color for the character outline.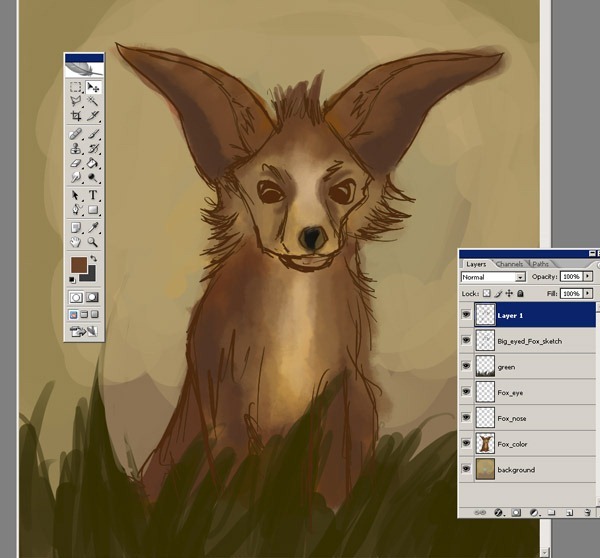
Step 9
To create the soft glow effect, we need to blur the image on our "Gaussian blur" layer. Go to Filter/Blur/Gaussian Blur.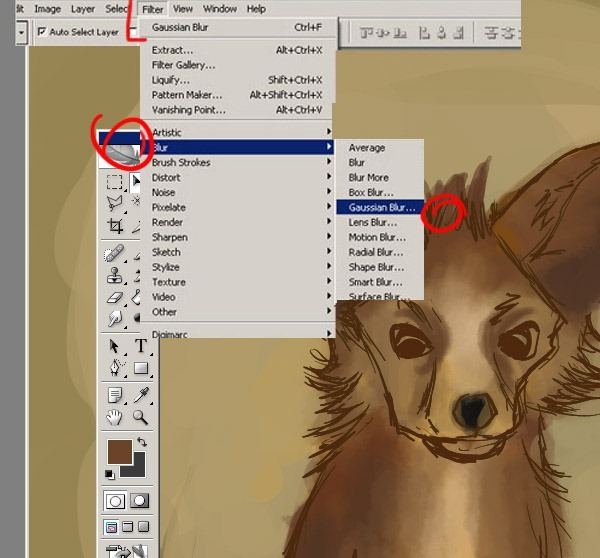
Step 10
Here when you click on Gaussian Blur , you are going to see a new little window.... This will bring up Photoshop's Gaussian Blur dialog box. Drag the Radius slider at the bottom of the dialog box towards the right to increase the amount of blurring that's being applied to the layer, or drag the slider to the left to decrease the blur amount.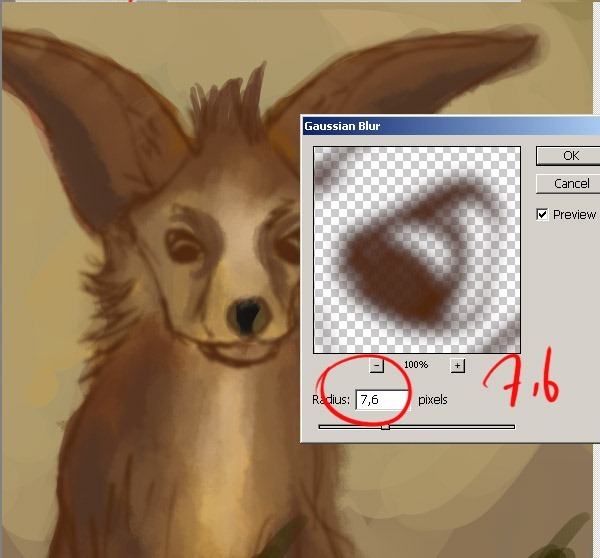
Step 11
Choose radius 6,2 and click OK when you're done to accept the blur effect and exit out of the dialog box. Here's my image sketch after applying the Gaussian Blur filter...See the difference?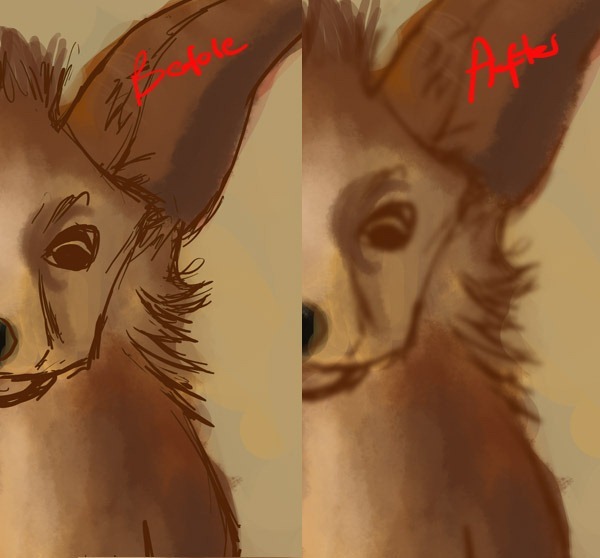
Step 12
Then Choose Layer > Merge Layers. Merge down is found by selecting Layer/ Merge Down, or by clicking on the arrow in the upper right-hand corner of the Layer Palette and selecting it: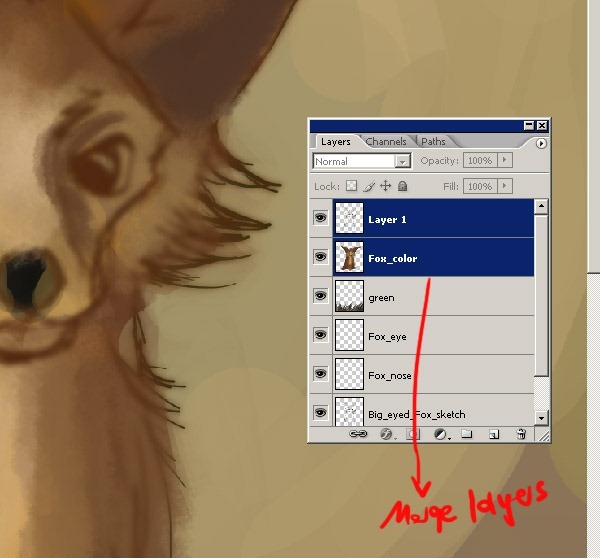
Step 13
The two layers are now merged together. You should notice the two layers are just one layer in the Layers palette. When you are painting on Adobe Photoshop, often you will want to combine two layers into one, so that adjustment you make (which aren't layer adjustments) will apply to both of them.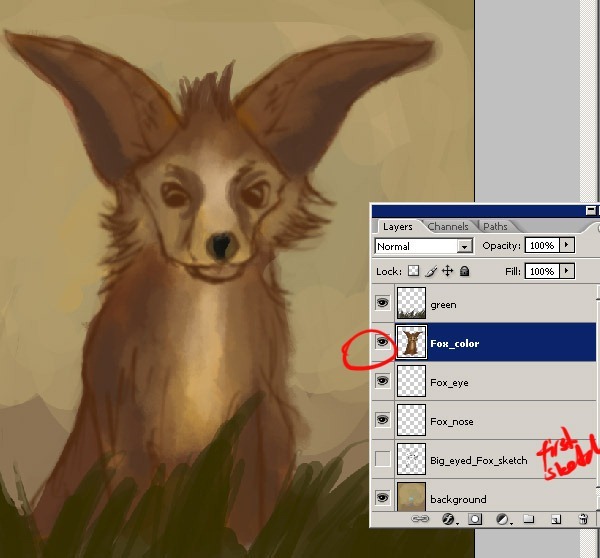
Step 14
Now it is time to clean it up!Taking eraser tool erase all the access skin that will be touching to the background. Taking a small soft brush and setting is about 40% -30%. I go around with my brush tool that are going to be highly shaded. Start to add a new layers to add shades and shadows.And shadows doesn't have to be always be darker versions of the color used for the base color. it can be other colors too. Start by the darker colors,then, little by little add the light. Here it looks clean now and as you see I open the first sketch layer too.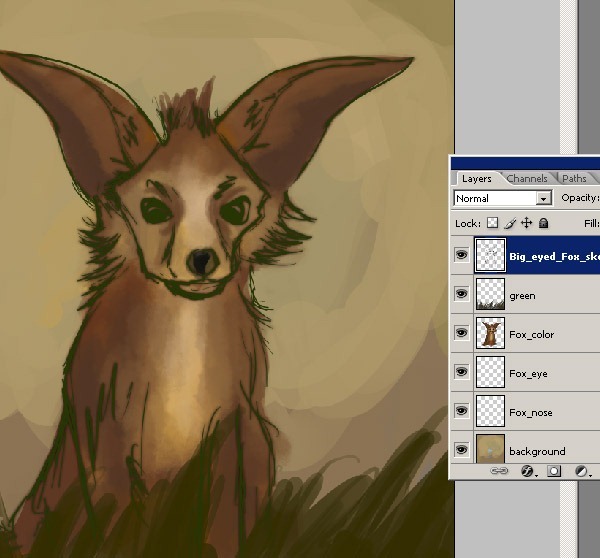
Step 15
Now at this step I decided to add some flowers and some trees to the background. Here as you see I add two new layers in Photoshop underneath the drawing and begin coloring in details. One layer is for the flowers and the other one is for the tree and I also want to make a detailed background of the character.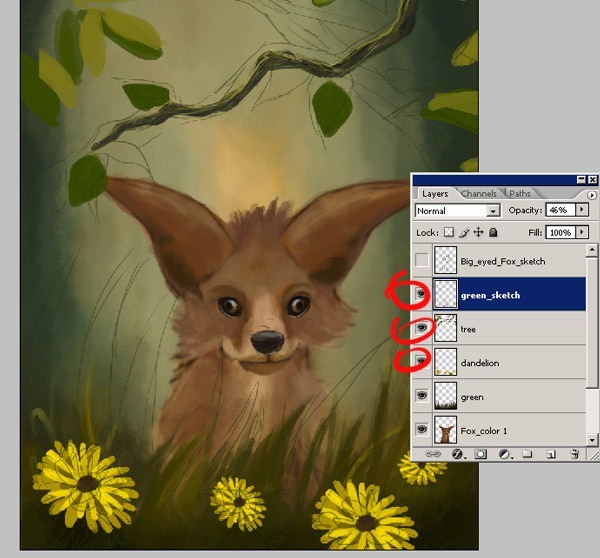
Step 16
For the dandelion flowers used a hard round brush. Here I have simple three colors for the dandelion.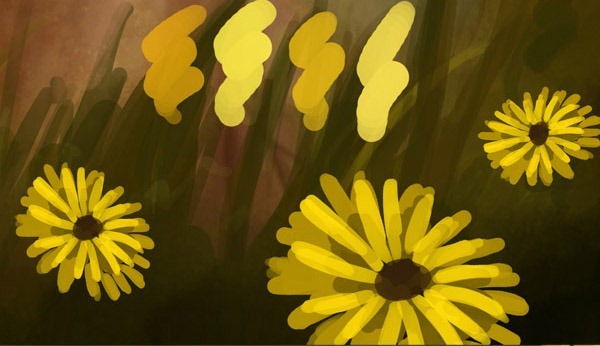
Step 17
For the detailed parts, for example the hair, or other fine lines, you can use the helpful setting: Shape Dynamics, Other Dynamics. Get smudge tool and keep smudging till the fur is about this quality. Get a blurry large eraser and erase the ends of the fluff.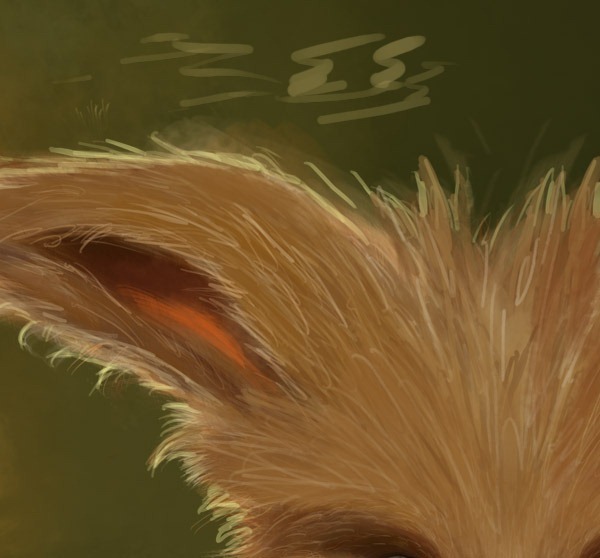
Step 18
The only thing you need for the fur is "airbrush opacity flow" like this and you have to use different brush px... depending on the creature you want to draw. Here as you see make sure that you colored you creature without stopping.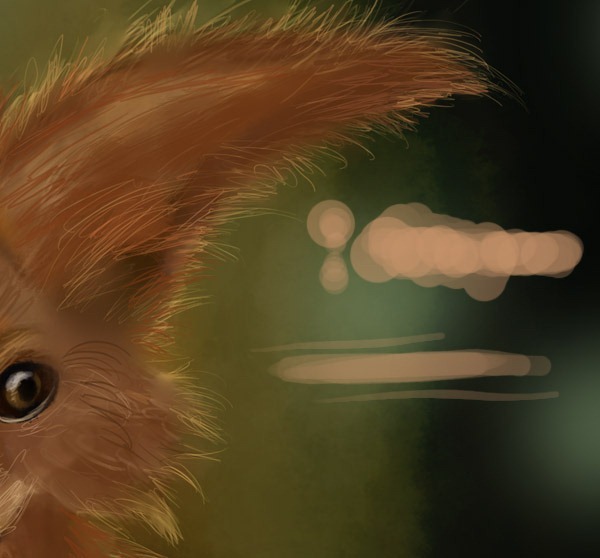
Step 19
Continue with smaller brush. Keep detailing that fur. Use Dodge-Highlights with a large blurry brush at 25% to lighten areas that already have fur texture.Make correction as the last stage with eraser tool..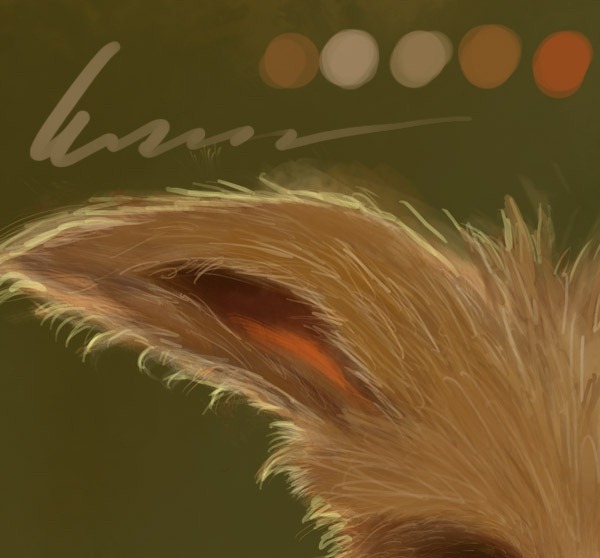
Step 20
Now you may amazed at first but I only used the some standard type of brushes, I just fell that this gives me the most control.I have used the Smudge tool and a big brush for this effect. Stroke it in a few directions as shown by the arrows.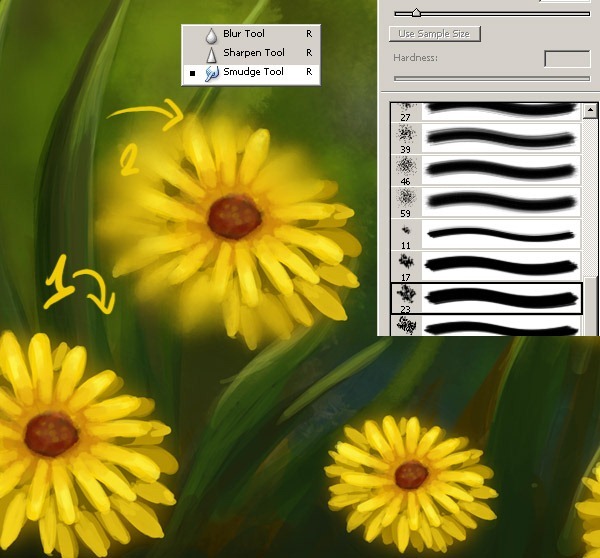
Step 21
The strength must at 8%or more little to get a smooth transition between the colors. To dodge an area gradually, set the tool to a low exposure value and drag several times over the area you want to correct.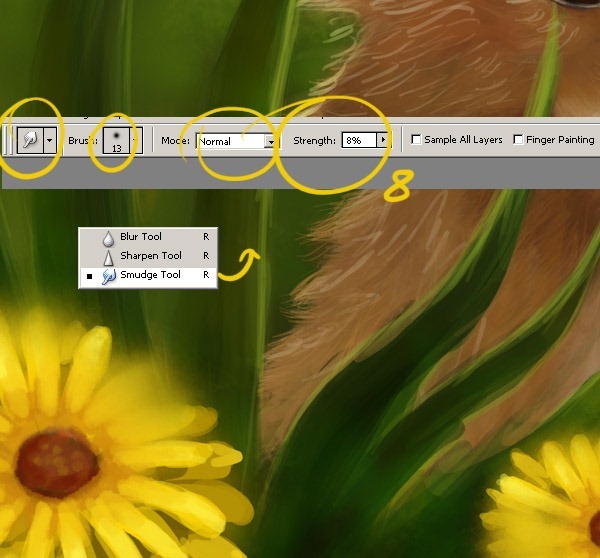
Step 22
More detailing, you can change the brushes at this point to achieve this. Keep working in the details and defining little areas, like the around of the big leafs.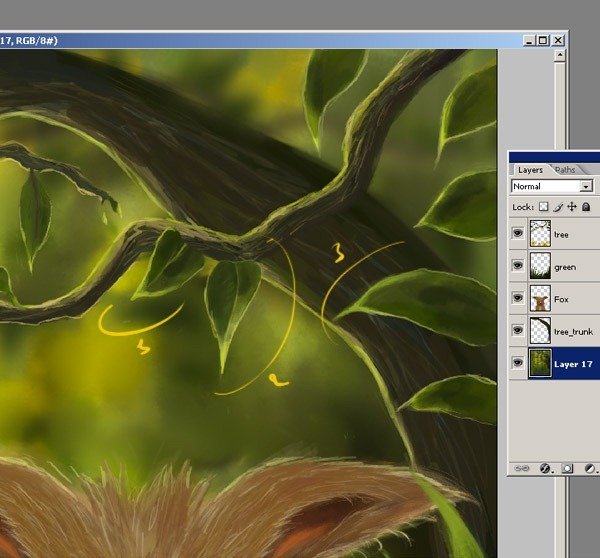
Step 23
I use the same settings but deactivate other dynamics. I reduce the brush size and paint the little details. Draw some more trees to the background and then smudge them so they don't look like big fake sticks or something like this :) Also make some green tree branches behind them and use the smudge tool with a lower settings as I did.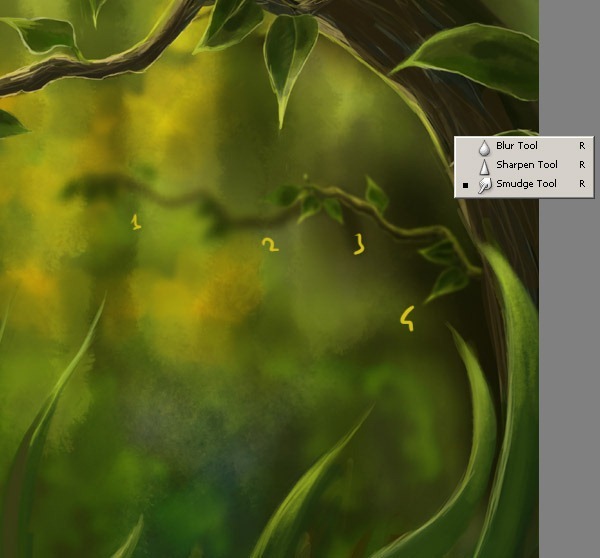
Step 24
Now I am going to make some little water drops from the green leafs.Here I click on the Brush Tool (B) and choose a very thin, hard brush.As you know, soft brushes are the blurry ones and hard brushes are more solid. Note that you can have any color selected as your brush color because we'll go over it with a layer style shortly.I created a layer behind the sketch layer and filled it with my chosen basic colors. Pick the base dark drop color and paint with a new layer onto the sketch layer. Decide where the shadows/water will be... no need to go into minor details.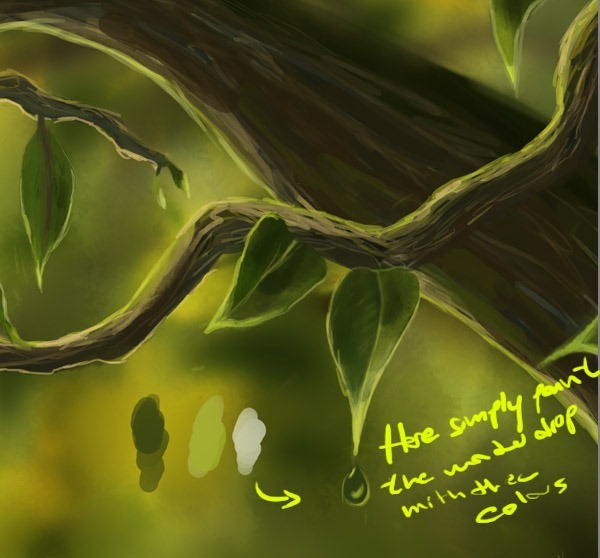
Step 25
When beginning the painting detail process there are absolutely no tricks in my painting realistic water drops . Here add the highlight colors, thinking about how the light would fall on the object. You can begin blending the colors in now. There are a few days to do;-Using the Smudge tool
-Using the Gaussian Blur filter
-Blending with the brush
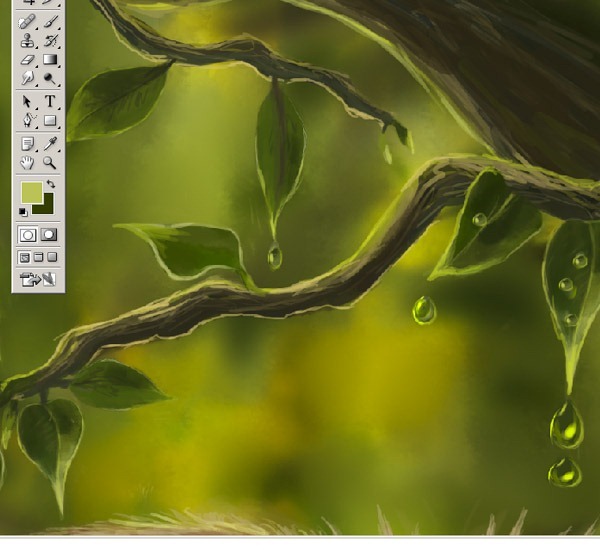
Step 26
I have used the smudge tool for the water drops. Stroke it in a few directions, as you see. Now I do think water drops don't need to have much detail. Finish adding light color as desired and then create an new layer for details. Take your time with the detailing process.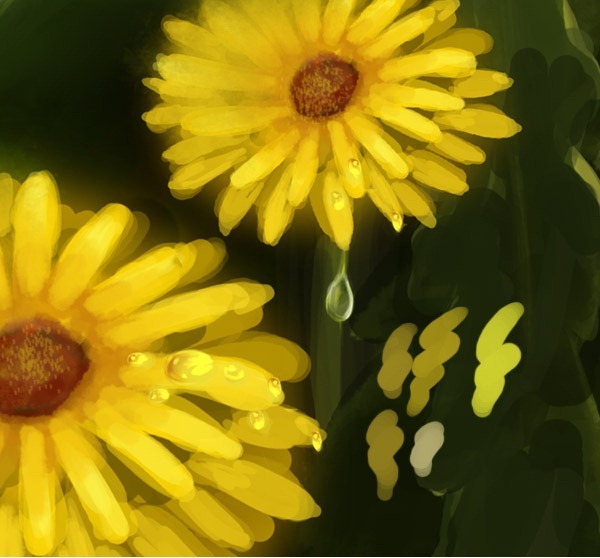
Step 27
Now I decide to draw a little bird on the top of the top branches...Here is a screenshot of my bird sketch to understand how the strokes look.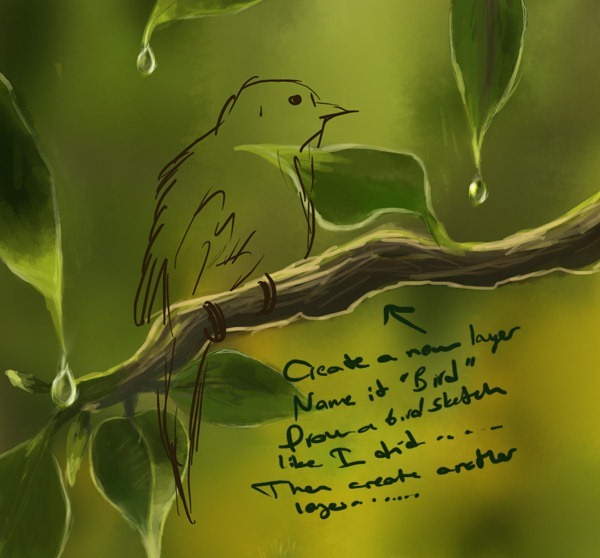
Step 28
Start to add a new layer to add shades and shadows. ..And shadows doesn't have to be always be darker versions of the color used for the base color. it can be other colors too. Start by the darker colors,then, little by little add the light. Taking eraser tool erase all the access skin that will be touching to the background. Taking a small soft brush and setting is about 40% -30%. I go around with my brush tool that are going to be highly shaded. Remember, keep lighting sources in mind when shading your sketch...now it looks better.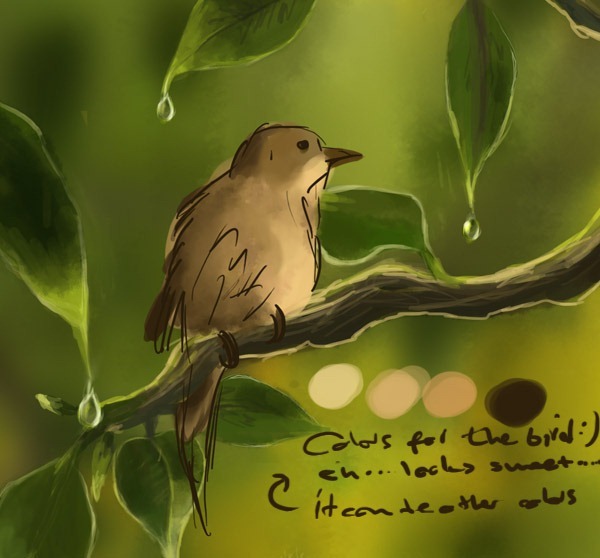
Step 29
When I am looking for a color, I process like this. Here take a look at how I paint the bird with my basic colors.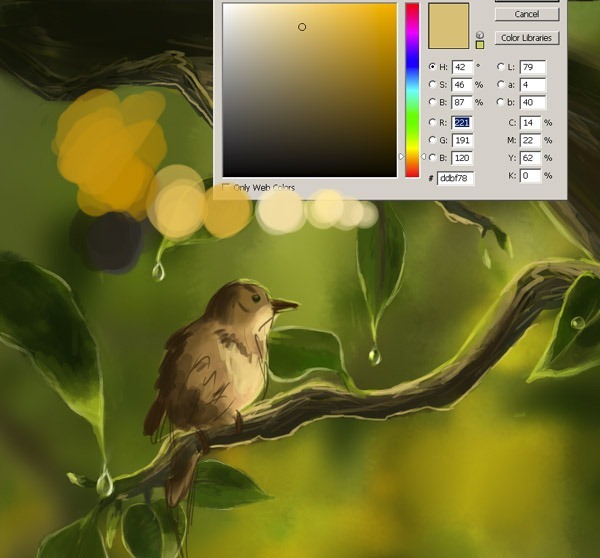
Step 30
At this stage I decided to work on shadows.. I'll add some bright areas with the Dodge Tool and you will see the difference on the body. So Here I choose the Dodge Tool and add some bright areas and some new brush strokes. Here I used the Burn Tool for the darky areas. And I used the Dodge Tool for the bird beak :J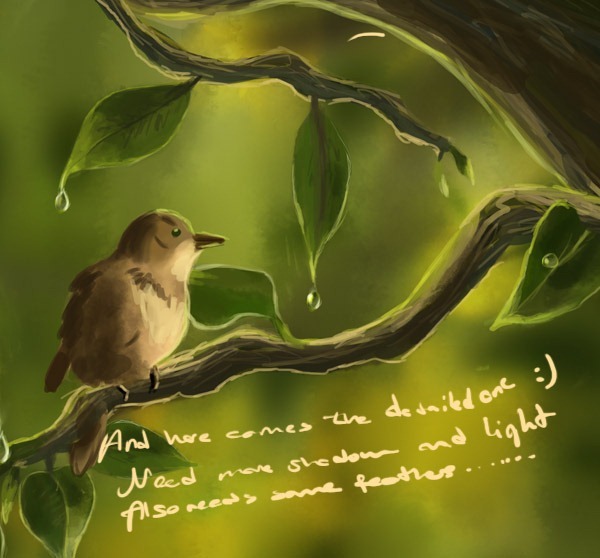
Step 31
Now I'll open a new Layer Group. With a Layer Group your layers palette will look less cluttered and there will be less need to scroll.Create a new Layer Group by clicking on the Layer Group icon Layers Palette at the bottom of your layers palette. It's important that you name your layer groups, otherwise you will get confused when you have a few of them. My Layer Group name is "Bird" and drag your layers for bird to this Group.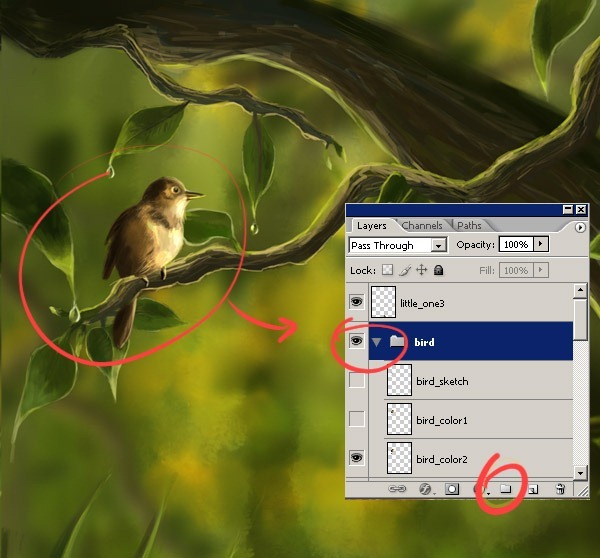
Step 32
After naming the Layer, make a new layer in this Group and name it Light...I used a large soft brush with a yellow color.To add lighter fur use a medium size hard brush and turn down the opacity and flow to 60%. At this step I would like to detail to eyes and its body feathers. Try not to lift your pen too much. Too many stroke will destroy the smooth gradient effect we are trying to achieve.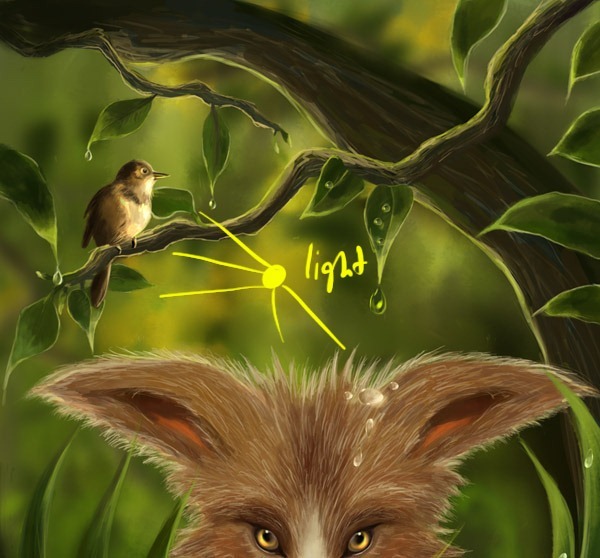
Final Results
Ok…that's all for today.Note that every artwork is different. These are just the steps I used in creating this specific artwork. Use these techniques as you see and have fun :) if you have any questions, feel free to send a commend on this page. I hope this has been helpful in some ways..Always keep practicing…Always use your imagination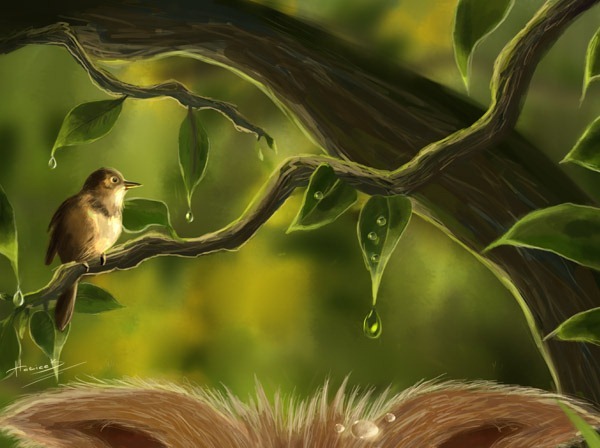
Keine Kommentare:
Kommentar veröffentlichen