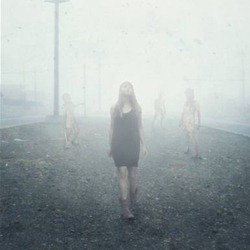
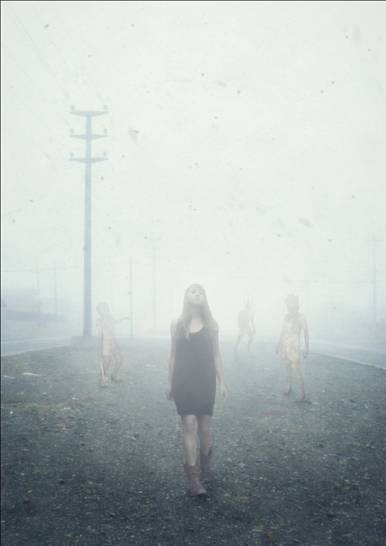
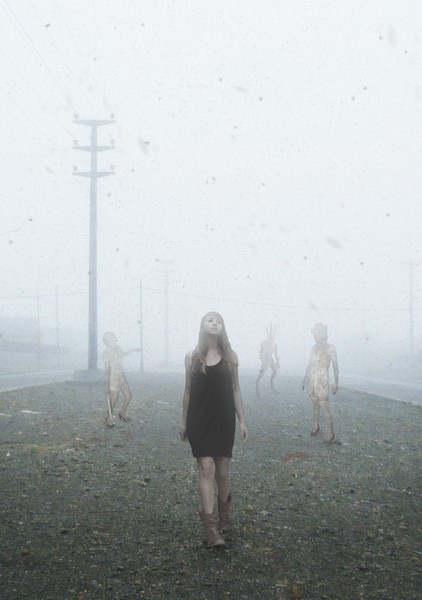
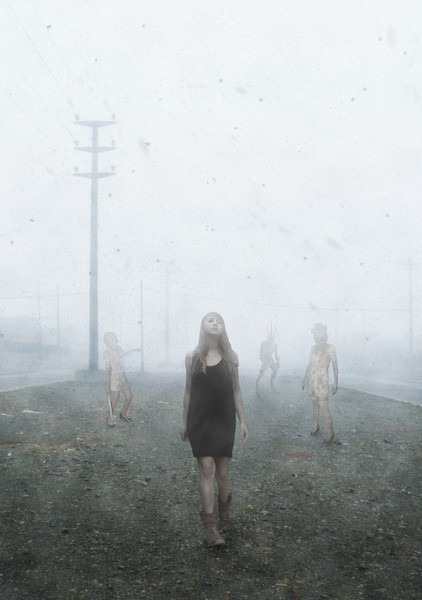
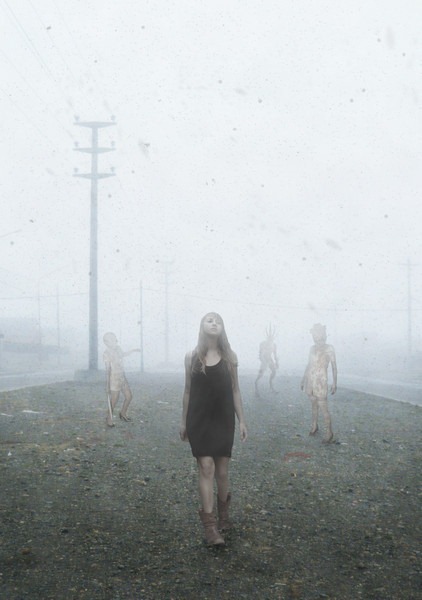
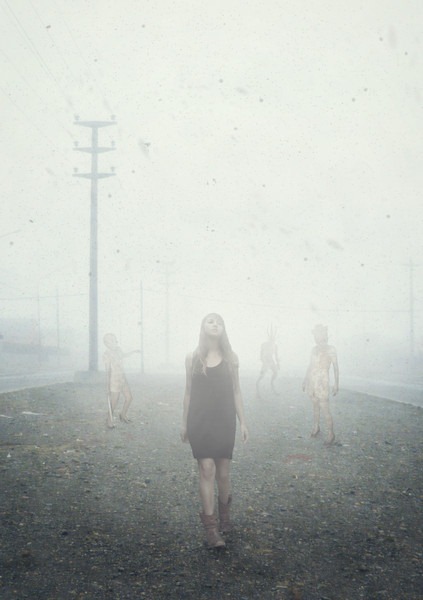
 In this tutorial, we are going to learn how to create a realistic Silent Hill inspired artwork. This tutorial covers techniques such as creating fog using only a few fill layers and the Cloud render tool, easy ways on how to blend images together to make them look like they are in a foggy scene, painting-in real looking ash through a few brush strokes and giving the image a soft contrast using the Blur tool and a few blending modes.
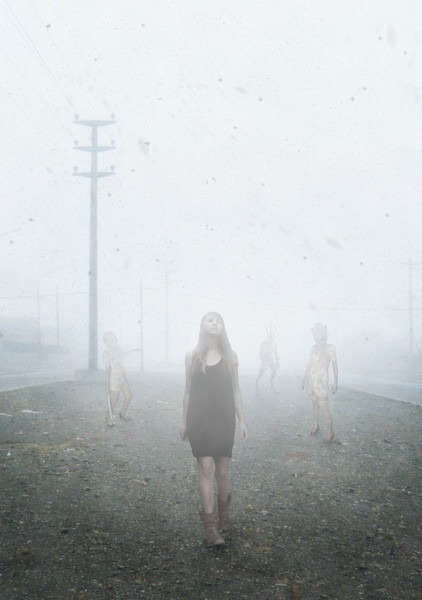
Preview of Final Results
Silent Hill Inspired Photo-Manipulation Photoshop Tutorial
Resources
Step 1: Create a Photoshop Image File
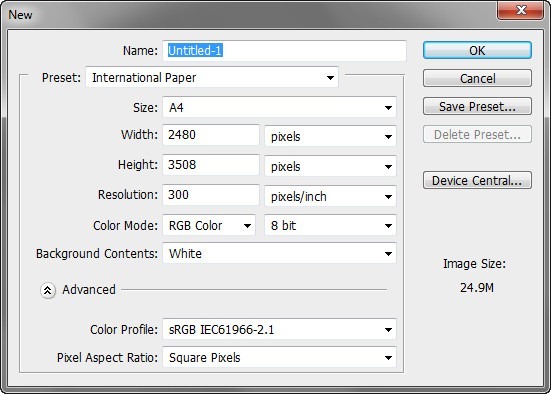
Let’s begin by creating a new image file, go to the Menu bar and click File > New, and then input the following values on their respective fields:
- Presets: International Paper
- Size: A4
- Width: 2480 pixels
- Height: 3508 pixels
- Resolution: 300 pixels/inch
- Color Mode: RGB Color; 8 bit
- Background Contents: White
Step 2: Create the Background
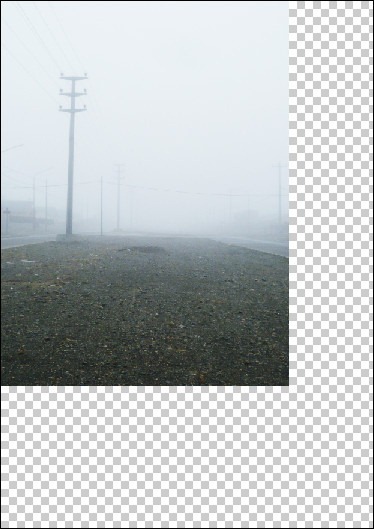
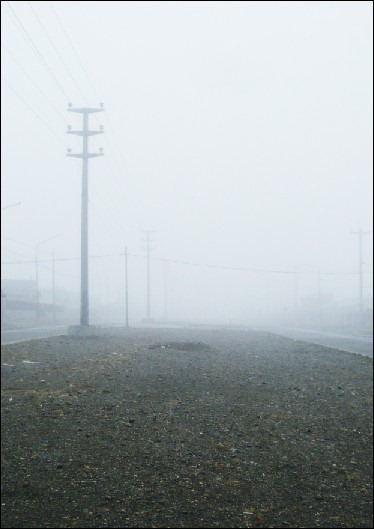
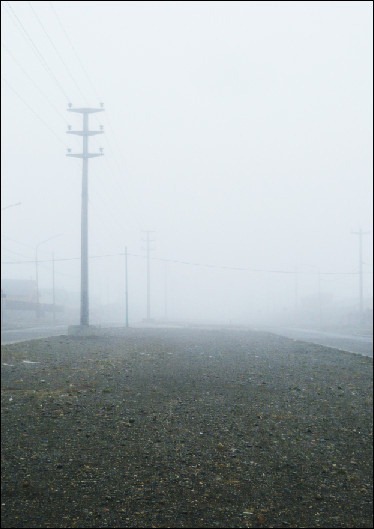
In this step, we will be creating the background. To start, let’s open Silent Hill BG by hielorei. Once open, activate the Move tool by pressing V on your keyboard. Now, drag that image into our canvas. It should appear like this:
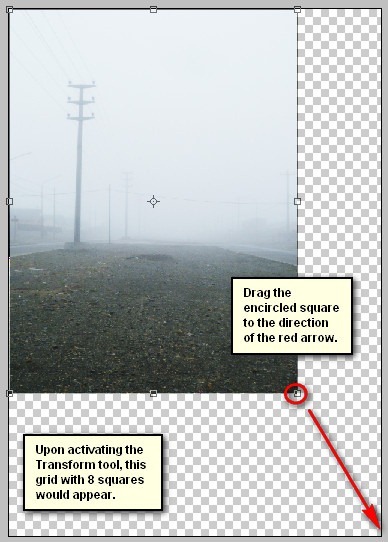
Next, activate the Transform tool (Ctrl/Cmd + T) and resize the image as shown below:
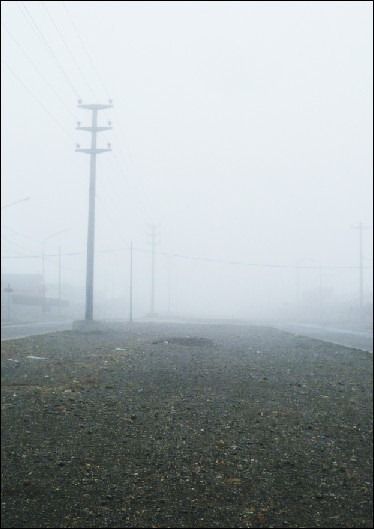
The result should be like this:
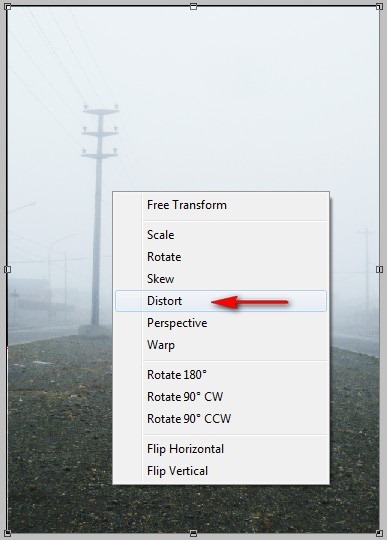
Next, let’s fix the angle of our background. To do that, activate the Transform tool (Ctrl/Cmd + T) and then once the grid appears, right click on the image and a contextual menu would appear. Click on Distort. See image below:
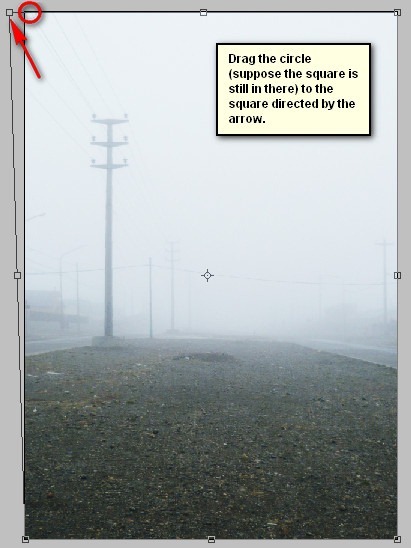
To distort the image, see the instructions shown on the image below:
The result should be similar to this:
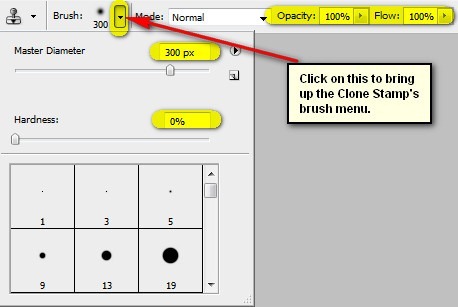
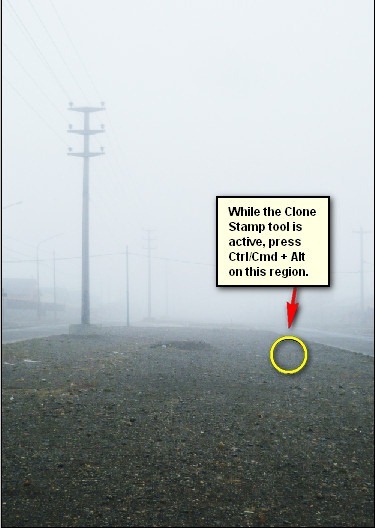
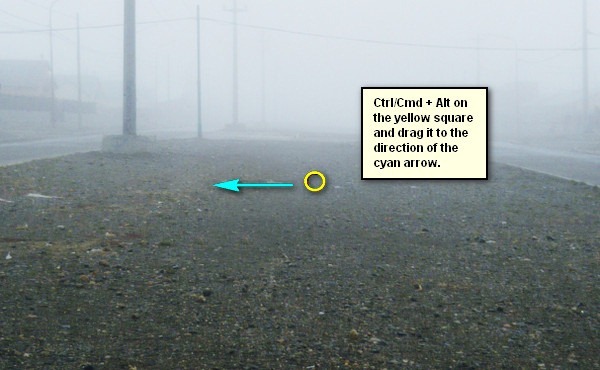
Next, let’s clean up this background - let’s remove that unwanted bulky thing on the road. To do that, activate the Clone Stamp tool (S). Once active, input the following:
- Brush size: 300px
- Hardness: 0%
- Opacity: 100%
- Flow: 100%
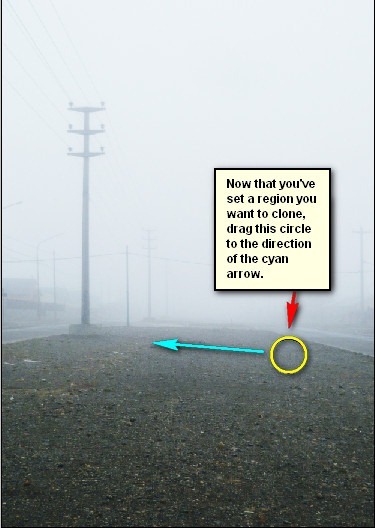
Now, let’s get to it!
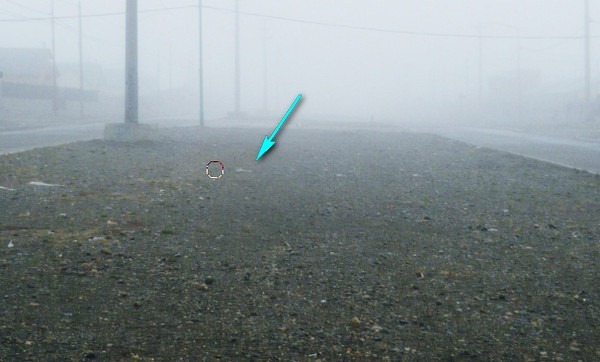
The result:
Let’s clean it up some more - activate the Clone Stamp tool again and set the following:
- Brush size: 100px
- Hardness: 0%
- Opacity: 100%
- Flow: 100%
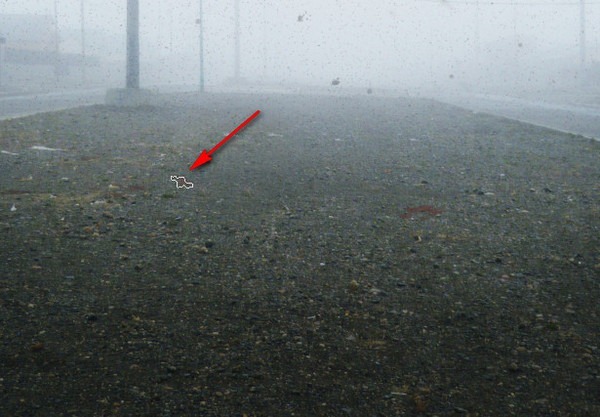
Now, remove the unwanted parts shown below:
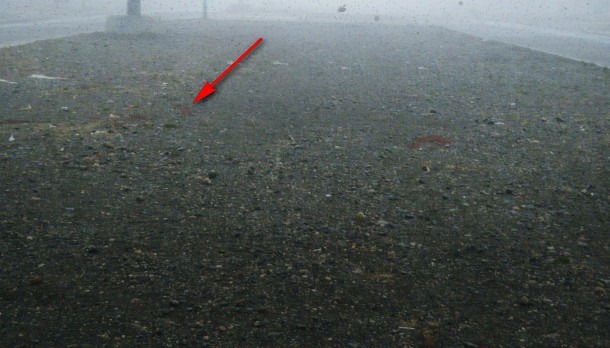
The result:
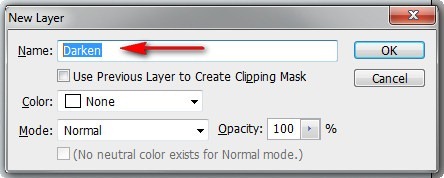
Now, let’s adjust the darkness of the foreground. To start, let’s create a new layer (Ctrl/Cmd + Shift + N) and when the New Layer box opens, input “Darken” on the name field.
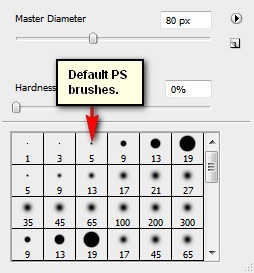
Next, activate the Brush tool by pressing B on the keyboard. Once open, make sure that the brushes are the default Photoshop brushes. See image below:
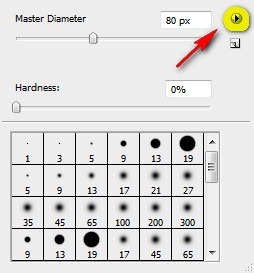
To make sure that you’re using that, simply right click the canvas while a layer is selected and while the Brush tool (B) is activated and then click on the button highlighted below:
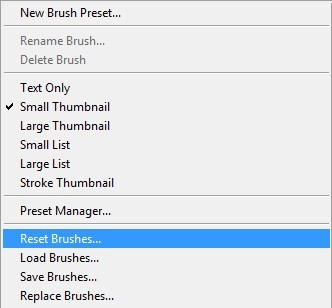
Then click on “Reset Brushes” from the contextual menu.
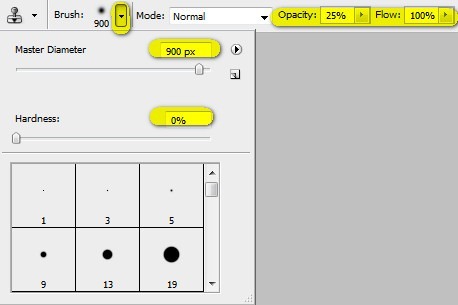
Now, that that is done input the following settings for our Brush tool (B):
- Brush size: 900px
- Hardness: 0%
- Opacity: 25%
- Flow: 100%
- #: 000000
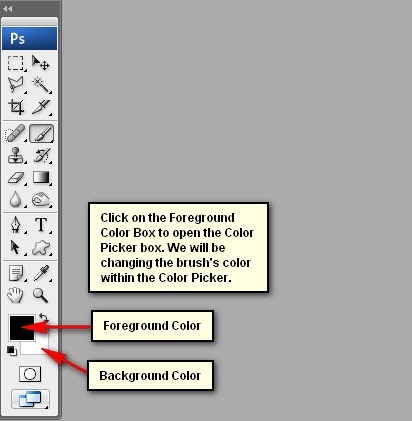
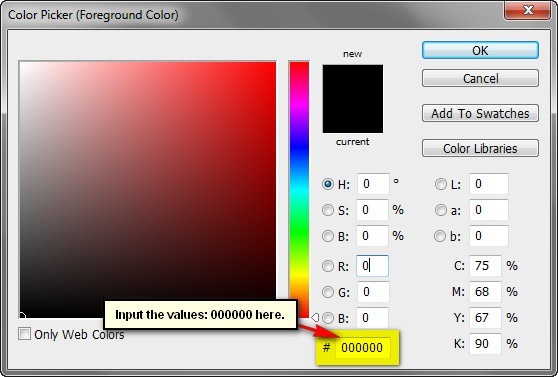
Note: #: 000000 is the Brush’s color. To set that, simply follow the instructions below:
The #: 000000 is the color of the Brush tool (B), so this means it is colored black. To set the brush color, follow the instructions below:
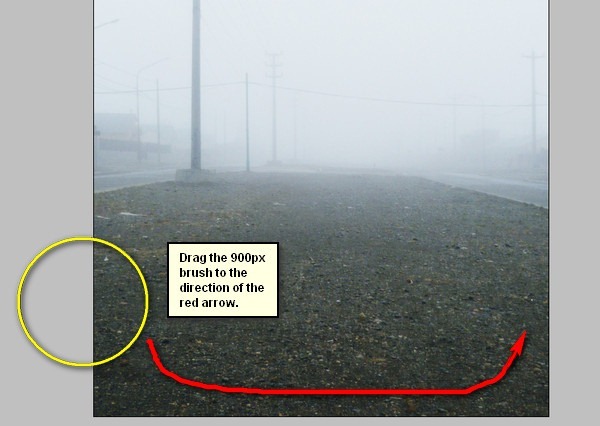
Now, let’s go painting!
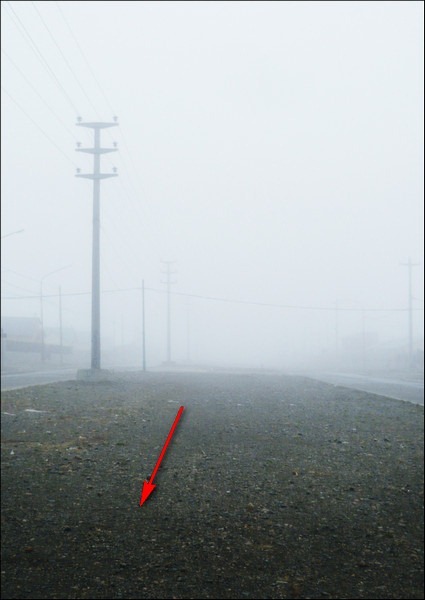
The result:
Step 3: Create the Ashes
Now, let’s give the image a touch of Silent hill by adding some ashes falling from the sky. To start, let’s create a new layer (Ctrl/Cmd + Shift + N), name - “Ash 1”.
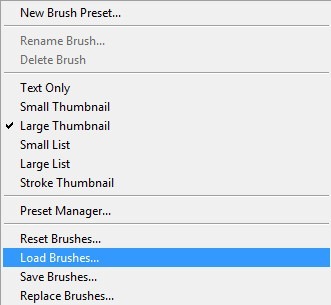
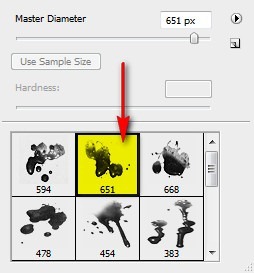
Now, activate the Brush tool (B) and open the brush set: “Winter SnowFlake Brushes PS7” by KeepWaiting. To load them, simply, right click on our canvas through any layer and then click on the drop-down button as shown below:
This will prompt the contextual menu to pop up and once you see that, just click on Load Brushes.
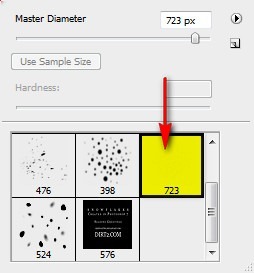
You will now be prompted to this directory: Adobe Photoshop > Presets > Brushes so make sure that you have put the brushes within this folder. Now locate the brush set and click OK. Right click on the canvas again using your Brush tool (B) and now you’ll notice that you have the Winter Snowflake brushes activated. Right click on the canvas while the Brush tool (B) is active and then activate this brush:
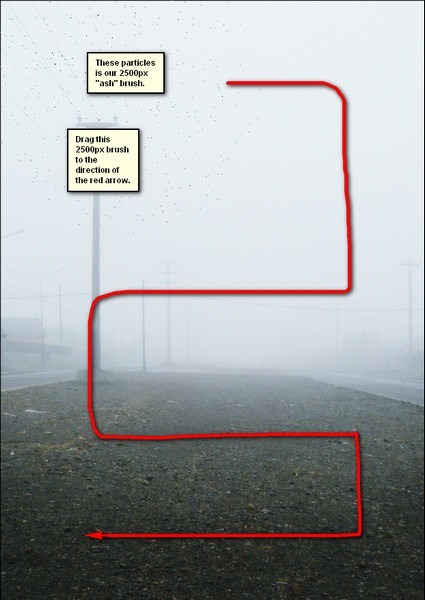
Once you’ve clicked on that brush that will be your active brush. Now input the following settings:
- Brush size: 2500px
- Hardness: Default
- Opacity: 25%
- Flow: 100%
- #: 000000
The result:
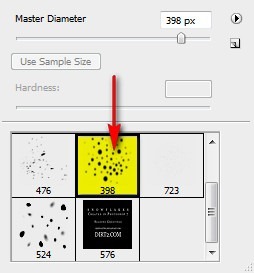
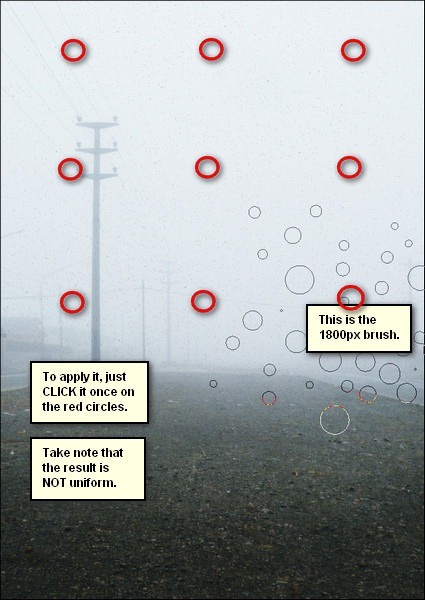
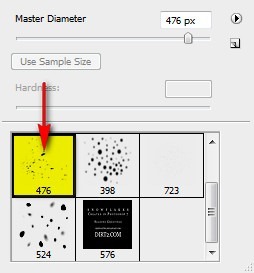
Next, let’s create the second batch of ashes. Create a new layer (Ctrl/Cmd + Shift + N) and input “Ash 2” on the name field. Activate the Brush tool (B) and choose the following brush from the “Winter SnowFlake Brushes PS7”.
Now, apply the following settings:
- Brush size: 1800px
- Hardness: Default
- Opacity: 25%
- Flow: 100%
- #: 000000
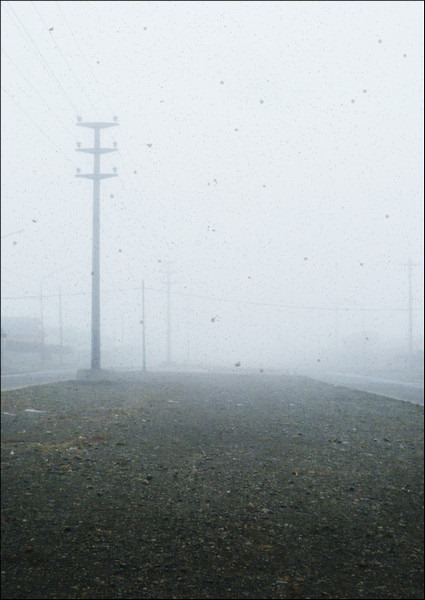
Try to come up with a result similar to this:
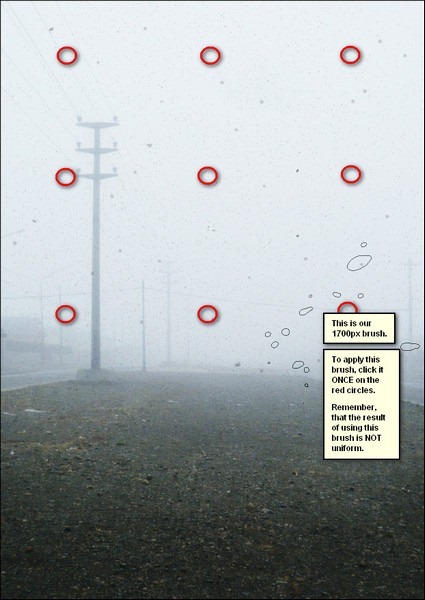
Next, let’s create the third batch of ashes. Create a new layer (Ctrl/Cmd + Shift + N) and then in the name field, input “Ash 3”. Next, activate the Brush tool (B) and choose the following brush from the “Winter SnowFlake Brushes PS7”:
- Brush size: 1700 px
- Hardness: Default
- Opacity: 15%
- Flow: 100%
- #: 000000
Now, let’s paint:
The result:
Step 4: Create the Blood
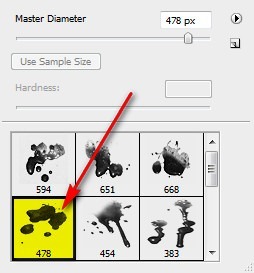
In this step, we’ll add some blood spills on the ground. To start, let’s create a new layer (Ctrl/Cmd + Shift + N) and on the name field, type “Blood 1”. Next, activate the Brush tool (B) and Load the brush set: “Blood Brushes” by KeRen-R. Once loaded, activate the following brush:
Next, input the following settings for this brush:
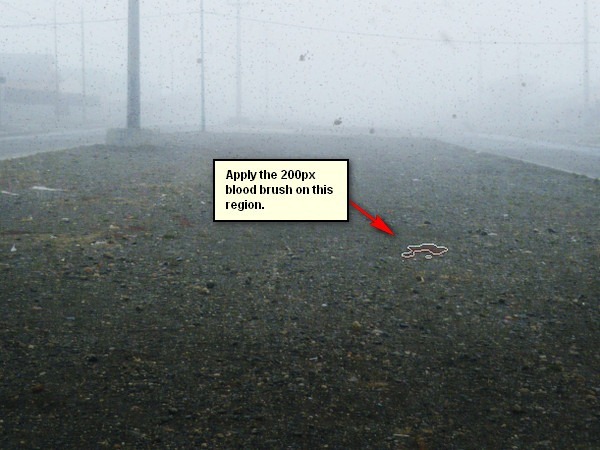
- Brush size: 200px
- Hardness: 0%
- Opacity: 75%
- Flow: 100%
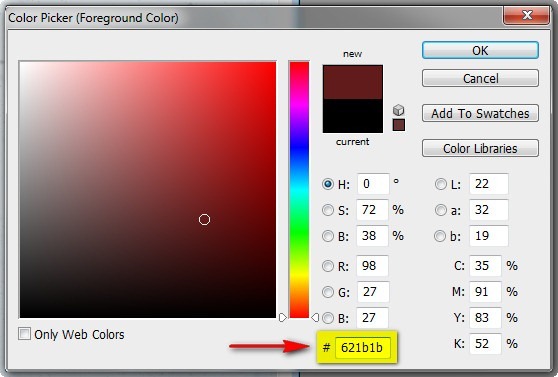
- #: 621b1b
Next, change the layer’s opacity to 50%. To do that, just click on 100% beside the word Opacity on the Layer window and then change it to 50%.
Now, let’s paint:
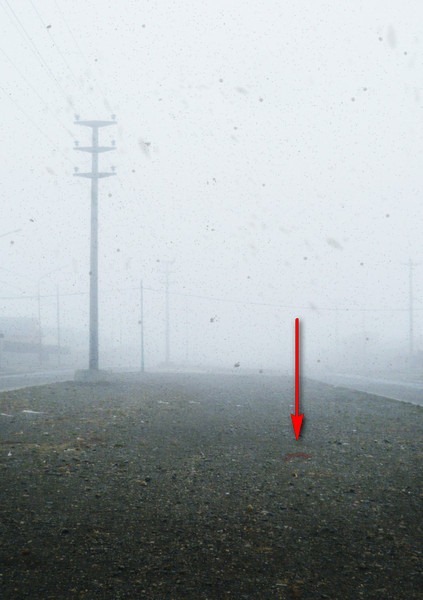
The result:
Next, let’s create the second patch of blood on the ground. Create a new layer again (Ctrl/Cmd + Shift + N) and name it “Blood 2”. Activate the Brush tool (B) and use the following brush:
Change the brush settings to the following:
- Brush size: 125px
- Hardness: 0%
- Opacity: 25%
- Flow: 100%
- #: 621b1b
Paint in the blood on the region shown below:
The result:
Now that we’re done, select all the layers and press Ctrl/Cmd + G to group them. We would need to group them to avoid confusion on later steps. Rename this group to “Background”.
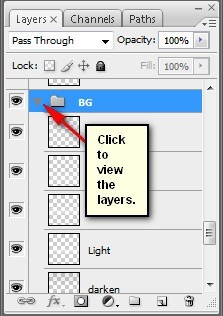
Note: Renaming a group is similar to renaming a layer. Just double click on the words “Group 1” and a text box would appear. You would also notice that the layers have been hidden from view, to view them again just left click on the arrow beside the Group’s name. See below:
Step 5: Create the lady
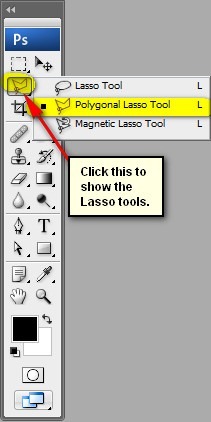
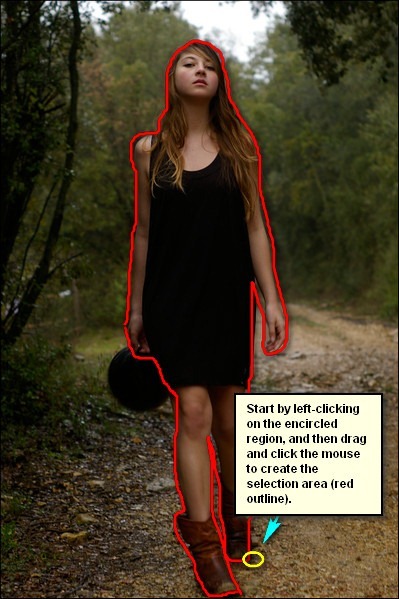
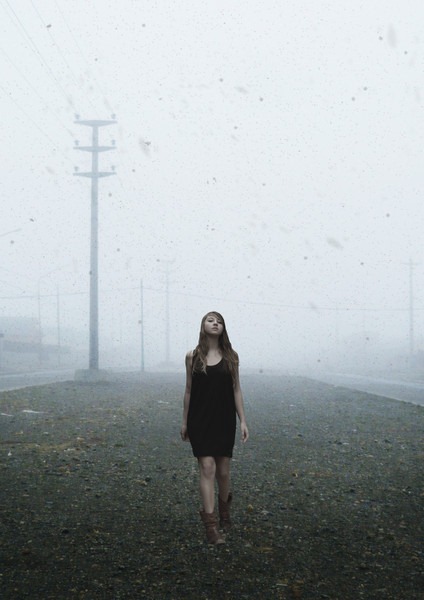
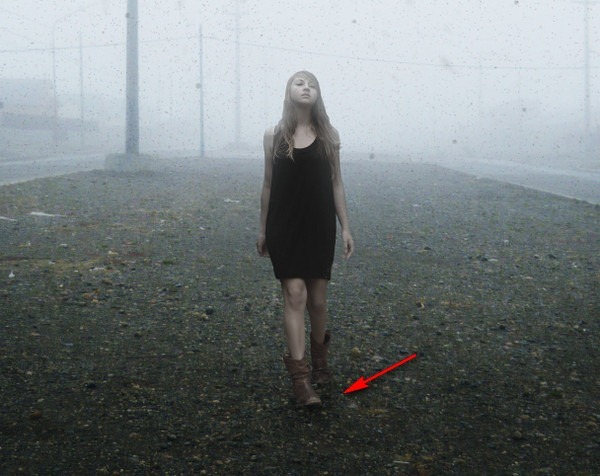
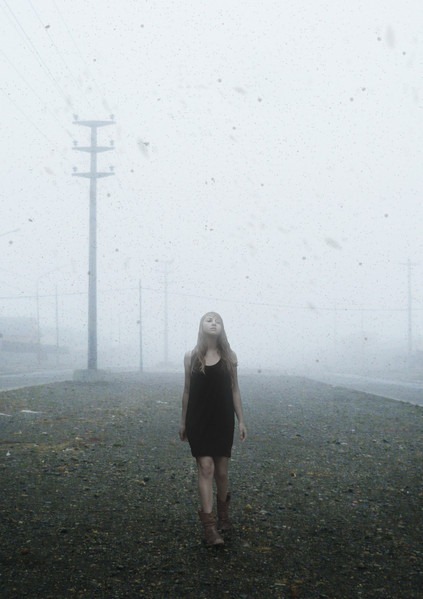
In this step, we will be adding a beautiful lady who is walking down the “Silent Hill” road with full confidence. To start, let’s open “ballade iii” by medusestock. Activate the Polygonal Lasso tool (L) and create a selection area around the lady.
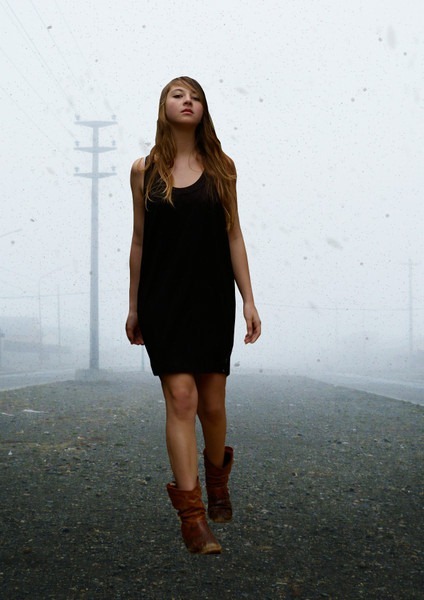
Now that you’ve created a selection area around the lady, it is now time to move her to the canvas. Activate the Move tool (V) and drag her to the canvas. Once on the canvas, rename the layer to “Lady”.
Position her in this area:
Next, activate the Transform tool (Ctrl/Cmd + T) resize the lady to the size shown below:
The result:
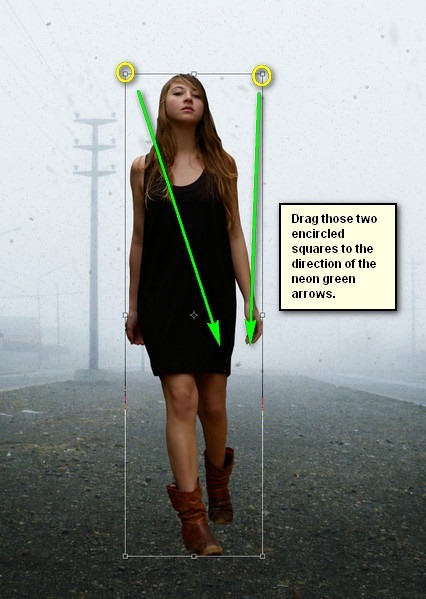
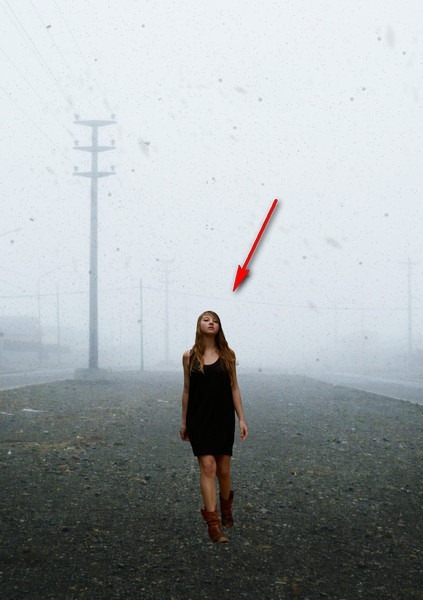
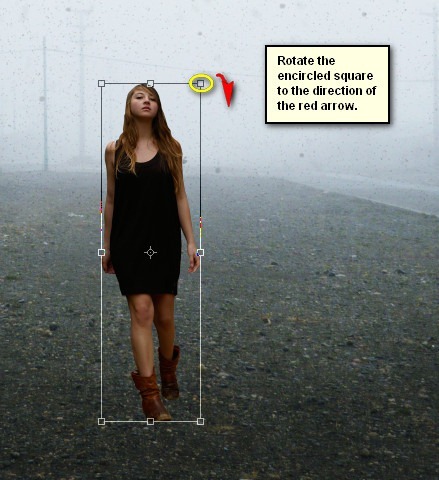
Activate the Transform tool (Ctrl/Cmd + T) once again and then right click on the canvas to show the Transform tool’s contextual menu. Once the menu opens, click on “Rotate”. Rotate the image to the degree shown below:
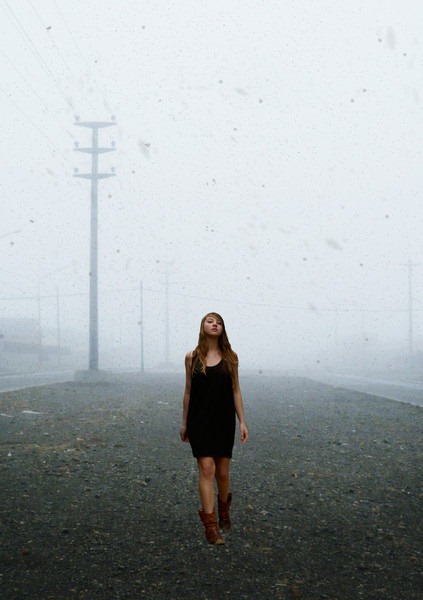
The result:
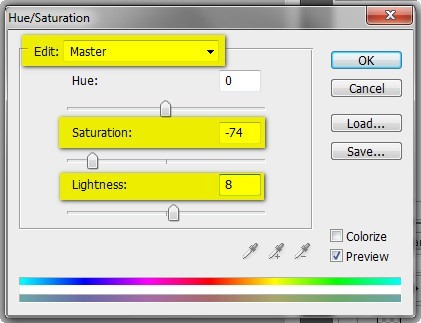
Next, we will change the color saturation of the lady. To do that, click on the lady’s layer and then go to Image > Adjustments > Hue/Saturation and input the following:
- Edit: Master
- Hue: 0
- Saturation: -74
- Lightness: +8
The result should be similar to the following:
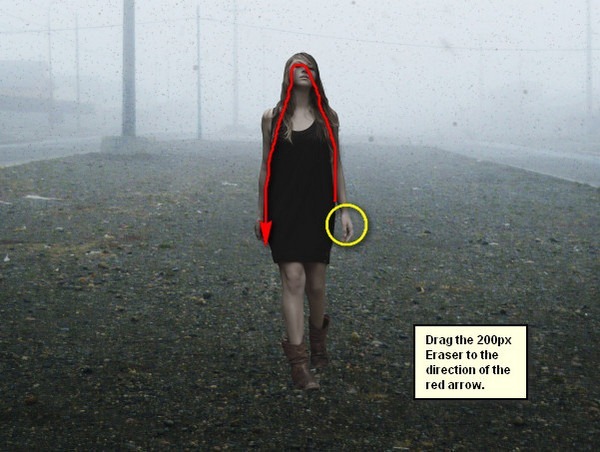
Next, let’s make her blend in with the foggy background. To do that, we’re going to use the Eraser tool to reduce the opacity of the lady. Activate the Eraser tool (E) and input the following:
- Brush size: 500px
- Hardness: 0%
- Opacity: 25%
- Flow: 100%
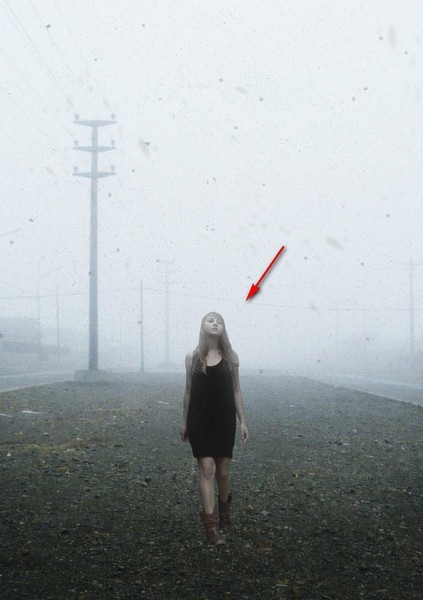
The result should be similar to the image shown below:
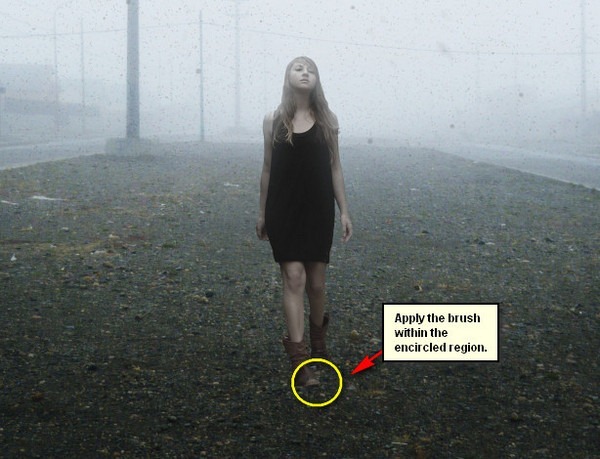
Next, let’s add a little shadow under her feet to make her blend with the image. To start, create a new layer (Ctrl/Cmd + Shift + N) and name it “Shadow”, put this layer below the “lady” layer. Next, activate the Brush tool (B) and Reset your brushes.
Now, with the brushes reset, use the following settings:
- Brush size: 250px
- Hardness: 0%
- Opacity: 15%
- Flow: 100%
- #: 000000
Now, let’s paint!
The result:
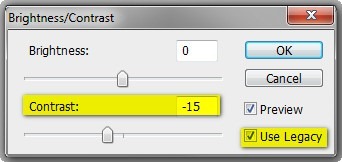
Now, let’s change the Contrast of the “lady”. To start, make sure that the active layer is that of the “lady’s” and then go to Image > Adjustments > Brightness/Contrast and then use the following:
- Brightness: 0
- Contrast: -15
- Use Legacy: Check
The result:
Now, when you’re done, group all the layers that we’ve created for this step and name that group to “lady”.
Step 6: Create the Nurses
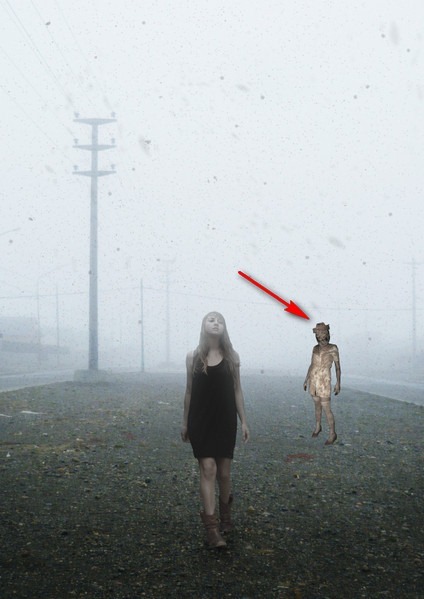
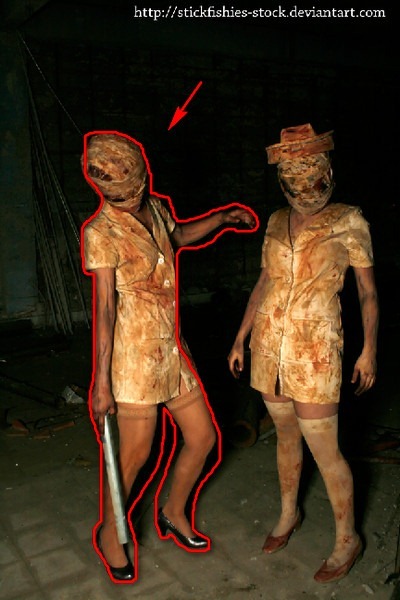
Now, let’s add the eerie nurses. To start, let’s open “Silent Hill Nurses 1” by Stickfishies Stock. Once open, activate the Polygonal Lass Tool (L) and create a selection area around the nurse shown below:
Next, activate the Move tool (V) and drag that nurse to our canvas. Put this layer above the “lady” group. Rename this layer as “nurse 1” and then position the nurse in the area shown below:
Now, activate the Transform tool (Ctrl/Cmd + T) and then resize the image as shown below:
After that, let’s now change the Hue/Saturation of “Nurse 1”. Make sure that the “Nurse 1” layer is active and then go to Image > Adjustments > Hue/Saturation and then input the following values:
- Hue: 0
- Saturation: -74
- Lightness: +8
The result would be like this:
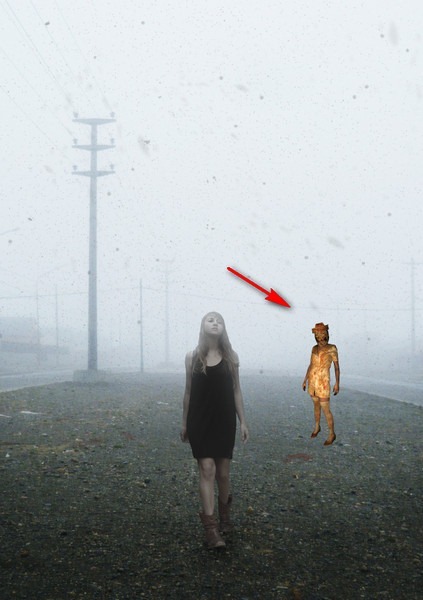
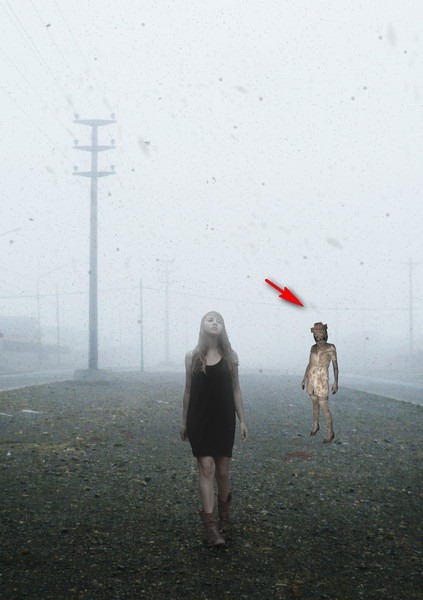
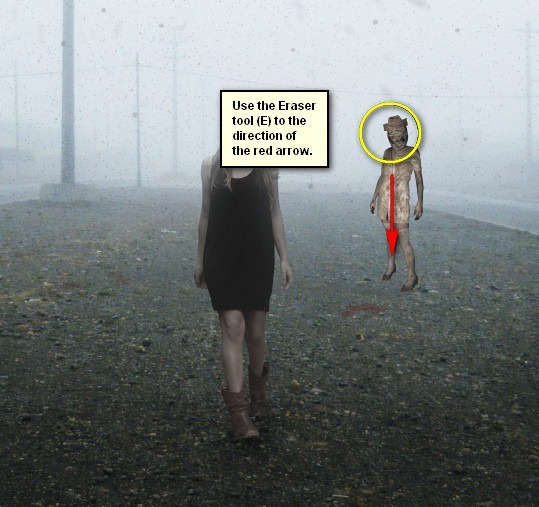
Now, let’s make her blend in with the image, and to do that, we will need the Eraser tool (E). Activate the said tool and then input the following:
- Brush size: 300px
- Hardness: 0%
- Opacity: 25%
- Flow: 100%
Now, let’s erase the areas of “Nurse 1” as shown below:
After that, lower the Opacity of the “Nurse 1” layer to 90%.
The result should be similar to this:
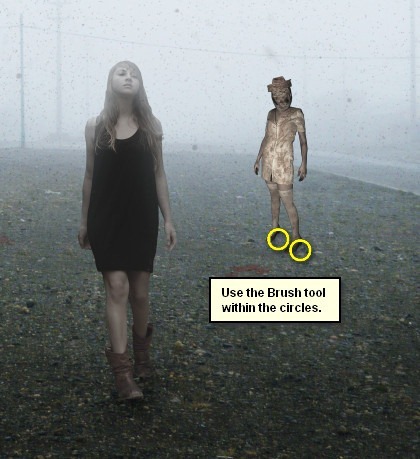
Next, let’s create the Shadow to make the nurse look like she really is standing on that ground.
To start, let’s create a new layer (Ctrl/Cmd + Shift + N) and then name it “Shadow”. Put this new layer under the “Nurse 1” layer to make the shadow appear under the nurse and not on the nurse.
Activate the Brush tool (B) and then input the following:
- Brush size: 100px
- Hardness: 0%
- Opacity: 15%
- Flow: 100%
- #: 000000
Now, let’s paint!
The result:
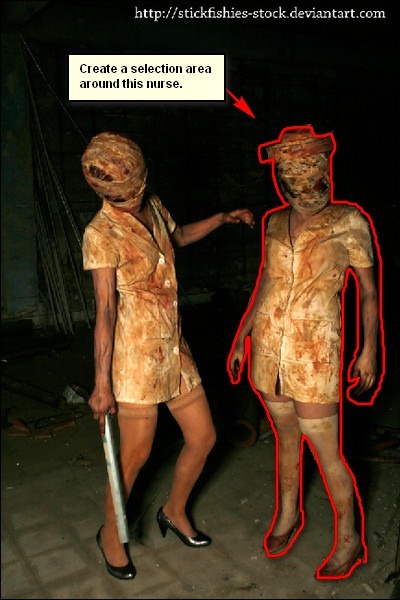
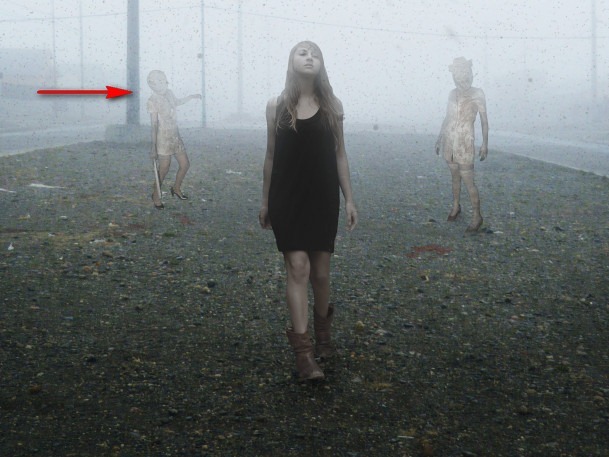
Now, let’s add the second nurse. Activate the Polygonal Lasso tool (L) and then create a selection area around the other nurse. See image below:
Once you’ve created the selection area, activate the Move tool (V) and then drag the second nurse to our canvas. Once there, rename it to “Nurse 2”. Put this layer above the “Nurse 1”. Position it as shown on the image below:
After that, activate the Transform tool (Ctrl/Cmd + T) and then resize “Nurse 2” as shown below:
Next, make sure that the active layer is “Nurse 2” and then change the Hue/Saturation by going to Image > Adjustments > Hue/Saturation and then input the following:
- Edit: Master
- Hue: 0
- Saturation: -74
- Lightness: +8
The result of that should be like this:
Next, let’s make it blend with our image and to do that, activate the Eraser tool (E). Once its active, input the following:
- Brush size: 200px
- Hardness: 0%
- Opacity: 50%
- Flow: 100%
Now, let’s start erasing:
The result should be similar to this:
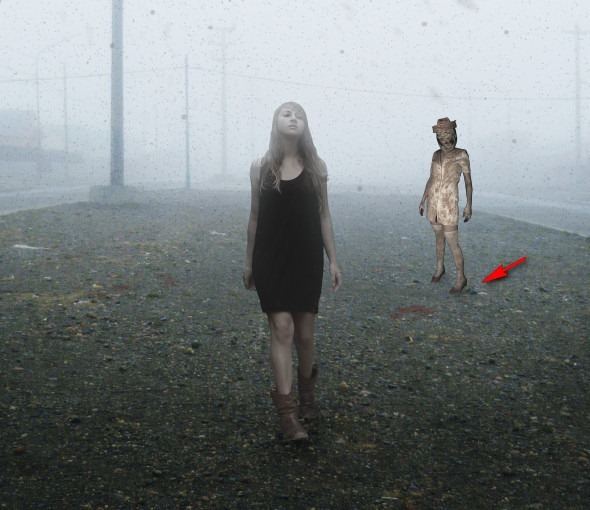
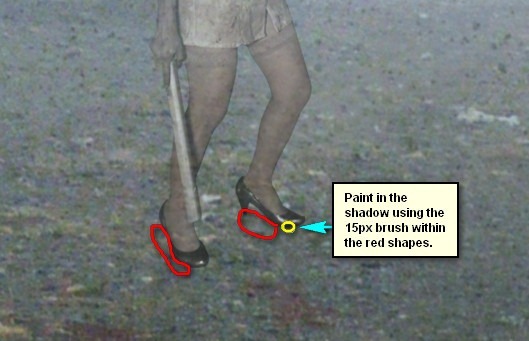
Next, let’s create its shadow. Create a new layer (Ctrl/Cmd + Shift + N) and name it “Shadow 2”. Put this layer below the “Nurse 2” layer.
Activate the Brush tool (B) and then input the following values:
- Brush size: 15px
- Hardness: 0%
- Opacity: 15%
- Flow: 100%
- #: 000000
Let’s paint!
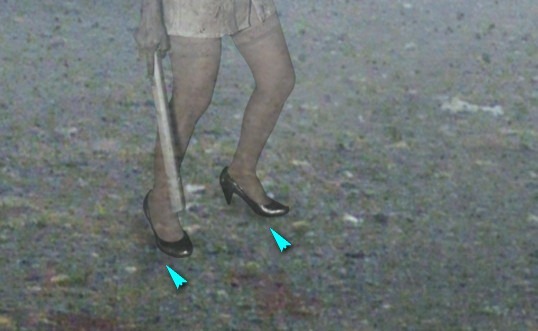
The result:
Now that we’re done with the nurses, let’s group them and rename the group to “Nurses”.
Step 7: Add the demonic creature
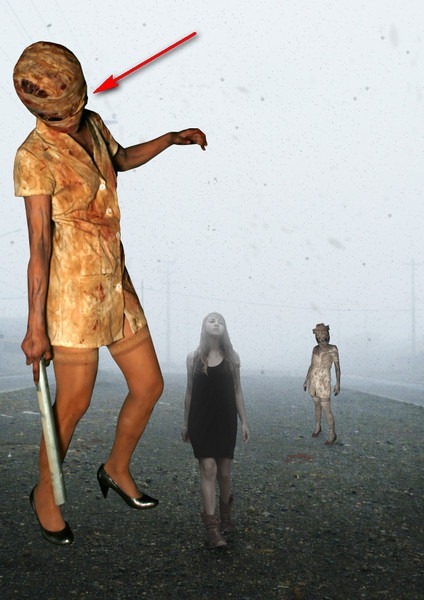
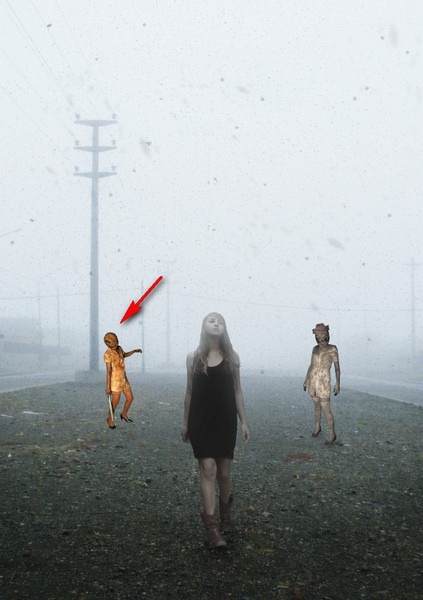
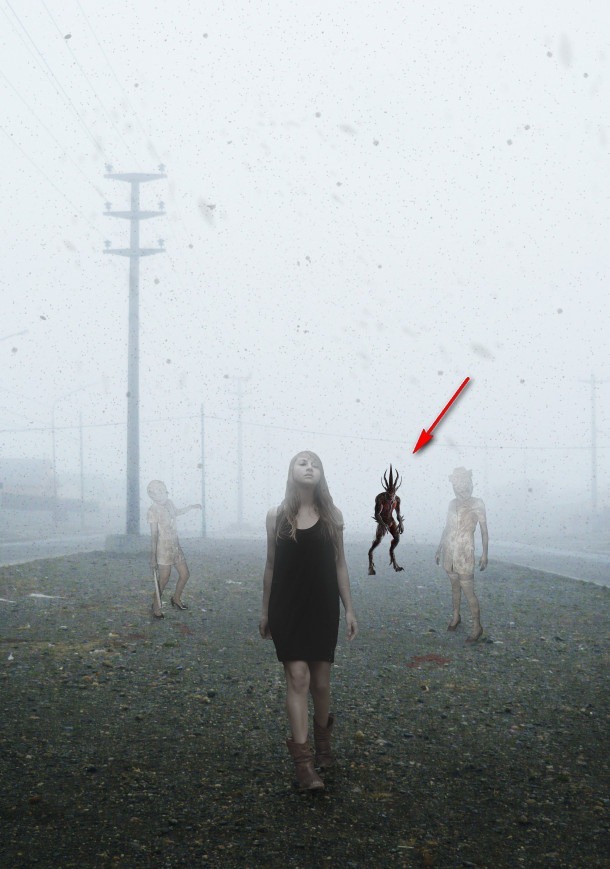
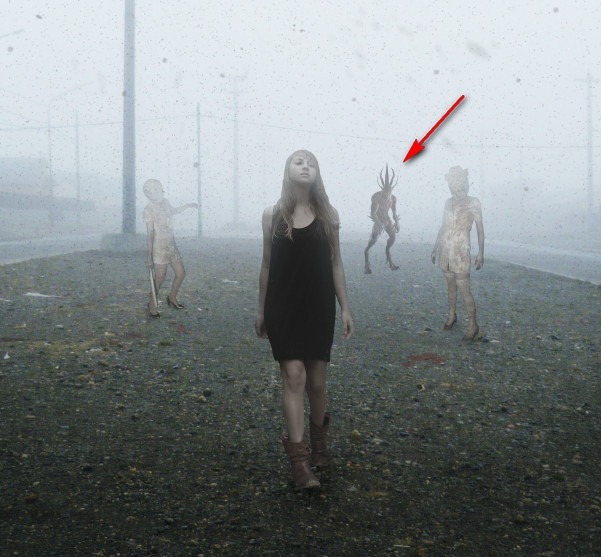
Now we will add a bizarre creature at the back of “Nurse 1”. To start, open “creature 01-01” by stiks 1969. Activate the Move tool (V) and drag this image to our canvas.
Note: This is a PNG file, and its background is transparent, that means it has no background - just the creature. So after moving it to our canvas, you’d only see the creature. Rename this layer now to “monster”.
Activate the Transform tool (Ctrl/Cmd + T) and then resize the monster to the size shown below:
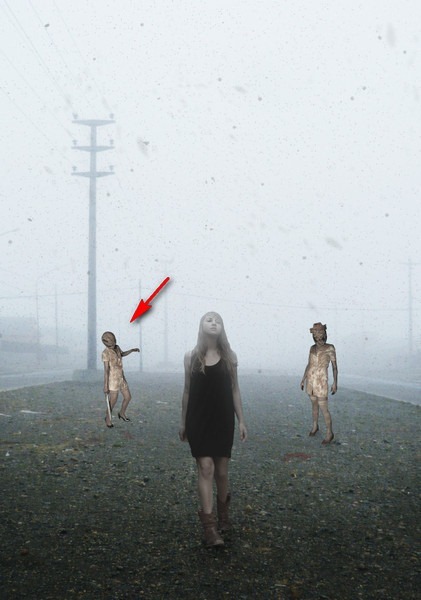
Next, reduce the “monster’s” opacity to 40%.
The result:
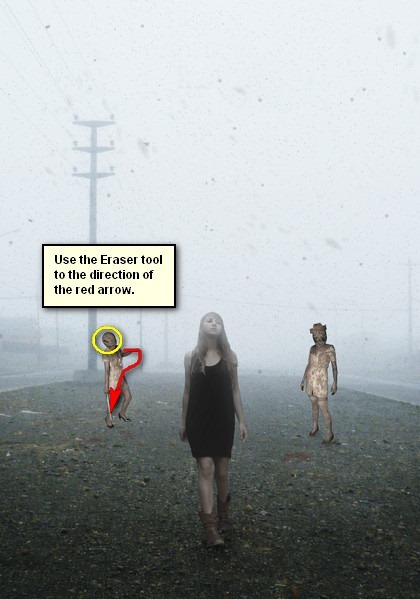
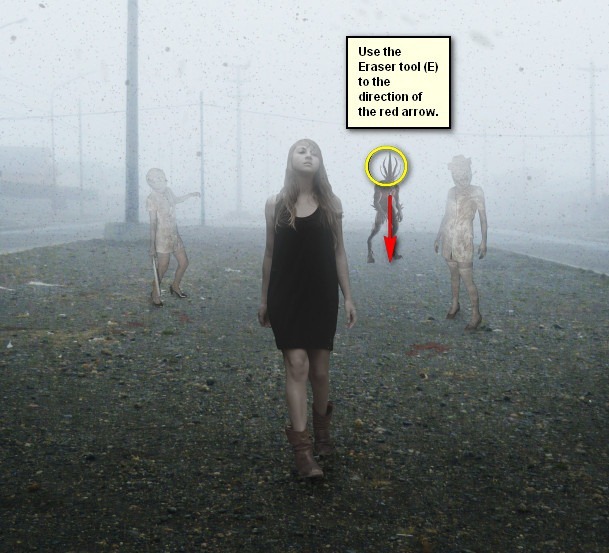
Now, let’s activate the Eraser tool (E) and erase some parts of this creature to make it blend with the foggy landscape. With the Eraser tool (E) activated, input the following settings:
- Brush size: 400px
- Hardness: 0%
- Opacity: 25%
- Flow: 100%
Now, let’s erase!
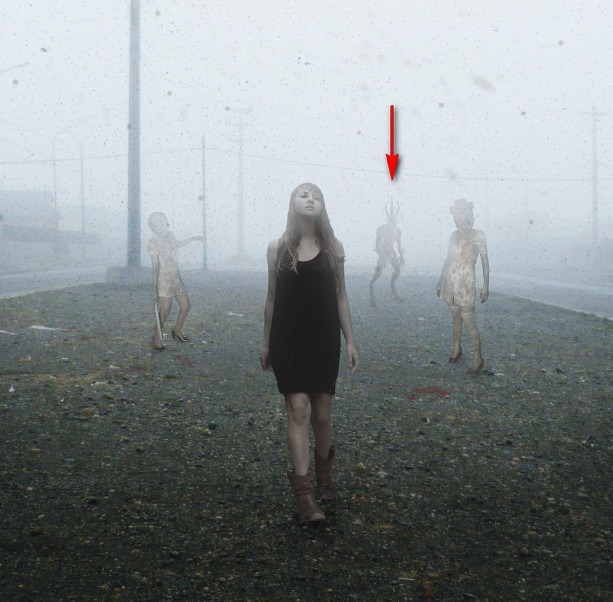
The result:
Step 8: Create the Fog
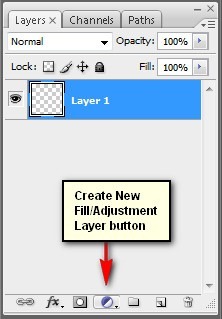
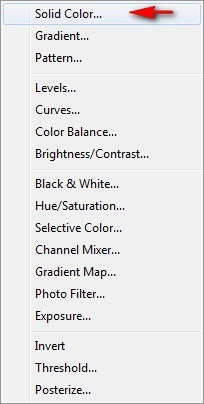
In this step, we will be adding the mist/fog to give that Silent Hill feel. To start, let’s create a Solid Color Adjustment layer. To do that, simply click on the button shown on the image below:
When it opens, click on the following:
Once you’ve clicked on Solid Color, the Color Picker menu would open. When it opens, input the following color:
Now, your canvas is all white, but we don’t want that, so let’s reduce this layer’s Blending Mode and Opacity to the following:
- Blending Mode: Soft Light
- Opacity: 50%
The result of that would be like this:
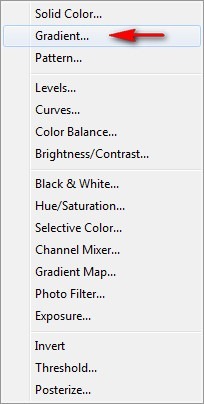
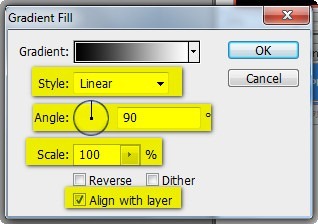
Next, let’s create a Gradient Adjustment layer. Click the Create New Fill/Adjustment layer button and click on Gradient.
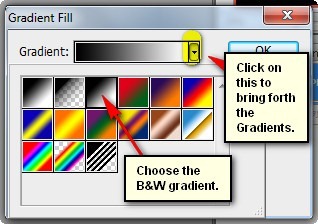
When it opens, input the following:
Now your canvas is filled with a black and white gradient so change the Blending mode, Opacity and Fill to the following:
- Blending mode: Soft Light
- Opacity: 40%
- Fill: 40%
Next, create a new layer (Ctrl/Cmd + Shift + N) and then name this layer to “clouds”. After that, go to Filter > Render > Clouds. After doing that you will see that the whole canvas is filled with smoke so we will need to make it blend with our image. Change its Blending mode and Opacity to the following:
- Blending mode: Soft Light
- Opacity: 30%
The result:
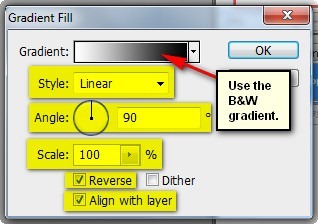
Next, let’s create a new Gradient adjustment layer to smoothen the effect of the “clouds”. Once its open, input the following:
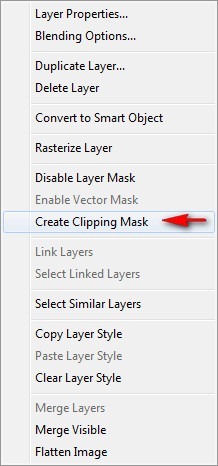
After hitting OK, right click on this Gradient adjustment layer and click on Create Clipping Mask.
After that, change the Opacity of the Gradient adjustment layer to the following:
The result should be similar to the following:
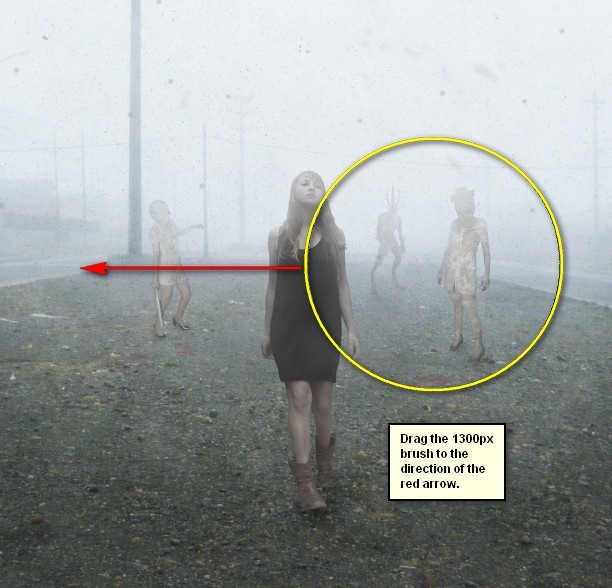
Now, we’re going to add more mist to our subjects. To start, let’s create a new layer (Ctrl/Cmd + Shift + N) above the Gradient adjustment layer that we just did. Name this layer to “Fog 2”. Activate the Brush tool (B) and then Reset the brushes.
With the brushes reset, input the following:
- Brush size: 1300px
- Hardness: 0%
- Opacity: 25%
- Flow: 100%
- #: ffffff
Now, let’s start painting!
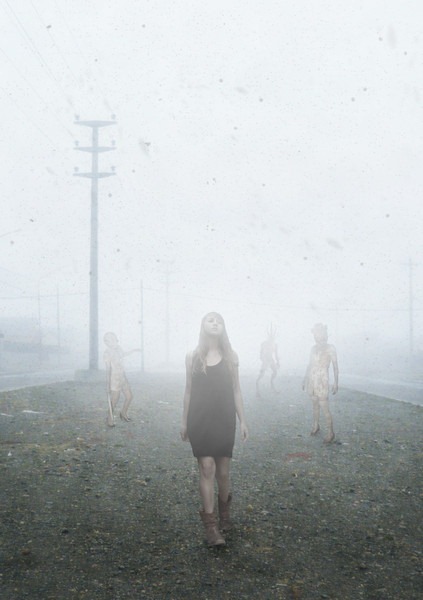
The result:
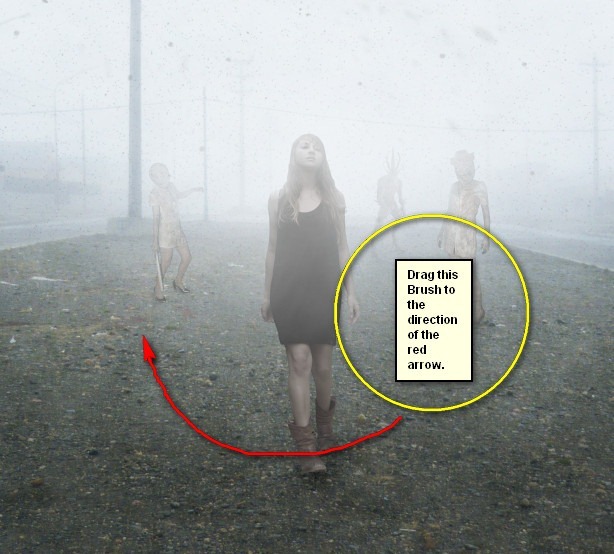
Next, let’s create Fog 3. To start, create a new layer (Ctrl/Cmd + Shift + N) and name it “Fog 3”. Activate the Brush tool (B) and then input the following:
- Brush size: 1000 px
- Hardness: 0%
- Opacity: 15%
- Flow: 100%
- #: ffffff
Now, let’s start painting:
The result should be similar to the following:
Now, with all those elements done, let’s now select all the layers that we created in this step and group (Ctrl/Cmd + G) them. Name this group to “FOG”.
Step 9: Create the Vignette
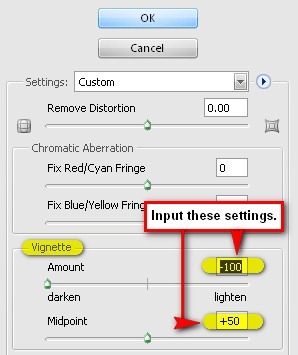
Now, we will learn how to create a vignette which will help enhance the focus on our subject. To start, go to the Menu bar and click on File > New and use the same settings we used to create our canvas. (Refer to Step 1). Take note, the background contents should be: WHITE Once it has been created, go to Filter > Distort > Lens Correction. Find the tab Vignette and use these settings:
- Vignette amount: -100
- Midpoint: +50
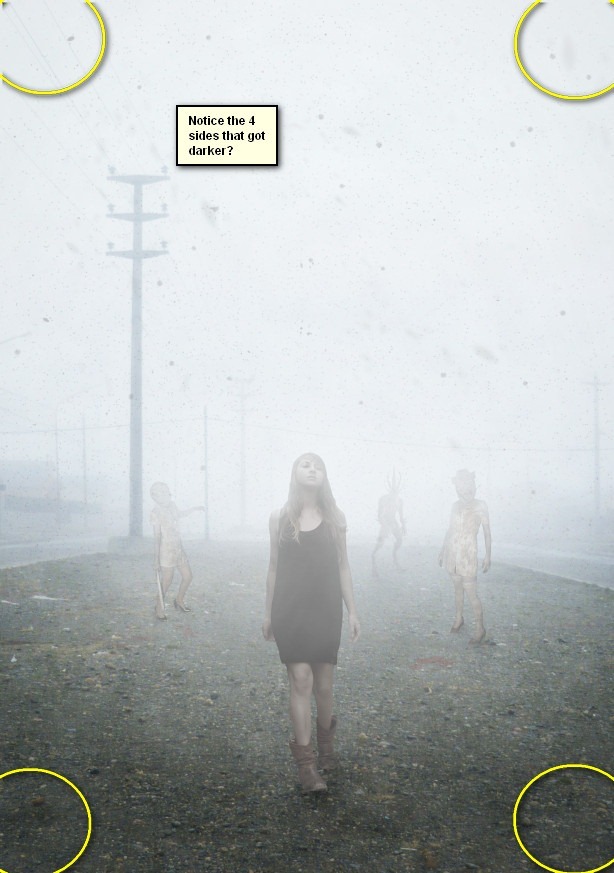
Now that that’s done, drag the vignette to our canvas using the Move tool (V) and put it on top of all the layers that we’ve created, and then set the following:
- Blending Mode: Multiply
- Opacity: 25%
- Flow: 25%
The result:
Step 10: Retouch
Now, we will be fixing the colors of the image to give it a more “cold” look. To start, let’s create a Solid Color adjustment layer from the “Create New Fill/Adjustment layer” button.
When it opens, click on the following:
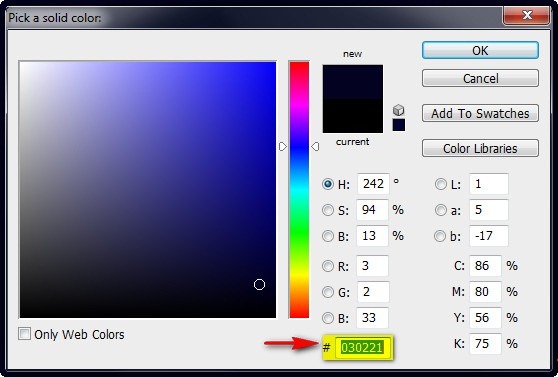
Input the following on the # field:
Now your whole canvas is covered with a dark blue color. We’ll need to make that blend with our image so change its Blending mode and Opacity to the following:
- Blending Mode: Exclusion
- Opacity: 40%
The result of that should be similar to this:
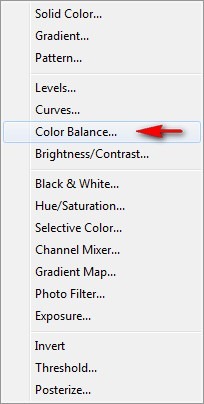
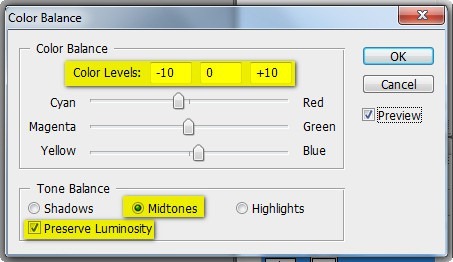
Next, let’s create a Color Balance adjustment layer.
When the Color Balance box opens, input the following:
- Color Levels: -10, 0, +10
- Tone Balance: Midtones
- Preserve Luminosity: Check
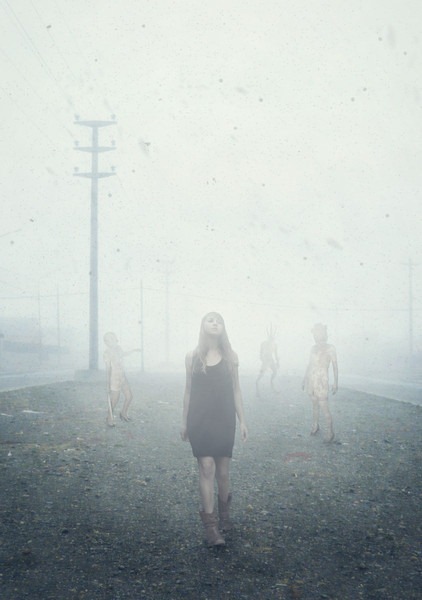
The result of that would be similar to this:
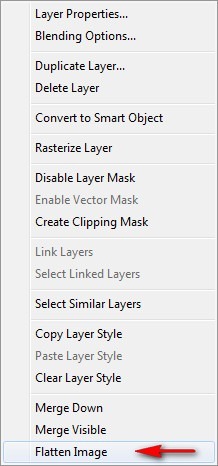
Now, that we’re done let’s compress all the layers for us to save it as one image. To do that, right click on any layer and then click on Flatten Image. See image below:
Step 11: Make the image glow
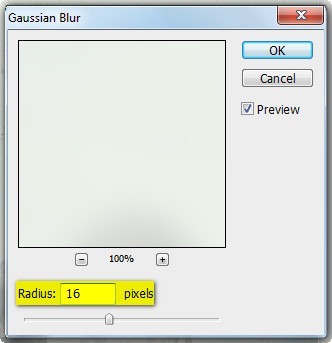
In this step, we will give the image a luminous effect to compliment the mist. Now, duplicate it (Ctrl/Cmd + J); click on the duplicated layer and then go to Filter > Blur > Gaussian Blur. Input the following:
After that, you’d see that your image is really blurry; so to make it glowing, change the Blending mode of the blurred (duplicated layer) to Lighten and set its opacity to 25%.
The result should be like this:

![image020[1] image020[1]](http://photoshoptutorials.ws/images/stories/fe3862fc252f_F0C/image0201.jpg)



![image021[1] image021[1]](http://photoshoptutorials.ws/images/stories/fe3862fc252f_F0C/image0211.jpg)





![image021[2] image021[2]](http://photoshoptutorials.ws/images/stories/fe3862fc252f_F0C/image0212.jpg)

![image083[1] image083[1]](http://photoshoptutorials.ws/images/stories/fe3862fc252f_F0C/image0831.jpg)
![image084[1] image084[1]](http://photoshoptutorials.ws/images/stories/fe3862fc252f_F0C/image0841.jpg)

![image004[1] image004[1]](http://photoshoptutorials.ws/images/stories/fe3862fc252f_F0C/image0041.jpg)
Keine Kommentare:
Kommentar veröffentlichen