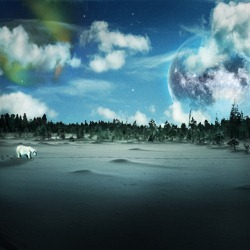
In this tutorial we will make a winter fantasy scene. Our aim is a dreamy, soft atmosphere and a balanced composition. I will be sharing with you some advanced channel masking techniques, selection tips and a quick peek into advanced blending. I hope you will enjoy this tutorial as much as I enjoyed making it.
Preview of Final Results
![image002[1] image002[1]](http://photoshoptutorials.ws/images/stories/4e87332e2856_11009/image0021.jpg)
Surreal Arctic Scene Photoshop Tutorial
Resources
- Sunset in Finland
- Full Moon Luc Viatour
- Sky panorama with clouds
- Aurora Borealis Brushes
- Oso Polar 1
Step 1
Open the image "Sunset in Finland" and resize it to: 2000 X 1333 pixels. This step is optional but for the needs of illustrating a tutorial this size will be sufficient.![image003[1] image003[1]](http://photoshoptutorials.ws/images/stories/4e87332e2856_11009/image0031.jpg)
Step 2
We will remove the sky by using a channel mask. Go to channels palette and make a copy of the red channel. You can do that by right clicking and selecting "Duplicate channel". With only the red channel copy selected go to Image > Apply Image. Use "vivid light" blending mode at 100% opacity.![image004[1] image004[1]](http://photoshoptutorials.ws/images/stories/4e87332e2856_11009/image0041.jpg)
Step 3
Select the lower part of the red channel copy like shown in the image below. Press D to set default background and foreground colors then press ctrl+Backspace to fill the selection with black.![image005[1] image005[1]](http://photoshoptutorials.ws/images/stories/4e87332e2856_11009/image0051.jpg)
Step 4
Select the upper part of the red channel copy and press alt+Backspace to fill the selection with white.![image006[1] image006[1]](http://photoshoptutorials.ws/images/stories/4e87332e2856_11009/image0061.jpg)
Step 5
Press ctr+D to deselect. Choose a round brush with the following setting :- Size: 200 px
- Hardness: 0%
![image007[1] image007[1]](http://photoshoptutorials.ws/images/stories/4e87332e2856_11009/image0071.jpg)
Step 6
Press ctrl+I to revert the channel. Your red channel copy should look like the image below. This will be our selection mask. In a selection mask white reveals and black conceals.![image008[1] image008[1]](http://photoshoptutorials.ws/images/stories/4e87332e2856_11009/image0081.jpg)
Step 7
Ctrl + click red channel copy to load channel as a selection, pres ctrl+2 to select the RGB composite image. Now press ctrl+J to make a new layer from the selection. Voila, you made a tricky selection using channel masks. Now you can turn off visibility of the background layer. Name the new layer foreground.![image009[1] image009[1]](http://photoshoptutorials.ws/images/stories/4e87332e2856_11009/image0091.jpg)
Step 8
Make a new fill layer by going to Layer > New Fill Layer > Solid Color. Use this color to fill the layer: #434952. Right click the fill layer and choose "Create clipping mask". Change the layer mode to color. This will remove the orange color cast from our image.![image010[1] image010[1]](http://photoshoptutorials.ws/images/stories/4e87332e2856_11009/image0101.jpg)
Step 9
Now we will add some cold color to our foreground. Add a photo filter adjustment layer by going to Layer > New adjustment layer > Photo Filter. See that this adjustment layer it's clipping our foreground layer and it sits above our previous adjustment layer. Use following settings:- Color: #bfd500
- Density: 93%
- Preserve Luminosity: checked
![image011[1] image011[1]](http://photoshoptutorials.ws/images/stories/4e87332e2856_11009/image0111.jpg)
Step 10
Press D to choose default colors then press G to choose the gradient tool. Be sure that in the gradient option bar it's selected "Foreground to Background". Holding the Shift key drag the gradient like shown in the image below.![image012[1] image012[1]](http://photoshoptutorials.ws/images/stories/4e87332e2856_11009/image0121.jpg)
Step 11
Add another clipped Photo Filter adjustment layer above our previous adjustment layer and use the following settings:- Color: #08eefc
- Density: 93%
- Preserve Luminosity: checked
![image013[1] image013[1]](http://photoshoptutorials.ws/images/stories/4e87332e2856_11009/image0131.jpg)
Step 12
Add a clipped Color Balance adjustment layer and use the settings shown in the image below. Change the blending mode to "Soft Light" and opacity to 44%.![image014[1] image014[1]](http://photoshoptutorials.ws/images/stories/4e87332e2856_11009/image0141.jpg)
Step 13
Select Foreground layer and all the layers above then press ctrl+G to group them. Name this group Foreground.![image015[1] image015[1]](http://photoshoptutorials.ws/images/stories/4e87332e2856_11009/image0151.jpg)
Step 14
Go to File > Place and open " Sky panorama with clouds " . Drag the handle points and position him until it look like in the image below then press Enter. Be sure to put this layer below the Foreground group. Rename it "Sky".![image016[1] image016[1]](http://photoshoptutorials.ws/images/stories/4e87332e2856_11009/image0161.jpg)
Step 15
Make a new gradient map adjustment layer and make sure it's clipping our sky layer. Use settings like shown in the image below. For the foreground color choose black and for the background color choose # 0ef0f8. Change the blending mode to "Soft Light" and lower the opacity to 40%.![image017[1] image017[1]](http://photoshoptutorials.ws/images/stories/4e87332e2856_11009/image0171.jpg)
Step 16
Make a new Curves adjustment layer and make it's clipping the sky layer. Use settings like shown in the image below. Leave the blending mode set to normal.![image018[1] image018[1]](http://photoshoptutorials.ws/images/stories/4e87332e2856_11009/image0181.jpg)
Step 17
Select the sky layer and it's clipping layers then press ctrl+G to group them. Name this group Sky. You can select multiple layers by holding Ctrl then clicking the layers you want to select.![image019[1] image019[1]](http://photoshoptutorials.ws/images/stories/4e87332e2856_11009/image0191.jpg)
Step 18
Open "Full Moon Luc Viatour" file. Select the moon using the round marquee selection tool, press ctr+C to copy it then paste it in our document. Place this layer between the sky and foreground layer. Name this layer Moon. *Tip* When you need to make a tricky selection like objects in perspective or ellipses : 1. Draw a selection using marquee tool . 2.Press Q to enter quick mask mode. 3. Press Ctrl+T to transform your selection. Now you can adjust the selection to your heart desire using skew, perspective etc. 4. Press enter to apply transformation and press Q to exit Quick Mask mode. In order for this to work properly double click the quick selection icon from our toolbar on the left and choose "selected areas" option.![image020[1] image020[1]](http://photoshoptutorials.ws/images/stories/4e87332e2856_11009/image0201.jpg)
Step 19
Open the advanced blending mode of the layer moon by double clicking it. Use the settings shown in the image below.
Step 20
Position the moon like shown in the image below. Add a layer mask by clicking on the button "Add Layer mask" at the bottom of the layers panel.![image022[1] image022[1]](http://photoshoptutorials.ws/images/stories/4e87332e2856_11009/image0221.jpg)
Step 21
Select layer mask. Choose gradient tool and select reflected gradient. Press D to set default colors. Drag from middle of the moon to bottom. Now the top and the bottom of the moon blend seamlessly with the sky. Select a brush tool with the following settings:- Size: 100 px
- Hardness: 0%
![image023[1] image023[1]](http://photoshoptutorials.ws/images/stories/4e87332e2856_11009/image0231.jpg)
Step 22
Press ctrl+shift+N to make a new layer and position it above our moon layer. Press shift+F5 to fill it and choose 50% gray. Then go to Filter > Noise > Add noise and use a setting of 4%, check Gaussian and monochromatic. Press ctrl+M to open curves adjustment and drag the black point and the white point towards each other, so they will meet in the middle. Now we have a black sky with white stars. If you cannot see the stars you are zoomed too far out. This is because Photoshop dumps "unimportant" pixels when it zooms out, but it is only a temporary thing. When you save the file the stars will be there. You can also pres ctrl+1 to zoom to the actual size of the image and you will see the stars.![image024[1] image024[1]](http://photoshoptutorials.ws/images/stories/4e87332e2856_11009/image0241.jpg)
Step 23
Name this layer stars and change it's blend mode to screen. Now black disappears and only white stars are visible. Add a layer mask and select a brush with these settings:- Size: 100 px
- Hardness: 0%
![image025[1] image025[1]](http://photoshoptutorials.ws/images/stories/4e87332e2856_11009/image0251.jpg)
Step 24
Change the brush settings to the following:- Size: 6 px
- Hardness: 100%
![image026[1] image026[1]](http://photoshoptutorials.ws/images/stories/4e87332e2856_11009/image0261.jpg)
Step 25
Now we will create an aurora borealis. Using Edit > Preset Manager load aurora borealis brushes. Make a new layer and name it "Aurora". Place him above the group Sky. Choose brush 4 and increase size to 1000 px. Choose color #da9c1c as foreground color and click once to make an aurora.![image027[1] image027[1]](http://photoshoptutorials.ws/images/stories/4e87332e2856_11009/image0271.jpg)
Step 26
Double click layer Aurora to enter advanced blending mode. Use settings like shown in the image below. Notice the blend if sliders. By dragging those little triangles from underlying layer to the left we force white colors from the layer below us to "pop" in our current layer. We will make the white of the clouds to show through aurora, a task difficult to accomplish using basic selection and masking tools.To split the triangles hold Alt key then drag them.
Step 27
Open photo "Oso Polar 1". Make a selection of the polar bear using your favourite selection tool. I used quick selection tool. Don't worry about the rough edges as we will address this issue later.![image029[1] image029[1]](http://photoshoptutorials.ws/images/stories/4e87332e2856_11009/image0291.jpg)
Step 28
Press ctrl+C to copy the selection then go to our open document and press ctrl+V to paste it. Place this layer on top of the layers and name it Polar Bear.![image030[1] image030[1]](http://photoshoptutorials.ws/images/stories/4e87332e2856_11009/image0301.jpg)
Step 29
Ctrl+click layer Polar Bear to select it then press Ctrl+R to open refine edge window. You can use whatever settings make your bear look more realistic or you can use settings shown below.![image031[1] image031[1]](http://photoshoptutorials.ws/images/stories/4e87332e2856_11009/image0311.jpg)
Step 30
Delete the old layer bear and rename the new one Polar Bear. Add a clipped color balance adjustment layer and use settings like shown below. Change the color balance blending mode to color and lower the opacity to 70%.
Step 31
Select Polar Bear layer. Press Ctrl+T to enter free transform. Hold shift and drag one of the corner points towards center to resize the layer proportionally. While in Free Transform mode right click and choose Flip Horizontal. Place the bear like shown below.![image033[1] image033[1]](http://photoshoptutorials.ws/images/stories/4e87332e2856_11009/image0331.jpg)
Step 32
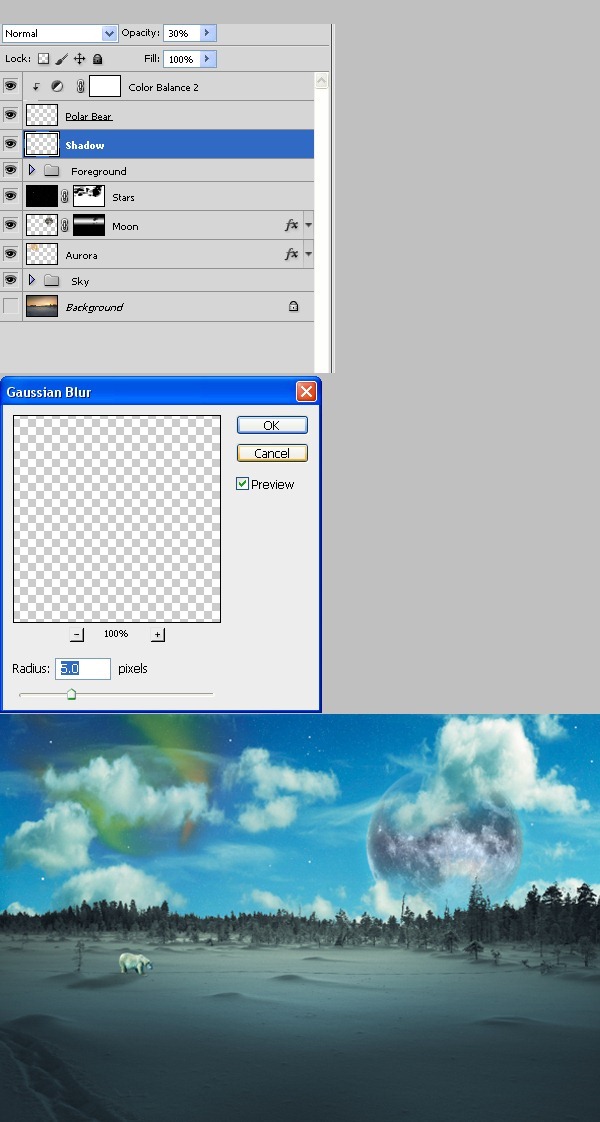
We will make the shadow of the bear so he doesn't look fake. Select layer Polar Bear and press ctrl+J to make a duplicate. Rename this layer shadow and move it below Polar Bear layer. Our color balance layer it's not clipping our layer Polar Bear anymore so hold alt and click between the Color Balance layer and Polar Bear layer. Press D to set default colors . Now press alt+shift+Backspace to fill opaque pixels with black. You probably won't see any change because the shadow layer is below our polar bear layer. Press ctrl + T to free transform our shadow layer. Drag the center point to lower left corner point. Transform the shadow like shown below.![image034[1] image034[1]](http://photoshoptutorials.ws/images/stories/4e87332e2856_11009/image0341.jpg)
Step 33
Apply Filter > Blur > Gaussian blur to our shadow. Then choose a brush with following settings:- Size: 9px
- Hardness: 0%
Step 34
Add a layer mask to Shadow layer. Press D to choose default colors. Press G to choose gradient tool. Choose Foreground to Background. Click on the layer mask to select it. Press X to switch Background and Foreground colors. Drag our gradient tool to blend the topmost of the shadow with the environment. Change the shadow layer blending mode to Multiply.![image036[1] image036[1]](http://photoshoptutorials.ws/images/stories/4e87332e2856_11009/image0361.jpg)
Step 35
Let's make the bear's tracks. Make a new layer and place it on top of the layers. Rename the layer tracks. Choose from the brush presets Chalk 17 px and lower brush opacity to 50%. Tap with the brush behind the bear on the snow like shown in the image below.![image037[1] image037[1]](http://photoshoptutorials.ws/images/stories/4e87332e2856_11009/image0371.jpg)
Step 36
Apply a Filter > Blur > Gaussian blur to Tracks layer. Lower Tracks layer opacity to 60%. Hold ctrl and click Tracks layer, Polar Bear layer, Shadow layer and Color Balance layer to select them. Press ctrl+G to group them. Rename the group Polar Bear.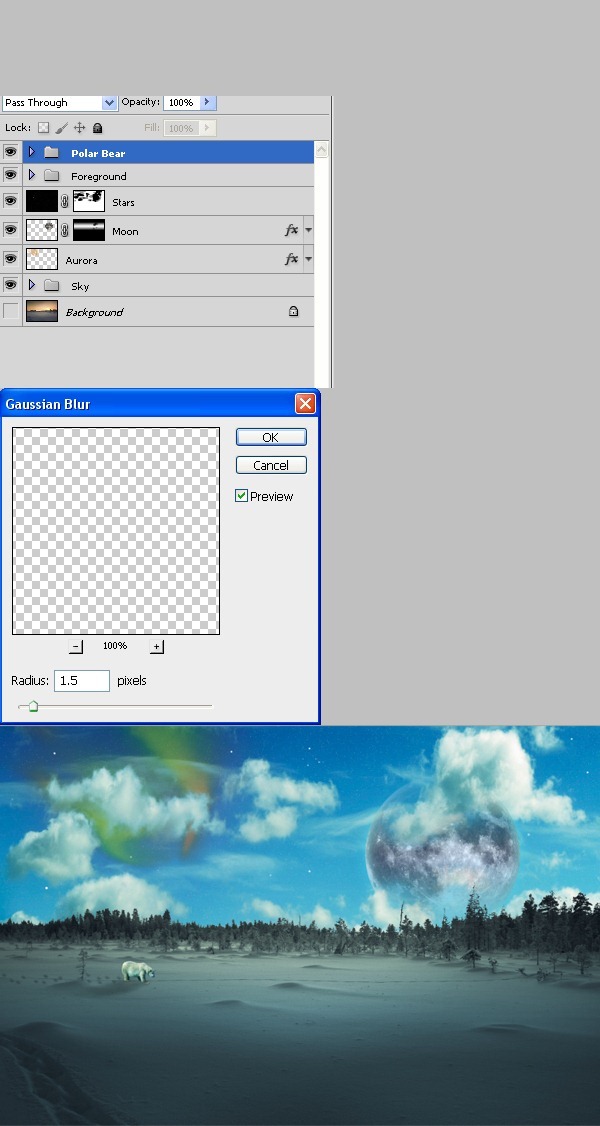
Step 37
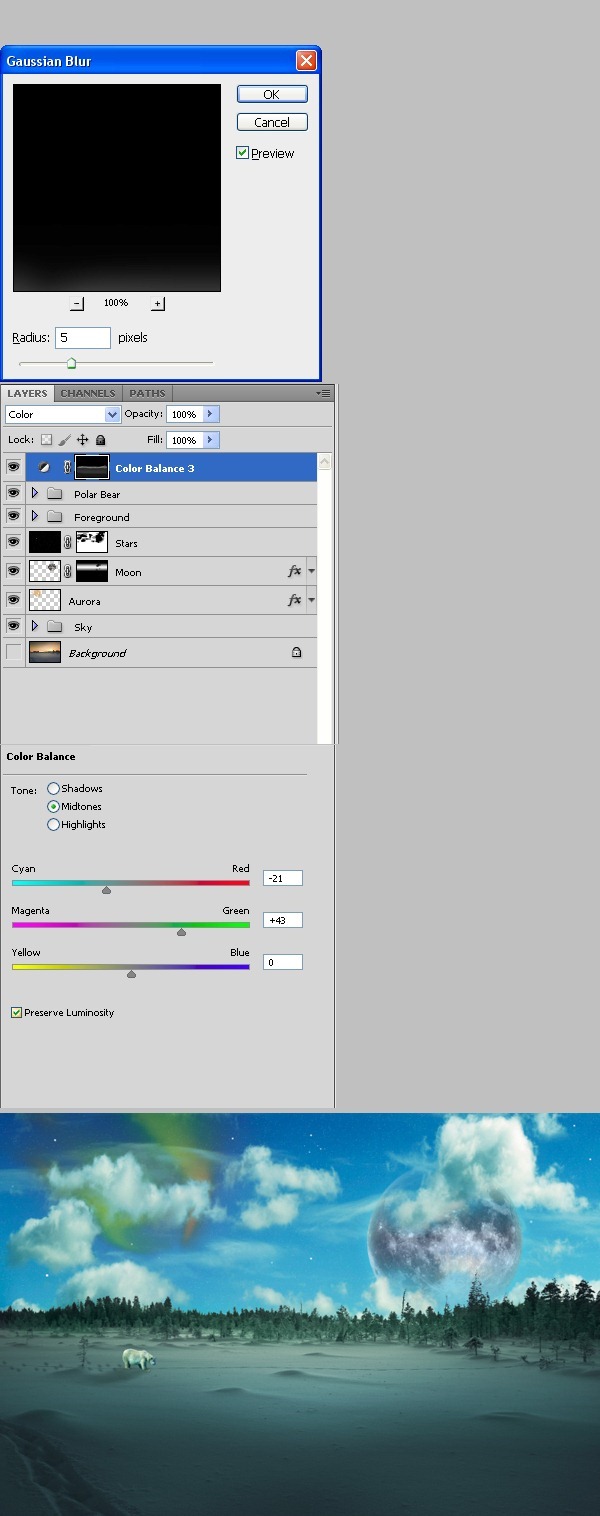
Now we will add some color to our image. Create a Color Balance adjustment layer with settings like shown below. Choose a round brush with following settings:- Size: 60px
- Hardness: 0%
Step 38
We will lower the saturation of the image. Make a new Hue/Saturation layer and place it above our layers. Use the settings like shown bellow. Choose a round soft brush and lower it's opacity to 90%. Select layer mask , press D to set default colors then pres X to invert them. Tap randomly in the trees area then brush gently over aurora , moon and bear. Lower the brush opacity to 50% and increase brush size to 200 px. Brush once or twice in wide strokes the area in front of the trees but don't go to far, leave the lower third of our image unchanged. Apply Filter > Blur > Gaussian Blur.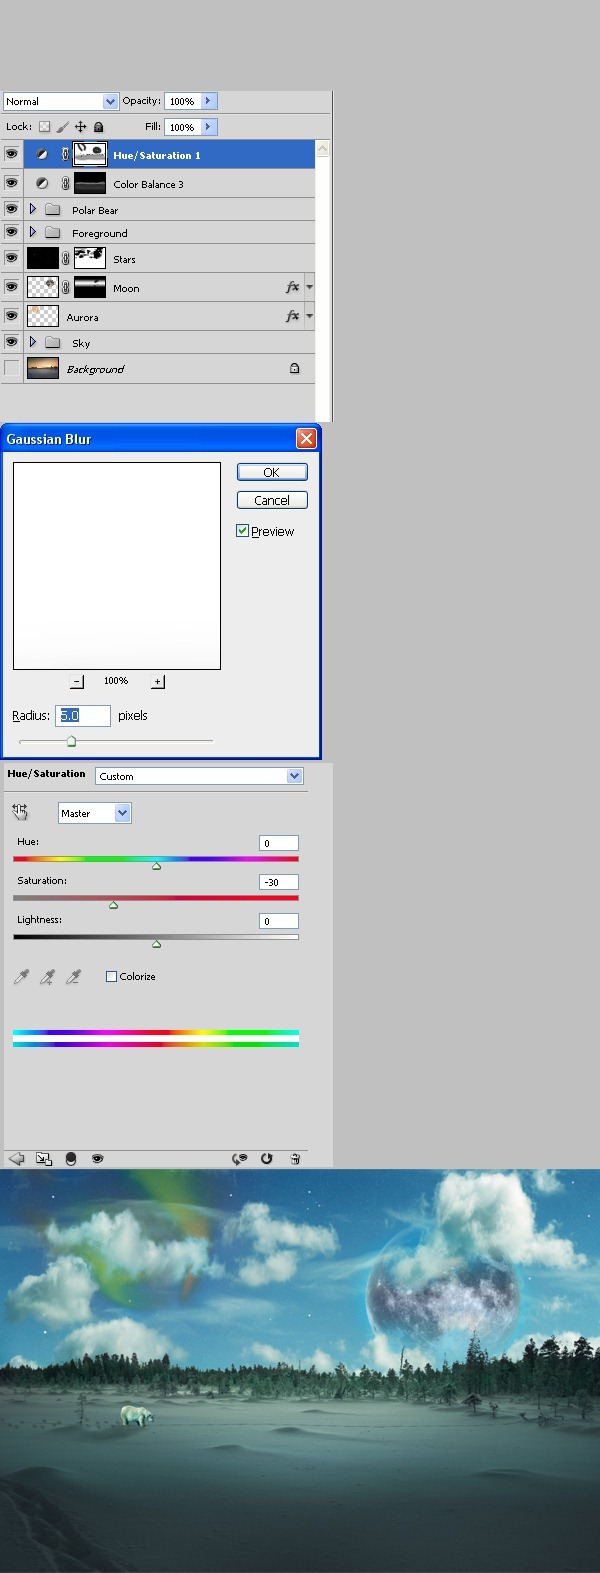
Step 39
Now we will make our image more interesting by adding some light variation. Add a curves adjustment layer and place it above our layers. Use the settings shown below. Click layer mask and press Ctrl+I to invert the mask. Choose white as foreground color and select a soft round brush. Lower it's opacity to 90% and brush randomly in the trees area. Try to leave the snow and sky unchanged. Also brush gently over the polar bear. Lower the brush opacity to 70% and increase the brush size. Brush randomly over the aurora and the moon. Also brush randomly across the white of the clouds. Try to leave the sky unchanged. Apply Filter > Blur > Gaussian blur.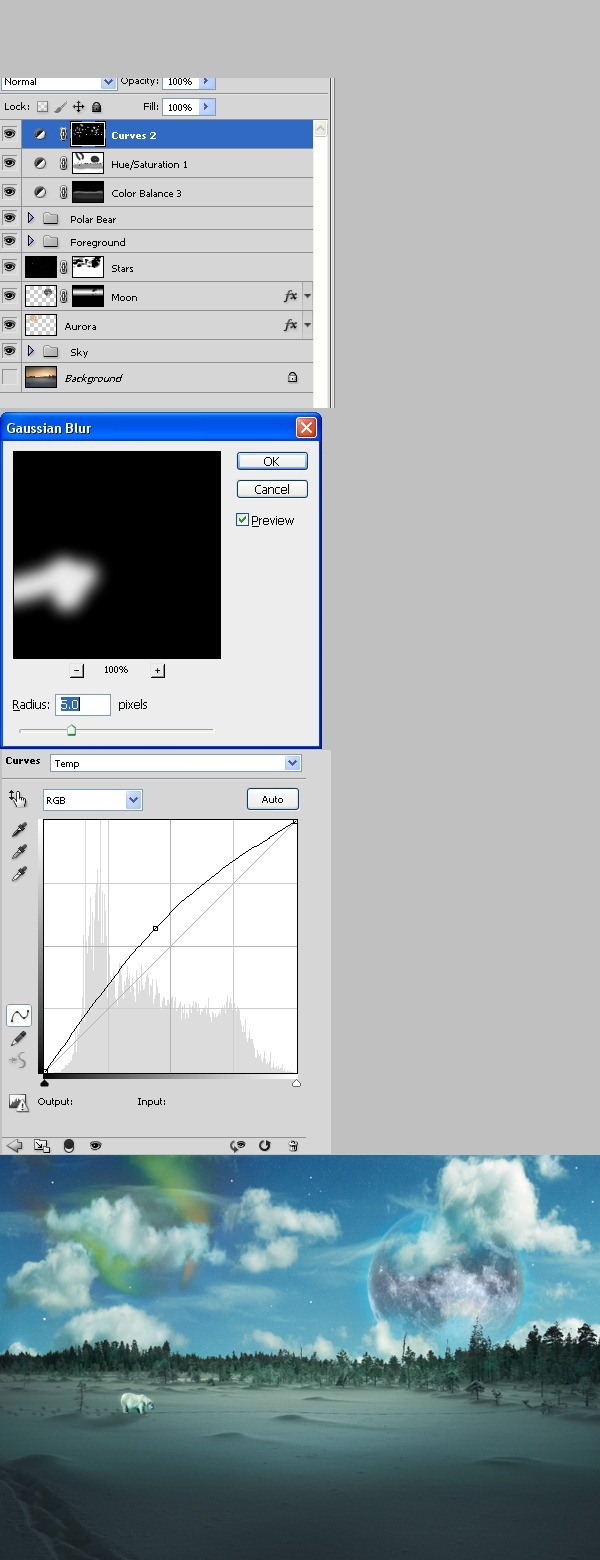
Step 40
Press ctrl+J to duplicate our curves layer. Make sure you have black as background color and press ctrl+Backspace to fill the mask with black. Choose a soft round brush and choose white as foreground color. Lower the brush opacity to 50% and increase size to 500px. Brush a couple of times gently over the snow. Lower the brush opacity and size and repeat. We basically want to make pools of soft white light over the snow area. Be subtle and don't overdo. Then apply Filter > Blur > Gaussian Blur. Use whatever settings make your strokes blend seamlessly.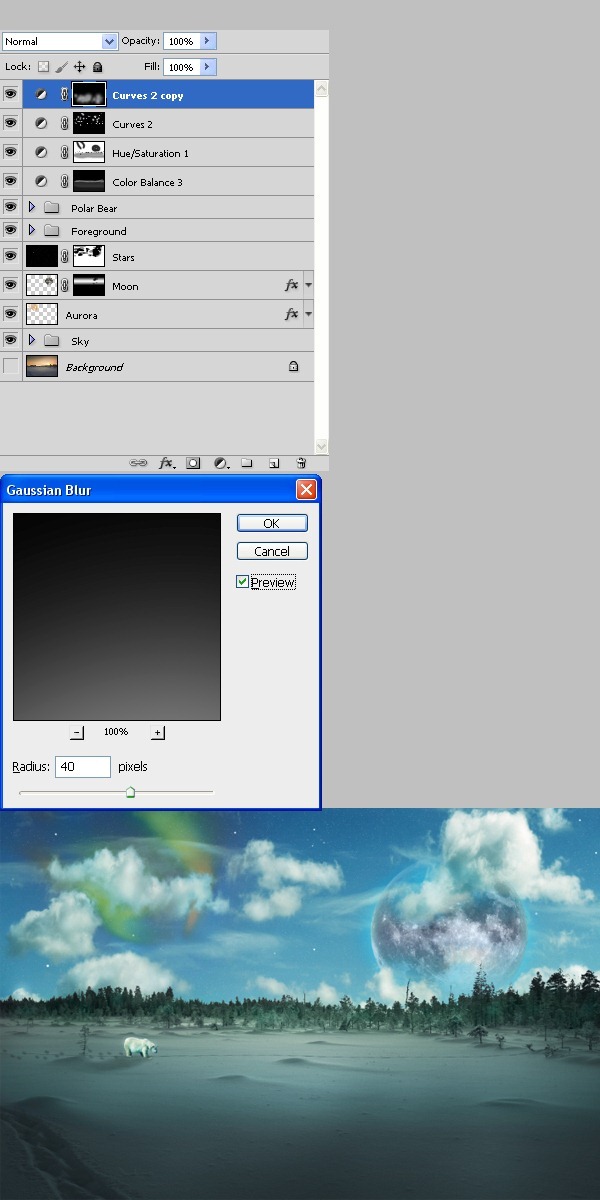
Step 41
Add a new curves adjustment layer and place it above our layers. Use the settings shown below. Change the layer blending mode to Luminosity and lower opacity to 50%. This will add some contrast to our image.
Step 42
Now we will use an old composition trick to direct viewer's eye toward the center of our image: a vignette. Make a new layer and place it above our layers. Change it's blending mode to multiply and set the opacity to 30%. Choose a large soft round brush and set it's opacity to 50%. Brush gently the sides and the top of the image a couple of times. Brush less on the bottom of the image as it is already dark.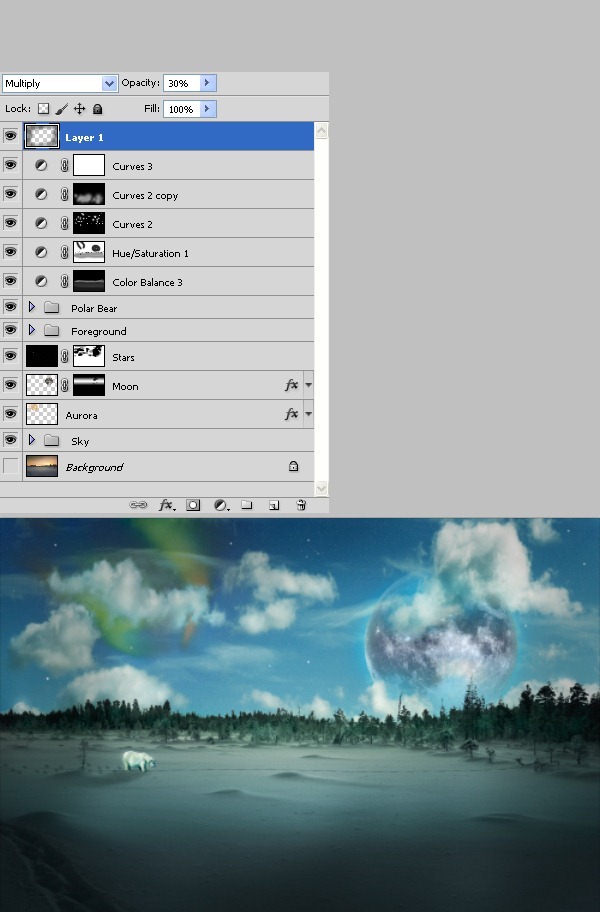
Step 43
Add a gradient map adjustment layer. Change the blend mode to luminosity and decrease opacity to 70%.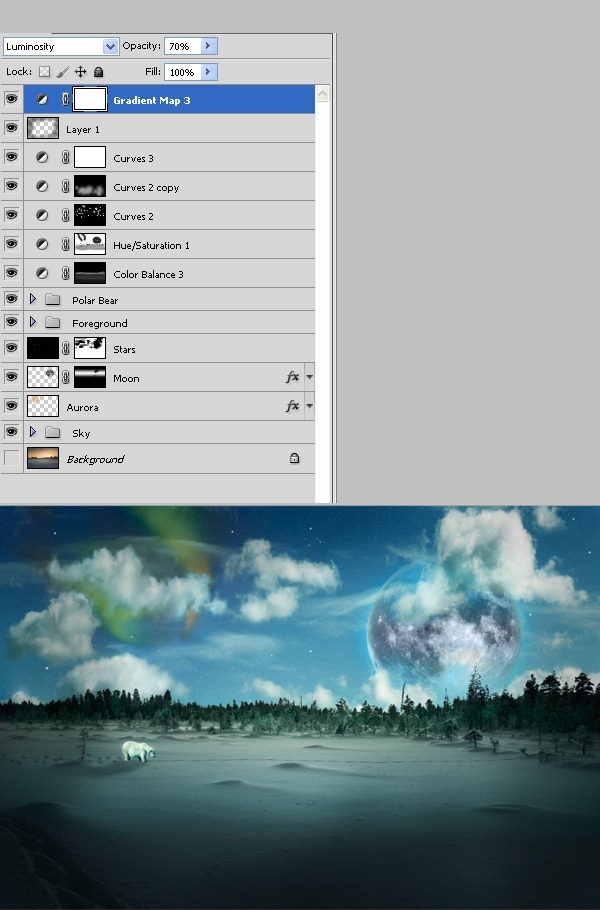
Step 44
Let's give our image a dreamy, mysterious look. Make sure the topmost of your layer is selected and pres ctrl+alt+shift+E. This will combine all our visible layer into a new layer while leaving the rest of the layers unchanged. Apply Filter > Blur > Gaussian Blur then change the layers blending mode to overlay and lower it's opacity to 40%.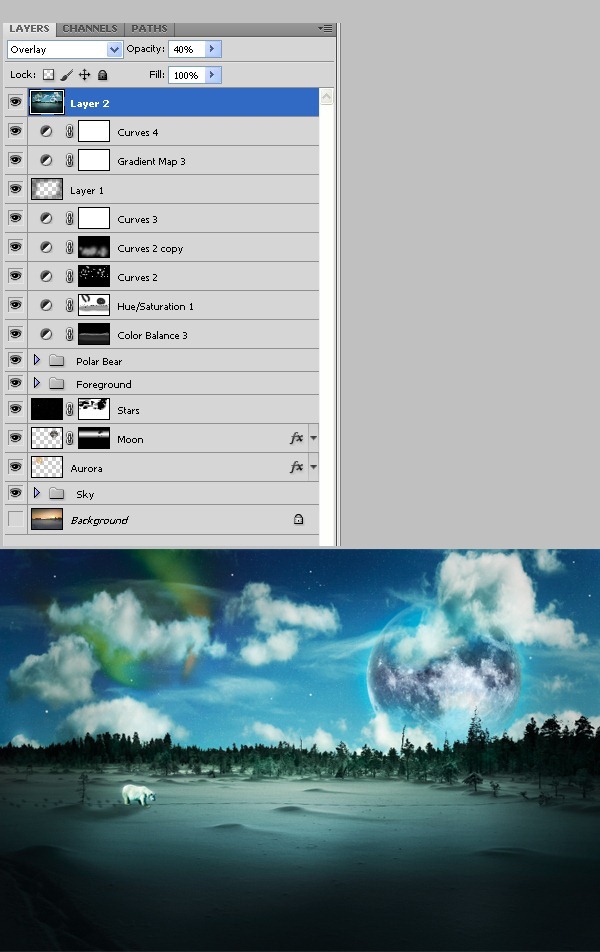
Final Results
![image047[1] image047[1]](http://photoshoptutorials.ws/images/stories/4e87332e2856_11009/image0471.jpg)
Keine Kommentare:
Kommentar veröffentlichen