
Hello photoshoppers! We occasionally need a home icon for our design project. Commonly, a designer draw with Illustrator, but this time let's create a mac style home icon with Photoshop. The techniques used will be about making shape and playing with layer style. It's not difficult to make this sweet icon. I hope you will get inspiration after following this tutorial.
Preview of Final Results
Download the PSD
Mac Style Home Icon Photoshop Tutorials
Tutorial Details
- Program: Adobe Photoshop CS4
- Difficulty: Beginner - Intermediate
Step 1 - Creating New Document.
Create a new document (Cmd/Ctrl +N) with these setting:.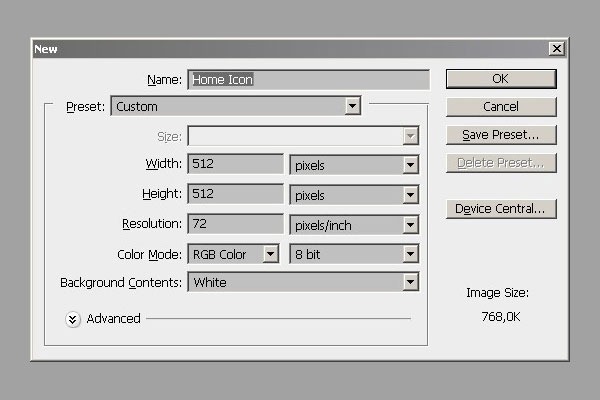
Step 2 - Creating Shape For Roof.
Activate rounded rectangle tool . On the option bar, set to shape layer, with 20 px radius, set color to #a2a2a2. Create a shape.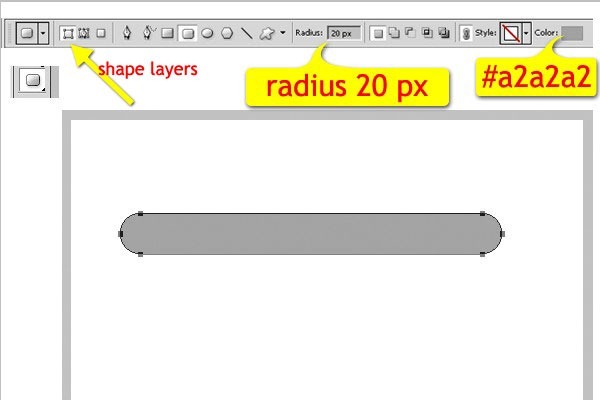
Step 3 - Modifying Path.
Activate Convert Point Tool. And click on these points shown below to convert them into angles.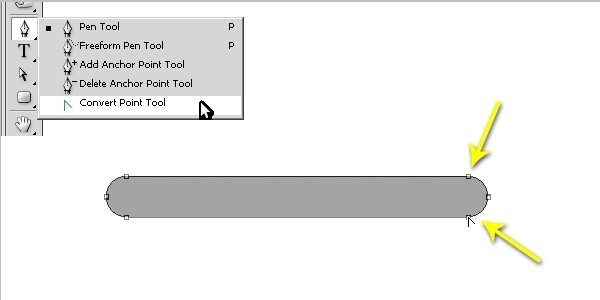
Step 4 - Modifying Path Again.
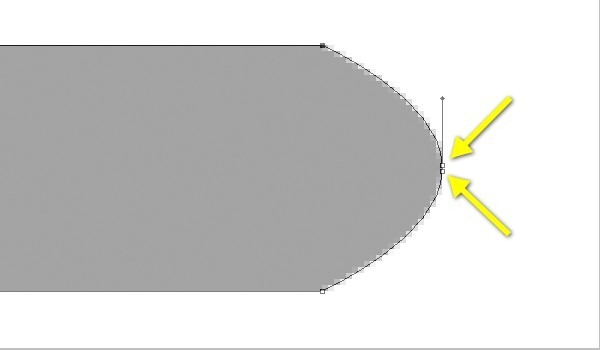
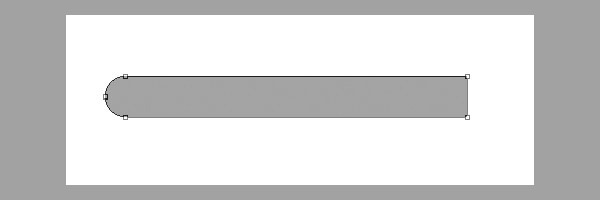
With pen tool and its "Auto Add/Delete", delete the anchor points below.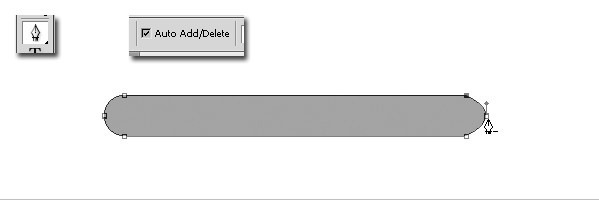
Step 5 - Duplicating Path.
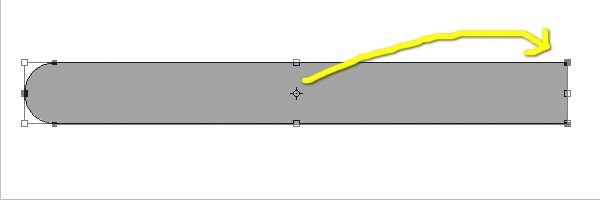
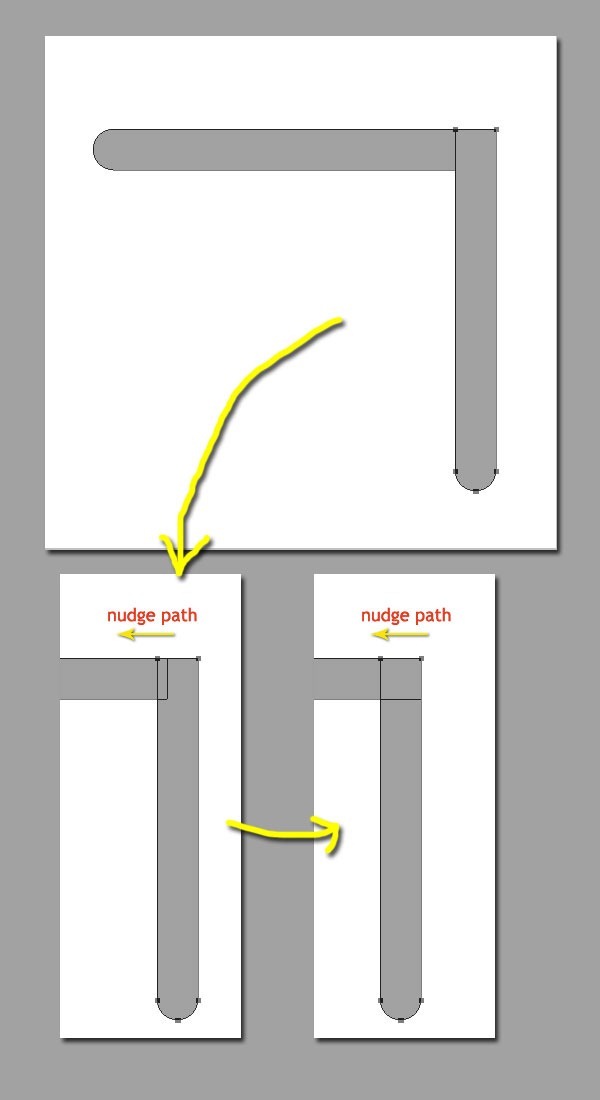
Use "Ctrl/Cmd + C" to copy path, then paste path "Ctrl/Cmd + V".Now we have two path in one layer. And then we'll make them into a 90 degree angle. Use "Ctrl/Cmd + T", and move the center of transform control to top right corner.
Step 6 - Preparing for Highlight (Duplicating Path and Scaling Down).
Now, we need to duplicate the layer with "Cmd/Ctrl + J". And name it "highlight". Then transform the paths on this new layer. Hit "Cmd/Ctrl + T" to show transform control. To get easier transforming, we can use Alt and Shift key. Scale down horizontally first, an then scale down vertically. Just like this.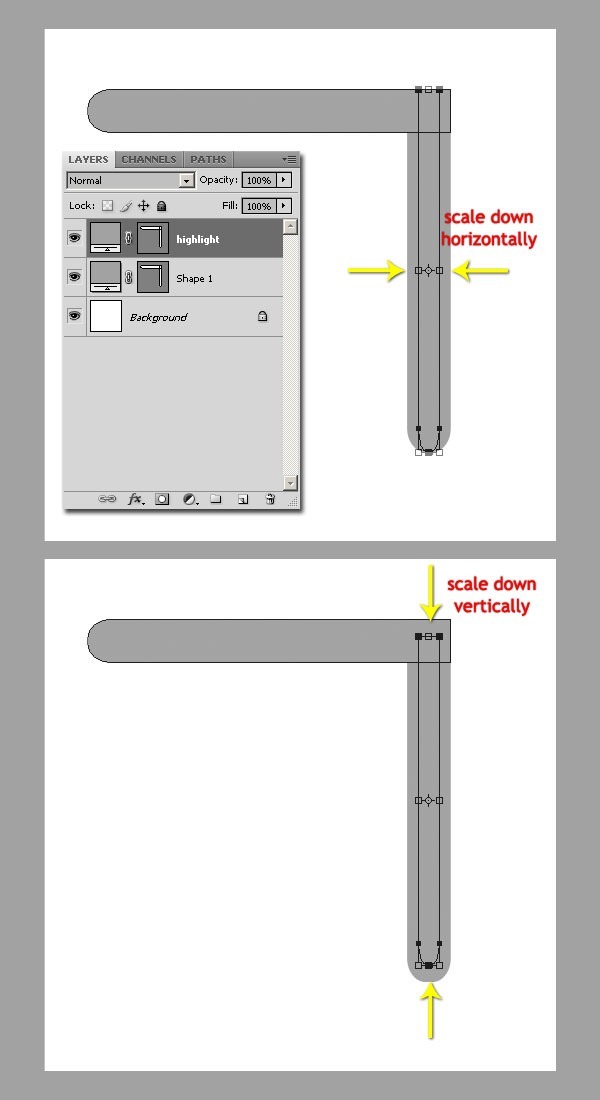
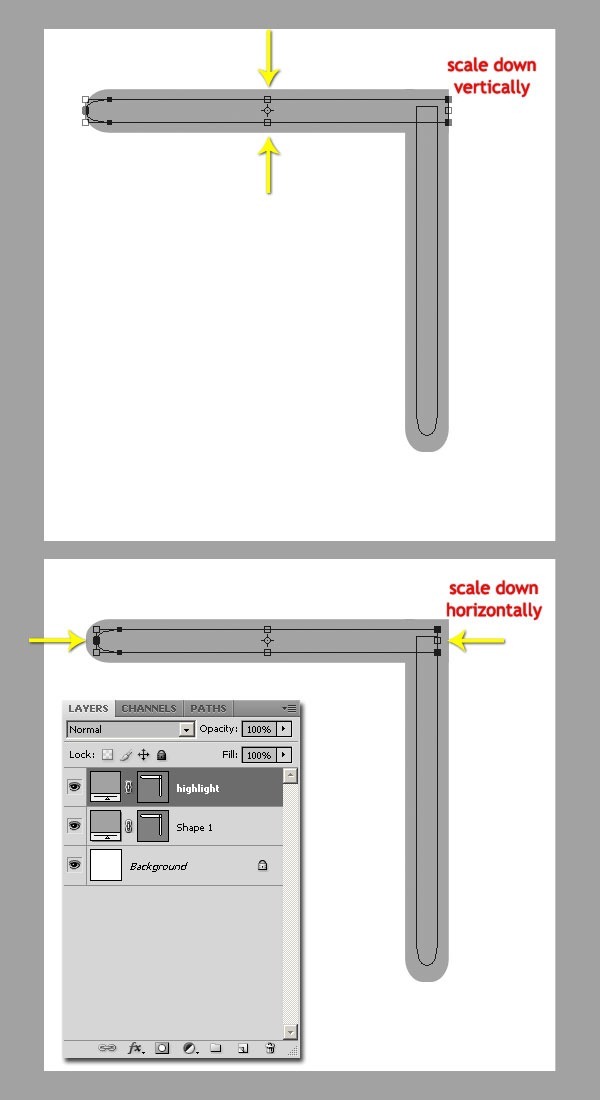
Step 7 - Rasterizing.
On the layer pallette, right click on "highlight" and select "Rasterize Layer". Or we can access it on Menu Layer > Rasterize > Shape.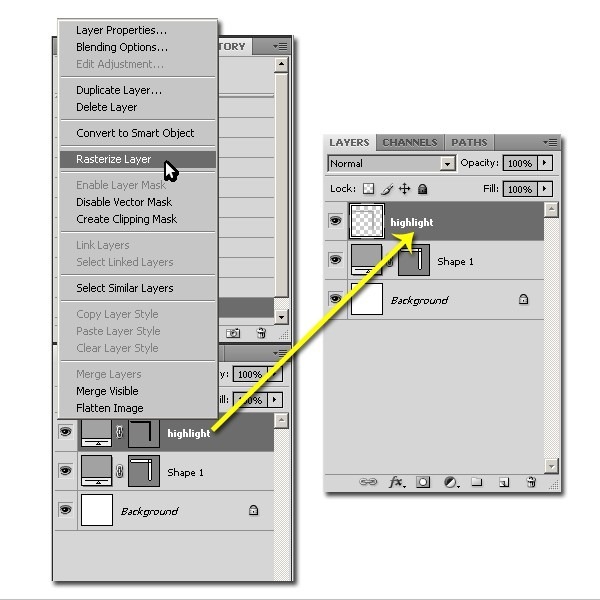
Step 8 - Selection
On layer palette, Ctrl + Click on "highlight" layer thumbnail to load selection. Then click menu Select > Modify > Feather or use "Shift + F6". Give 10 pixels radius.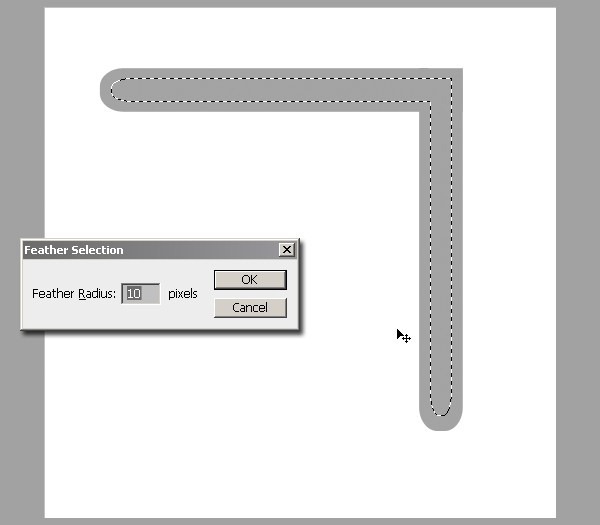
Step 9 - Filling with White.
Hit "D" on keyboard to set default color. "Cmd/Ctrl + Delete" to fill the selection with background color (white).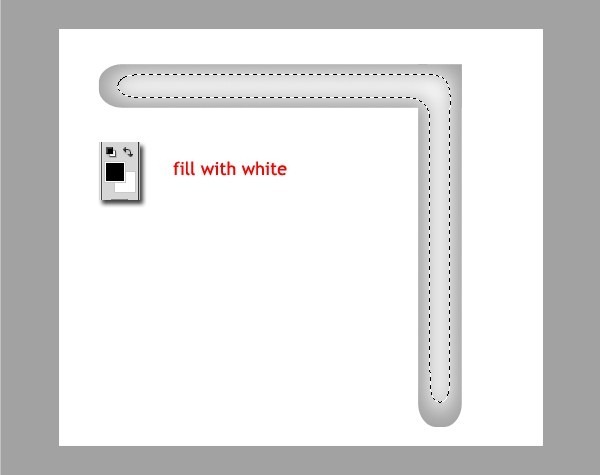
Step 10 - Make it Smoother.
Hit "Cmd/Ctrl + D" to deselect. Then add "Gaussian Blur" onto this highlight. Click Filter > Blur > Gaussian Blur and give 5 pixels. Then reduce the opacity layer to 50%. So it become smoother. But, the Gaussian Blur may increase its size. So make it into clipping mask to the lower layer. Just hit "Cmd + Opt + G" / "Ctrl + Alt + G". The highlight will be inside the shape of roof.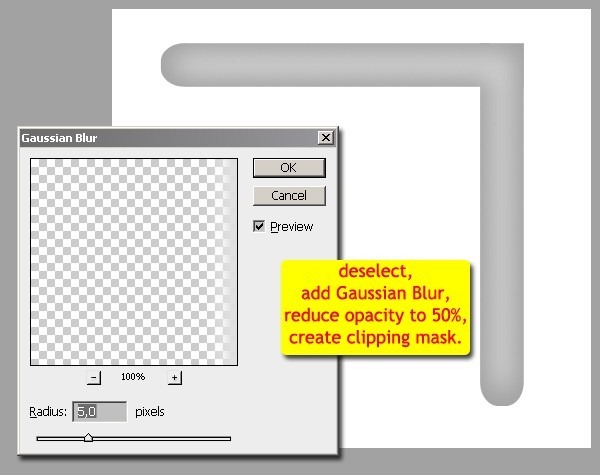
Step 11 - Rotating -45º
Select both layers at once ("highlight" and "shape 1"). Press "Cmd/Ctrl + T" and rotate -45º. Use "Shift" for easier rotating.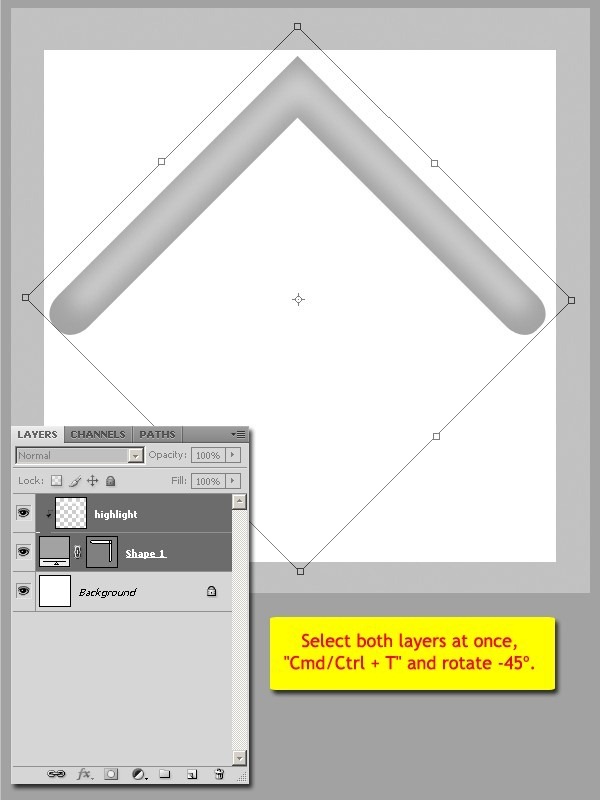
Step 12 - Adding Layer Style.
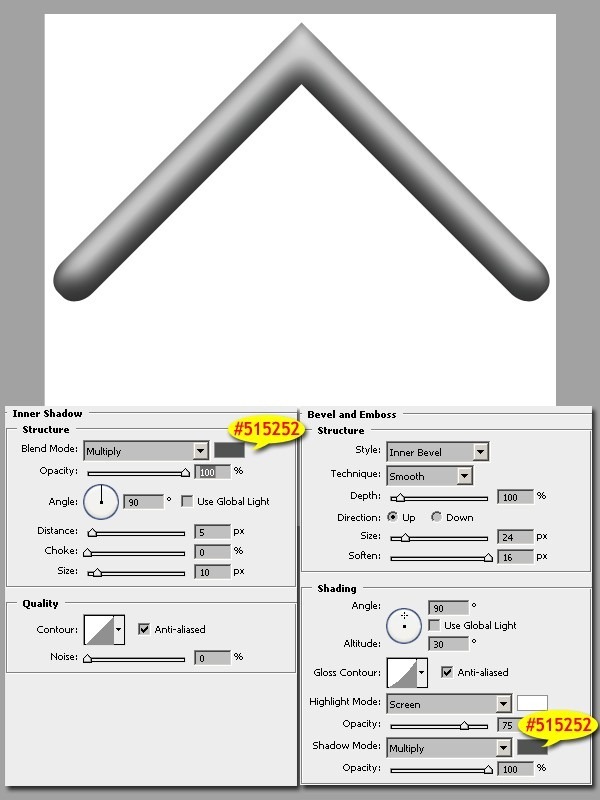
Add layer style onto shape layer.Inner Shadow
- Blend Mode : Multiply
- Set the shadow color to #515252
- Opacity : 100%
- Angle : 90º
- Distance : 5 px
- Choke : 0%
- Size : 10 px
- Style : Inner Bevel
- Technique : Smooth
- Depth : 100%
- Direction : Up
- Size : 24 px
- Soften : 16 px
- Shadow Mode : Multiply
- Set the shadow color to #515252
- Shadow opacity : 100%
Step 13 - Creating Shape Again.
With Rectangle Tool, create shape above background. And the color setting is #677479. And don't forget to use "Shift" to make a square rectangle.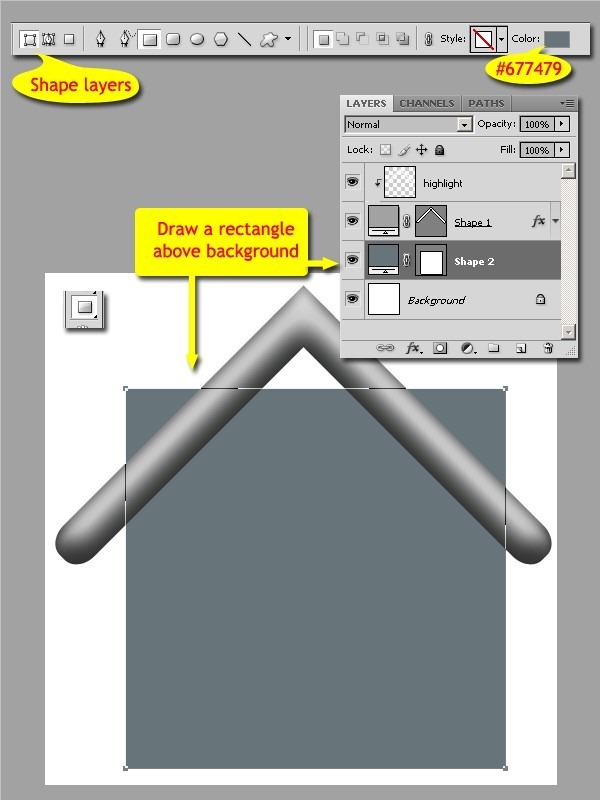
Step 14 - Rotating, Scaling and Placing.
Rotate the new shape, scale and place it proportionally.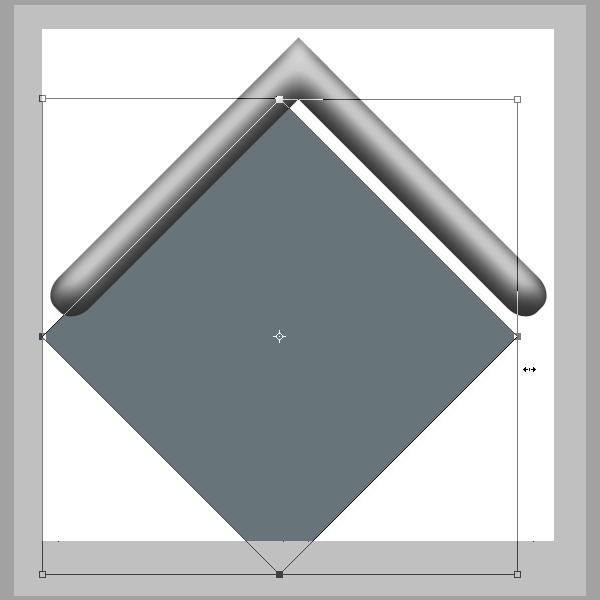
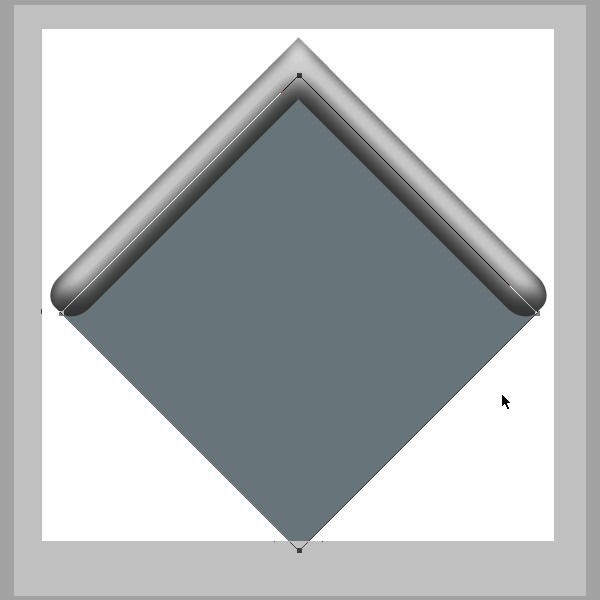
Step 15 - Grouping.
Group these layers by select them and press "Cmd/Ctrl + G". Give name "roof" to this group.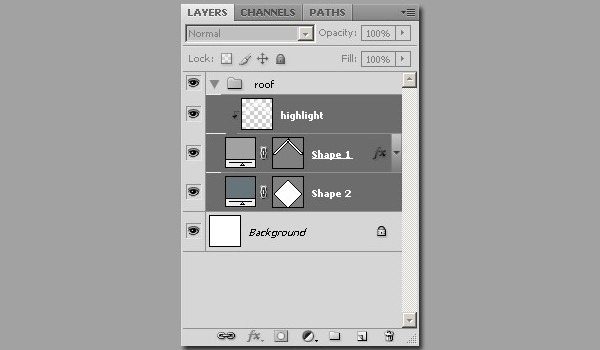
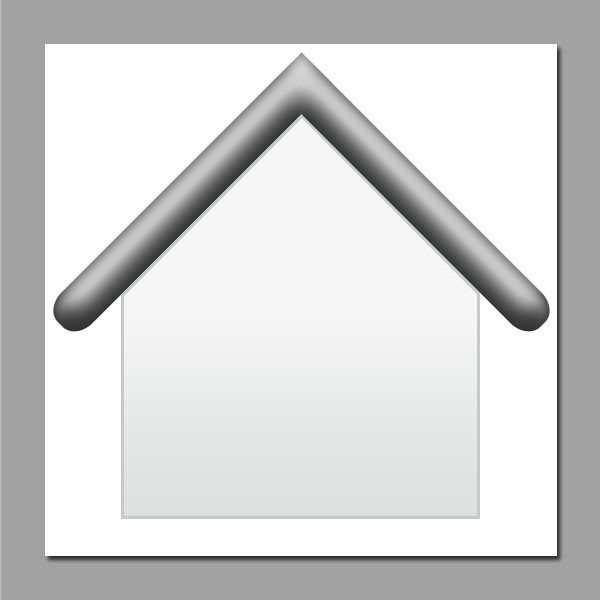
Step 16 - Drawing Path For Front Side.
Hide the "shape 2" layer by clicking eye icon. Then using rectangle tool, draw a rectangle outside the group, above the "Background" layer. Shown below.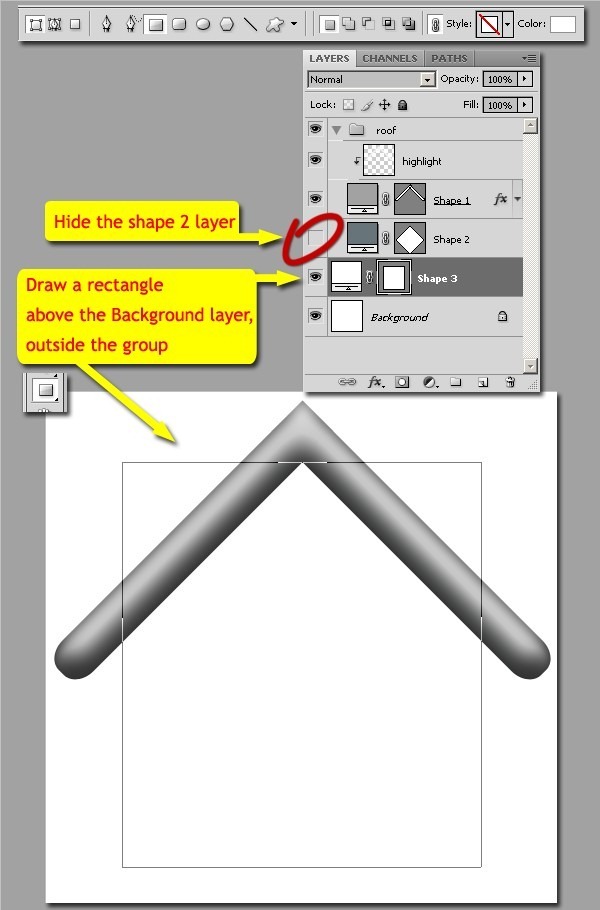
Step 17 - Modifying Path - Add Anchor Points.
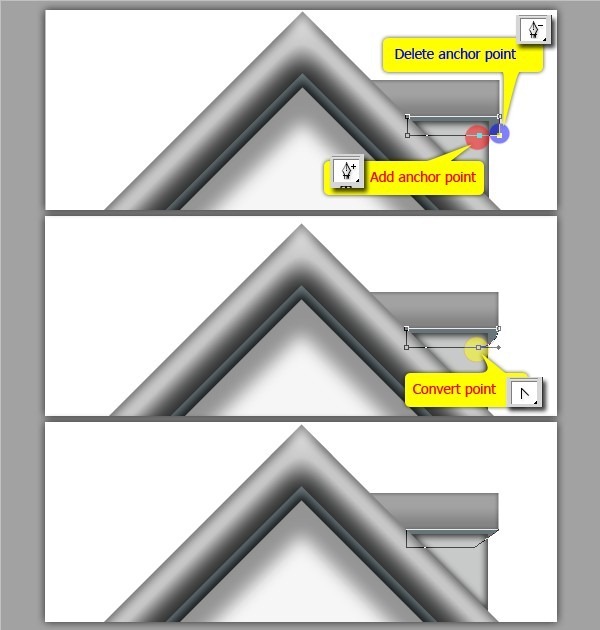
Using Pen Tool with "Auto Add/Delete, add anchor points on three places below. The pointer will automatic changed to Add Anchor Point Tool when brought nearer to path.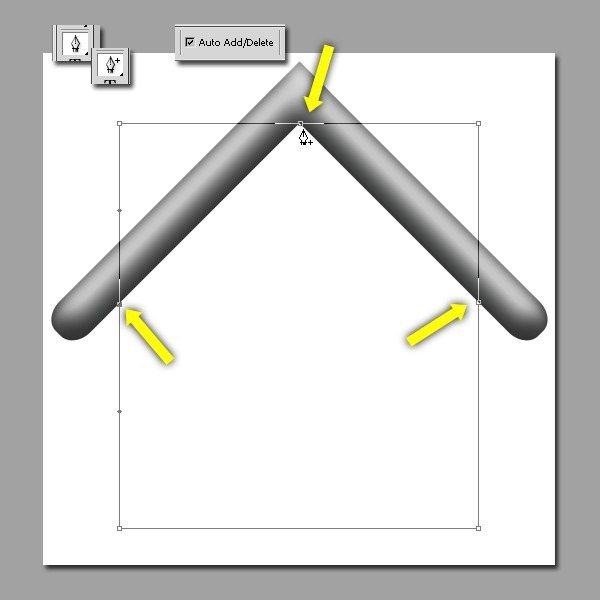
Step 18 - Modifying Path - Converting Points.
While Pen Tool still active, hold down the "Alt" key, pointer will be changed to Convert Point Tool. Click the anchor points we've just already created.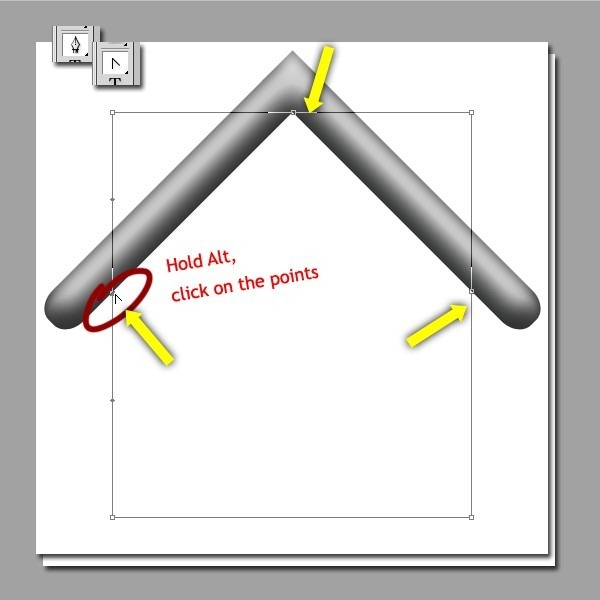
Step 19 - Modifying Path - Deleting Unnecessary Points.
There are two unnecessary points wich must be deleted. Use Pen Tool with "Auto Add/Delete". The pointer will automatic changed to Delete Anchor Point Tool when brought nearer to anchor point.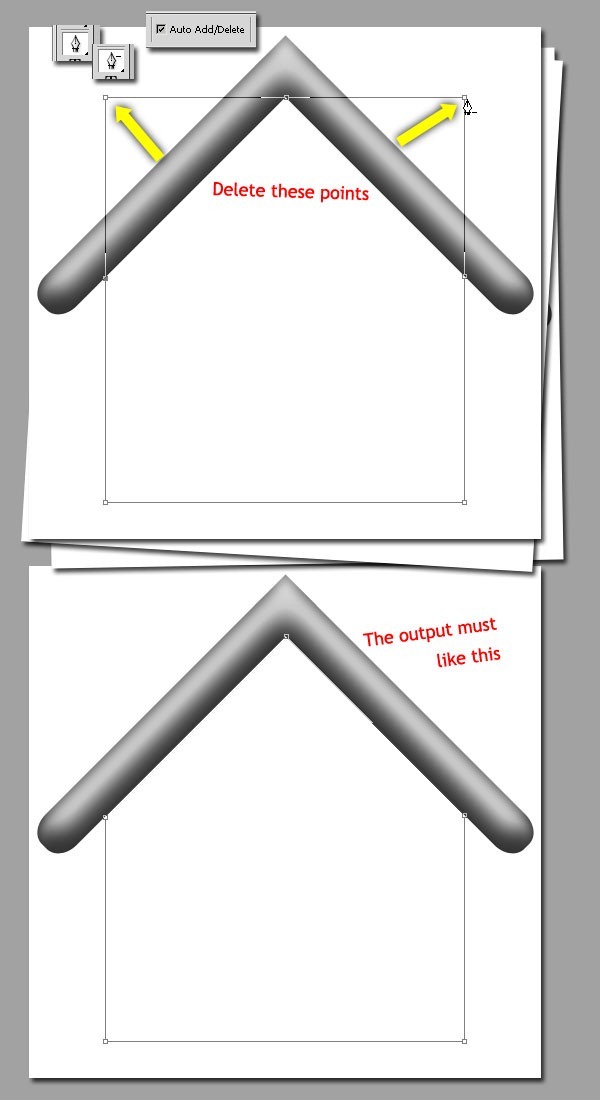
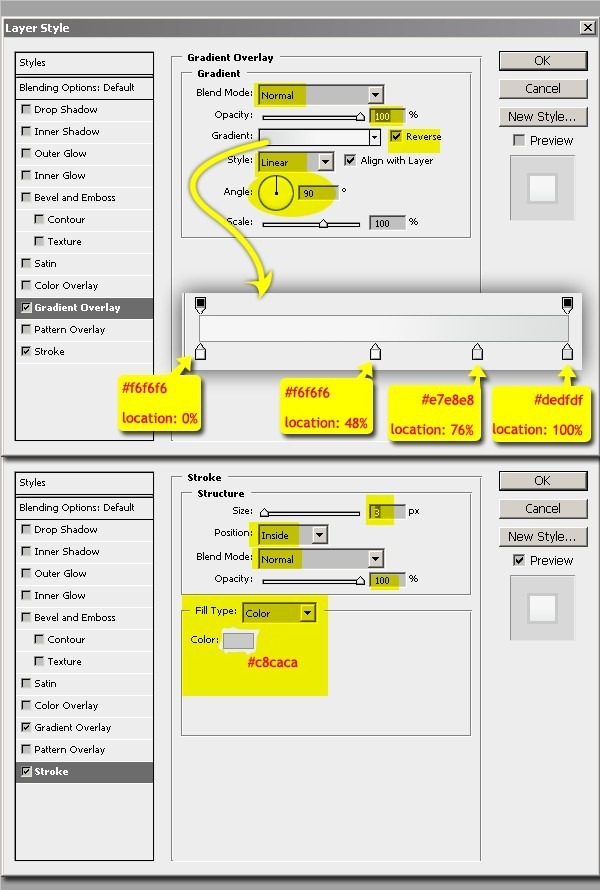
Step 20 - Adding Layer Style.
Add layer style with following parameters.Gradient Overlay
- Blend Mode : Normal
- Opacity : 100%
- Angle : 90º
- Style : Linear
- Scale : 100 px
- Custom Gradient with following stops:
- #f6f6f6 on location 0%
- #f6f6f6 on location 48%
- #e7e8e8 on location 76%
- #dedfdf on location 100%
- Size : 3 px
- Position : inside
- Blend Mode : Normal
- Opacity : 100%
- Fill Type : Color
- Set the stroke color to #c8caca
Step 21 - Back to Roof - Duplicating Path.
Activate shape 2. We will edit it.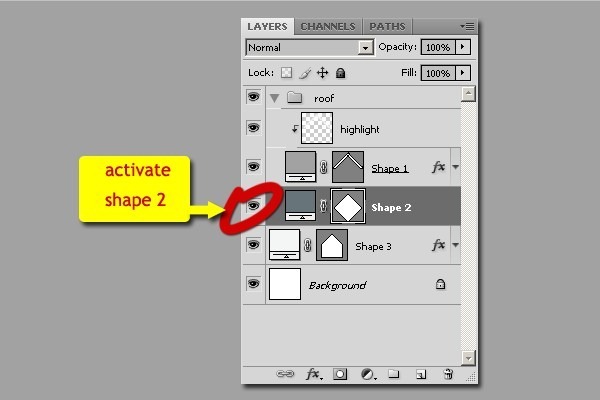
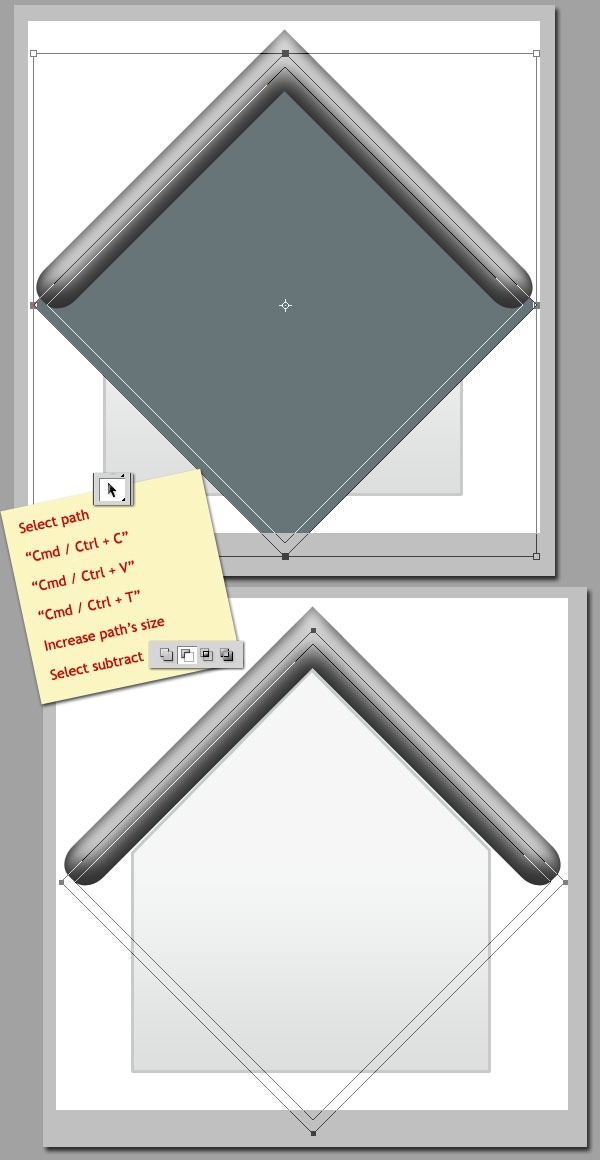
Step 22 - Modifying Path - Creating Guide.
To get easier way to edit this path, we will use guide. Use menu View > New Guide...Orientation : Vertical
Position : Just set to 1 in, we will change it later.
After the new guide has been already created, move it snap to shape 3. Then create new guide again and move it snap to the other side of shape 3.
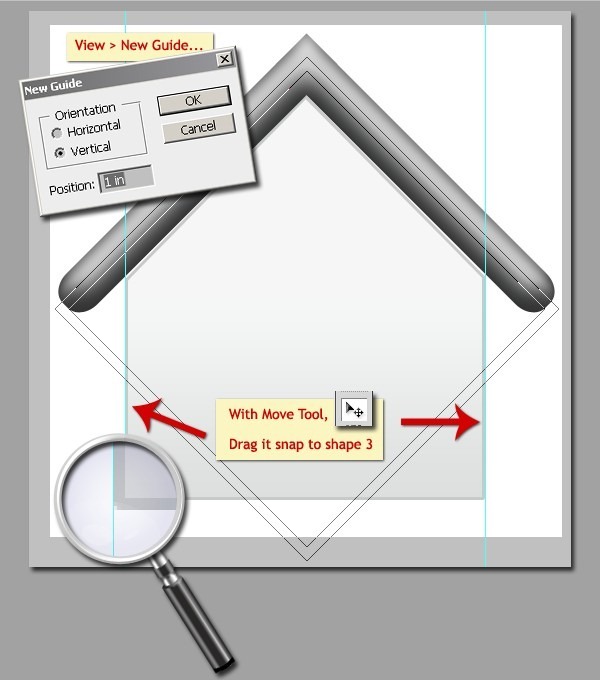
Step 23 - Modifying Path - Editing Points.
Add anchor points on new path. Then change anchor points with convert points tool.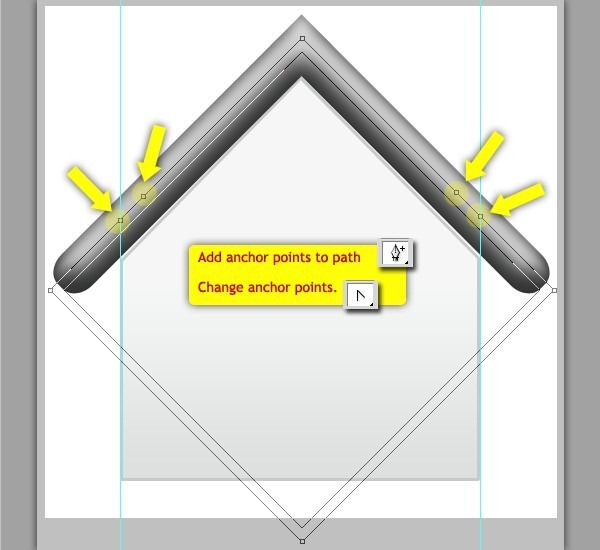
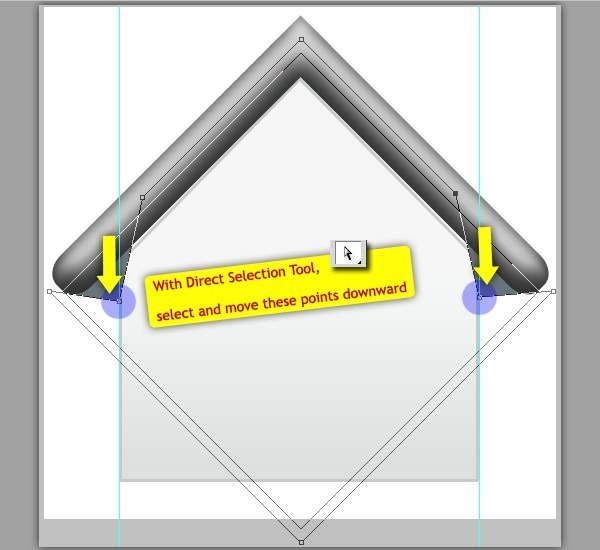
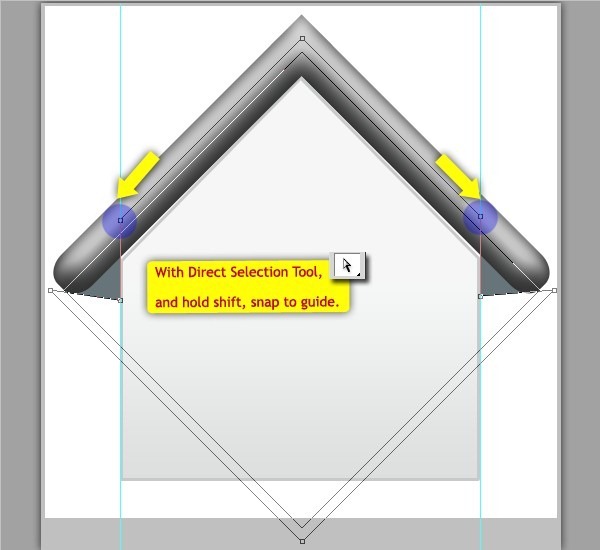
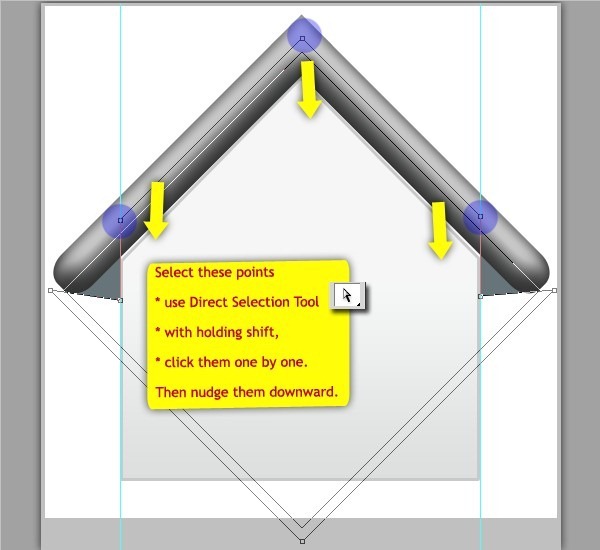
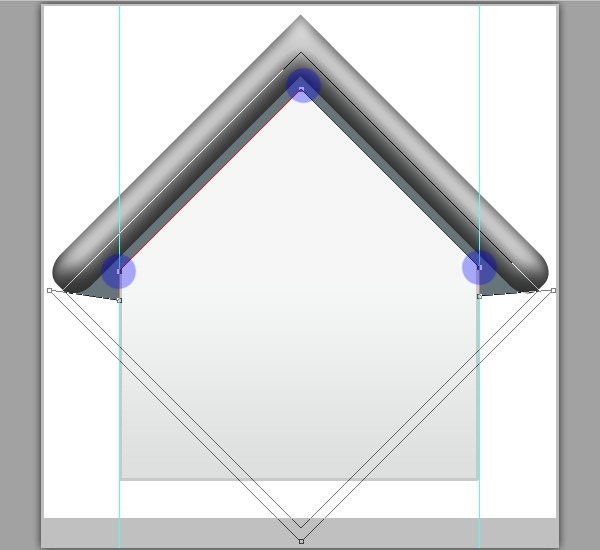
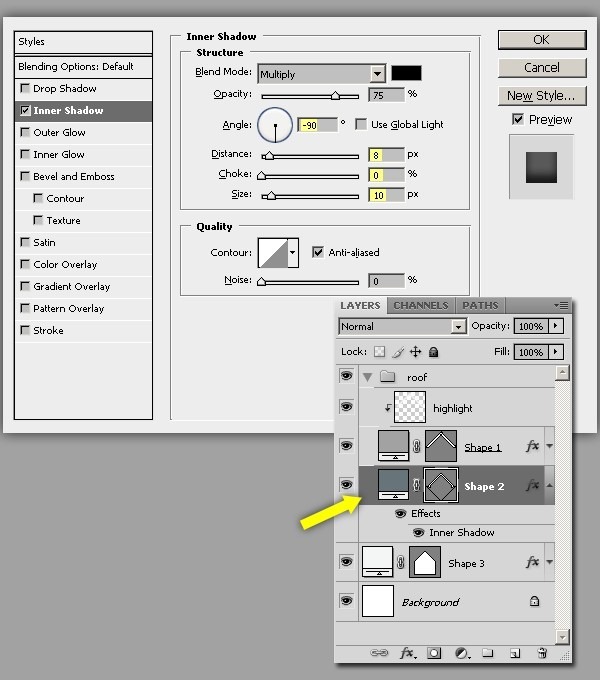
Step 24 - Adding Layer Style.
Add layer style with following parameters.Inner Shadow
- Blend Mode : Multiply
- Opacity : 75
- Angle : -90º
- Distance : 8 px
- Size : 10 px
Step 25 - Adding Small Shadow - Creating New Clipping Mask Layer.
Create new layer above "shape 2" by clicking new layer icon. And then press "Cmd + Opt + G" / "Ctrl + Alt + G" to convert it into clipping mask.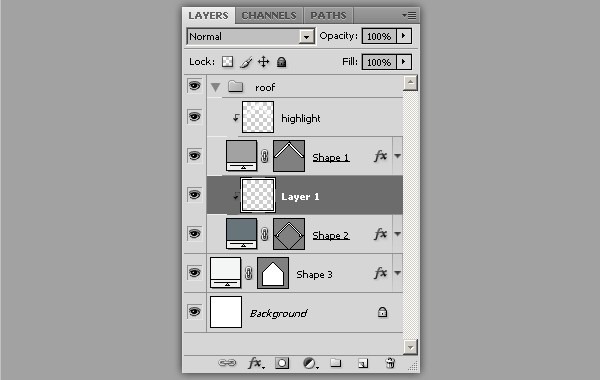
Step 26 - Adding Small Shadow - Drawing The Shadow.
With 40% opacity and 0% hardness brush, draw black shadow carefully.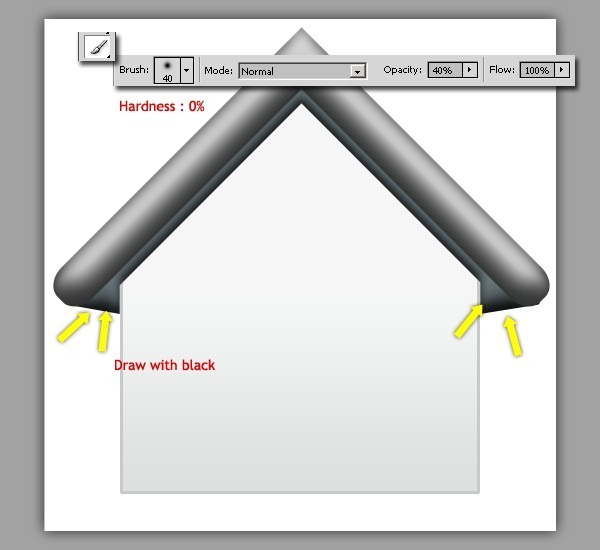
Step 27 - Adding Roof's Shadow - Creating New Layer in a New Group.
Create new layer above "shape 3", outside the group "roof", name it "shadow". And then select both layer "shadow" and "shape 3", hit "Cmd/Ctrl + G" to make them into group. Give a name "front" to this new group.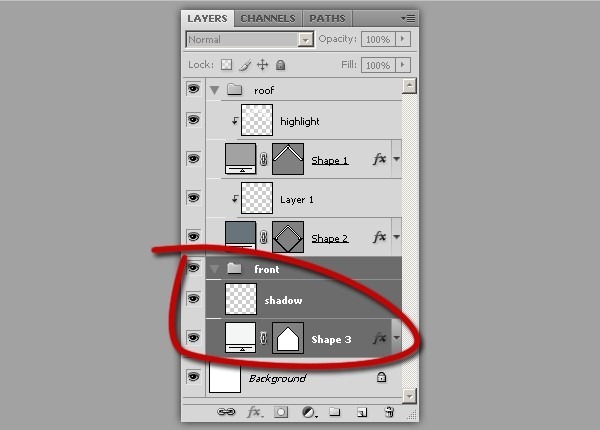
Step 28 - Adding Roof's Shadow - Filling With Black.
Place your cursor on "shadow" layer. Hold Cmd/Ctrl and click on "Shape 1" to make selection. Fill the selection with black. Then "Cmd/Ctrl + D" to deselect.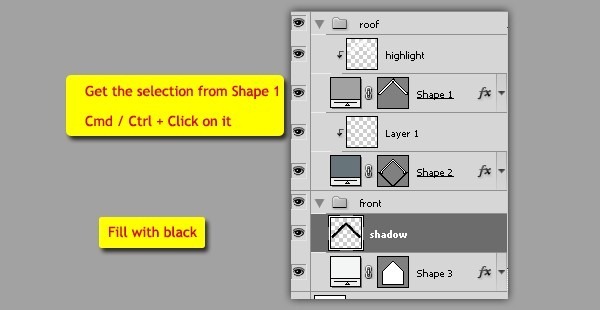
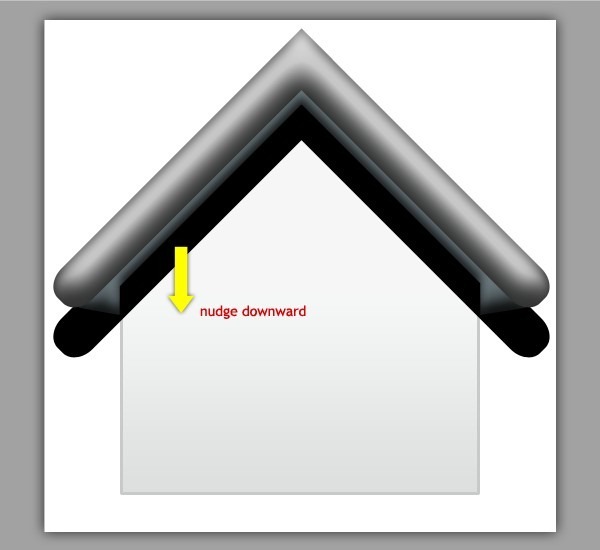
Step 29 - Adding Roof's Shadow - Blurring.
Use menu Filter > Blur > Gaussian Blur. Set radius to 7.0 pixels.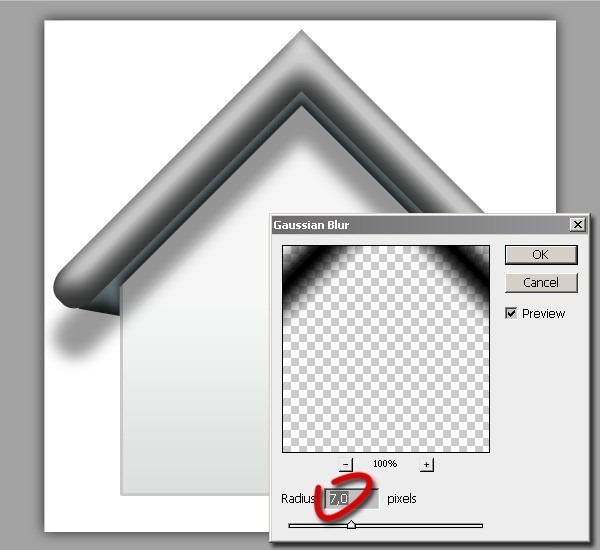
Step 30 - Adding Roof's Shadow - Creating Clipping Mask.
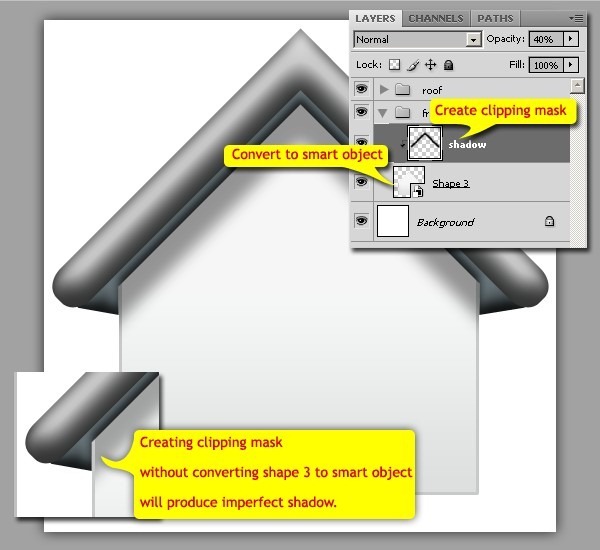
Go to layer pallet, right click on "Shape 3" and select Create Clipping Mask. Then move to "shadow" layer, press "Cmd + Opt + G" / "Ctrl + Alt + G" to create clipping mask.Note: if we create clipping mask without converting "Shape 3" to smart object, the "shadow" layer will not clipped into "stroke style" of "shape 3". The "shadow" will be imperfect.
Step 31 - Making Back Part - New Shape on New Group.
With Rectangle Tool, draw a #a2a2a2 colored rectangle above "background" layer or underneath "front" group. Then group it named "back".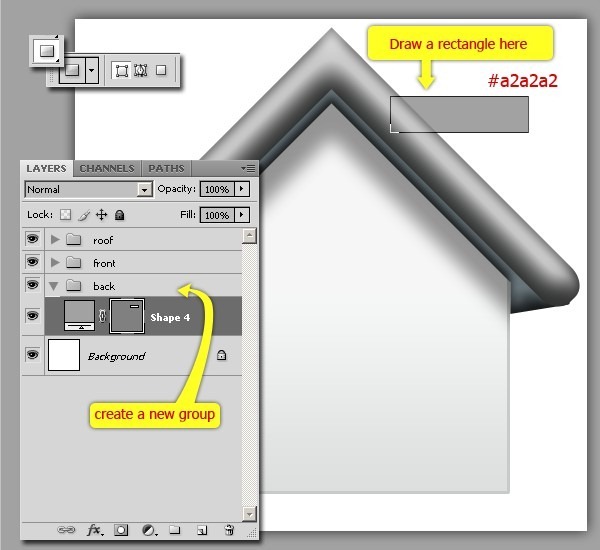
Step 32 - Making Back Part - Adding Layer Style.
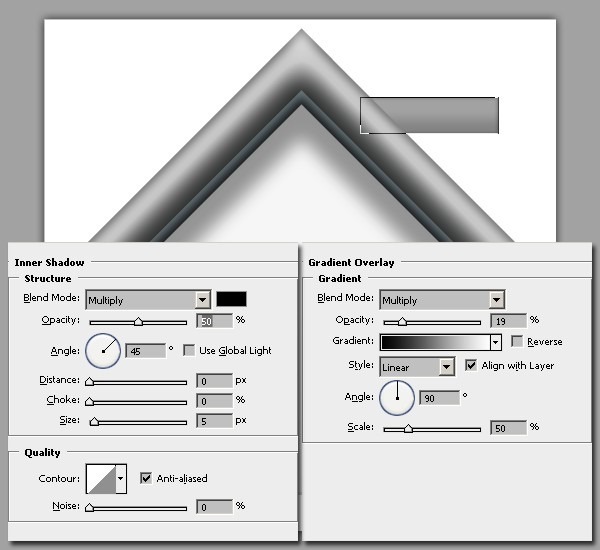
Add layer style with parameters shown below.Inner Shadow
- Blend Mode : Multiply
- Opacity : 50%
- Angle : 45º
- Distance : 0 px
- Size : 5 px
- Blend Mode : Multiply
- Opacity : 19%
- Gradient : Black to White
- Style : Linear
- Angle : 90º
- Scale : 50%
Step 33 - Making Back Part - New Shape.
Create a shape again. With Rectangle Tool, and set color to #c8caca. The shape layer must inside of "back" group.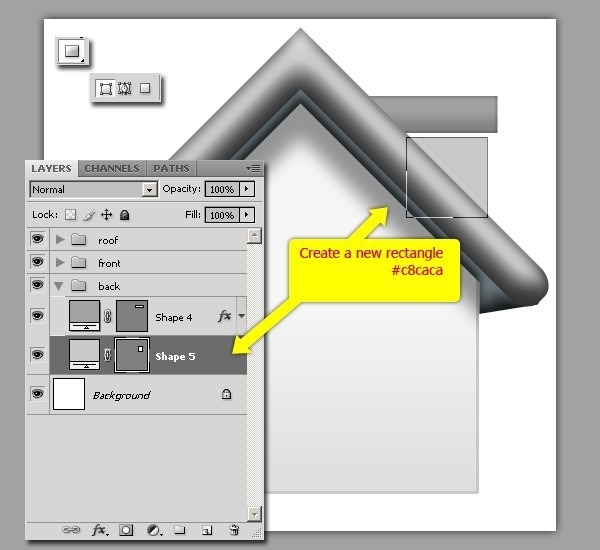
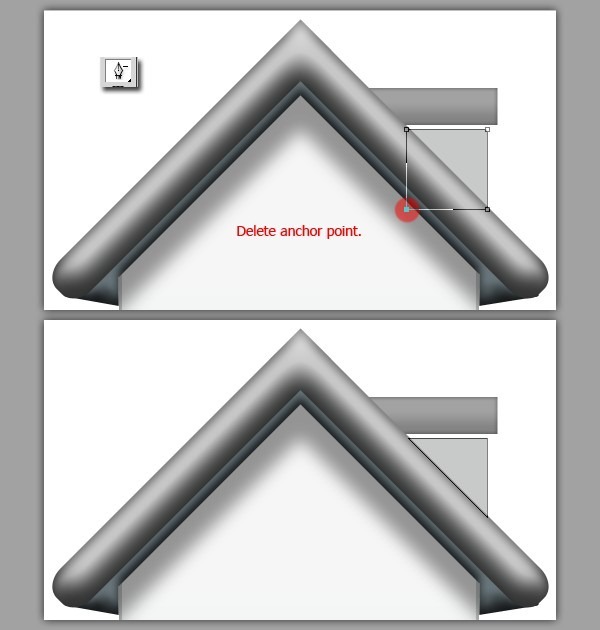
Step 34 - Making Back Part - Adding Layer Style.
Add layer style with parameters shown below.Inner Shadow
- Blend Mode : Multiply
- Opacity : 33%
- Angle : 146º
- Distance : 5 px
- Size : 10 px
- Blend Mode : Multiply
- Opacity : 75%
- Color of Glow : #515252
- Technique : Softer
- Source : Edge
- Size : 10 px
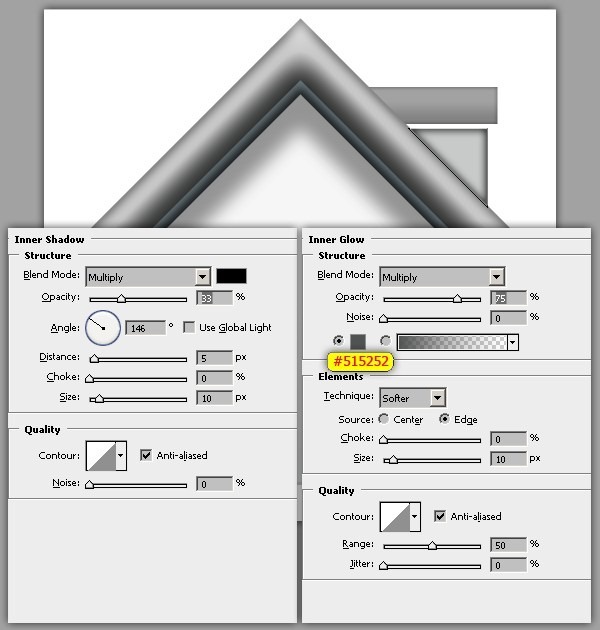
Step 35 - Making Back Part - New Shape Again.
Use Rectangle Tool to create a shape again, and set color to #677479. This shape not only must inside of "back" group, but also under all layers inside it.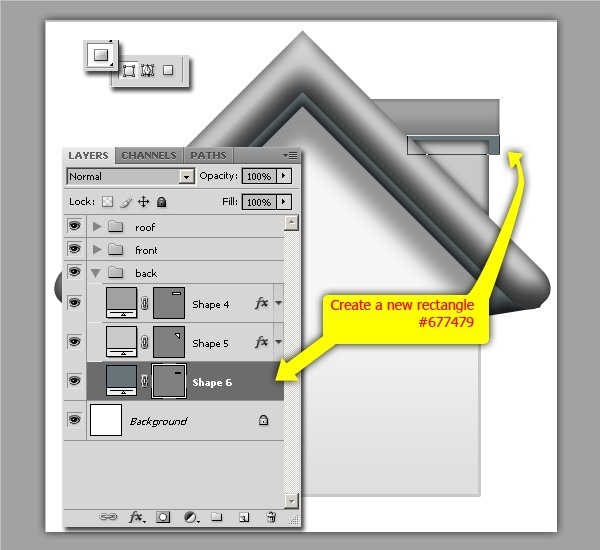
Step 36 - Making Back Part - Adding Layer Style.
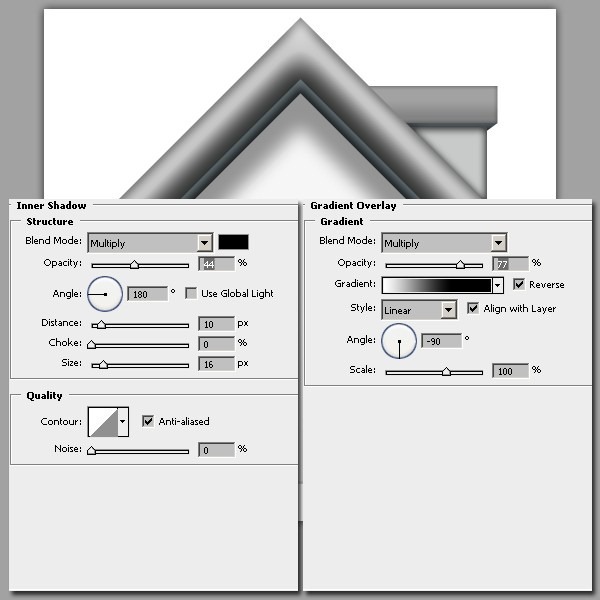
Add layer style on "shape 6".Inner Shadow
- Blend Mode : Multiply
- Opacity : 44%
- Angle : 180º
- Distance : 10 px
- Size : 16 px
- Blend Mode : Multiply
- Opacity : 77%
- Gradient : White to Black
- Style : Linear
- Angle : -90º
- Scale : 100%
Step 37 - Shape For Window.
Create a square shape with Rectangle Tool. Set color to #1f60ae. Make a group named "window".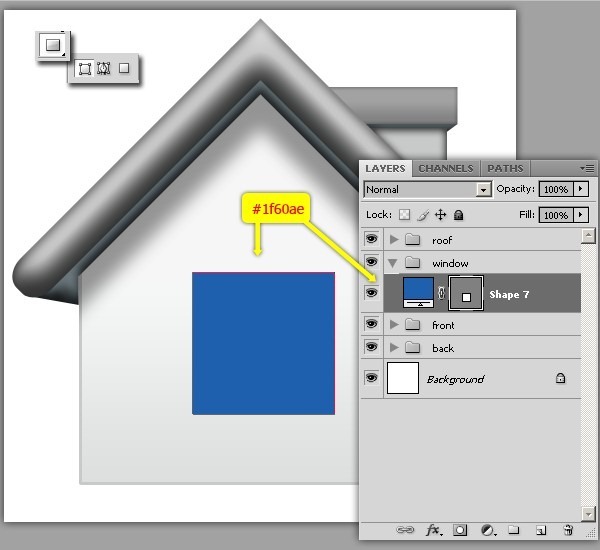
Step 38 - Layer Style For Shape.
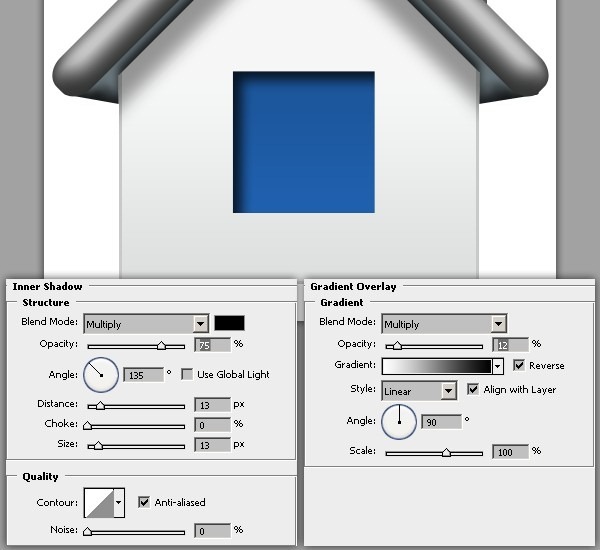
Add layer style with following parameters.Inner Shadow
- Blend Mode : Multiply
- Opacity : 75%
- Angle : 135º
- Distance : 13 px
- Size : 13 px
- Blend Mode : Multiply
- Opacity : 12º
- Gradient : White to Black
- Style : Linear
- Angle : 90º
- Scale : 100%
Step 39 - Making Frame - Making Shape.
Use Rectangle Tool to create shape above "shape 7". Make a group named "frame" inside of "window" group. And all of frames will be placed here. See layer pallet below for reference.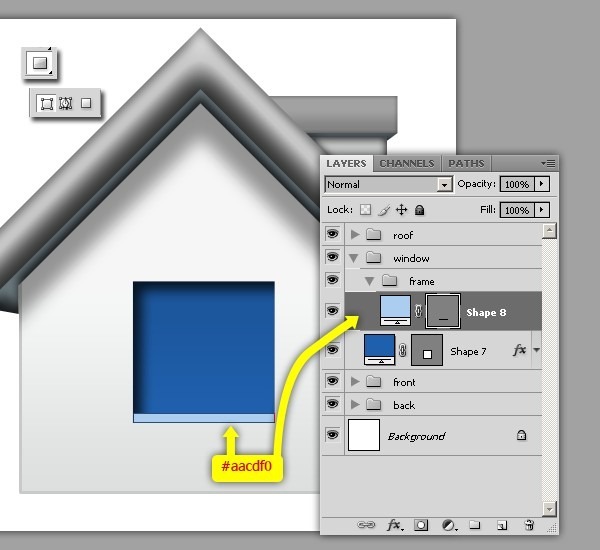
Step 40 - Making Frame - Making Shape Furthermore.
Make shape again on right side of window, use #6c9ec5 for color setting. And duplicate it to left side. Just use "Cmd + Opt" / "Ctrl + Alt" click and drag to duplicate.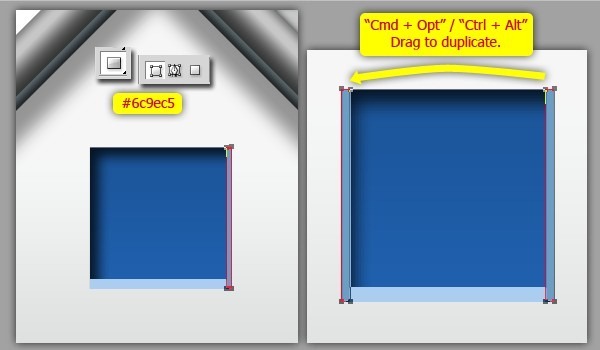
Step 41 - Making Frame - Again, Making Shape.
The last frame on top side. The color is darker than before, that is #373737.Place it under "shape 9" layer.
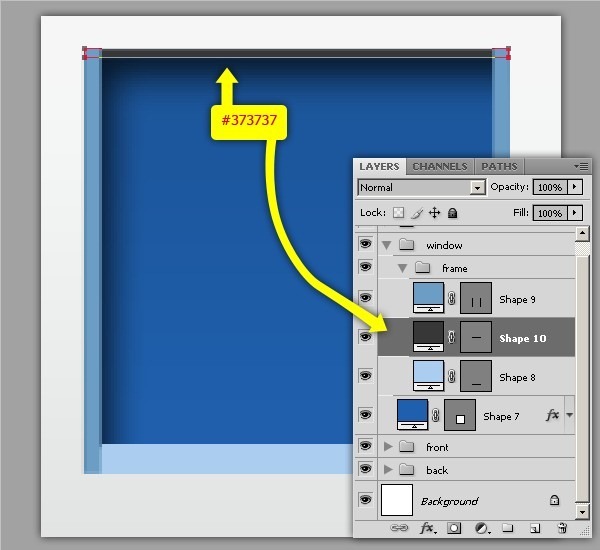
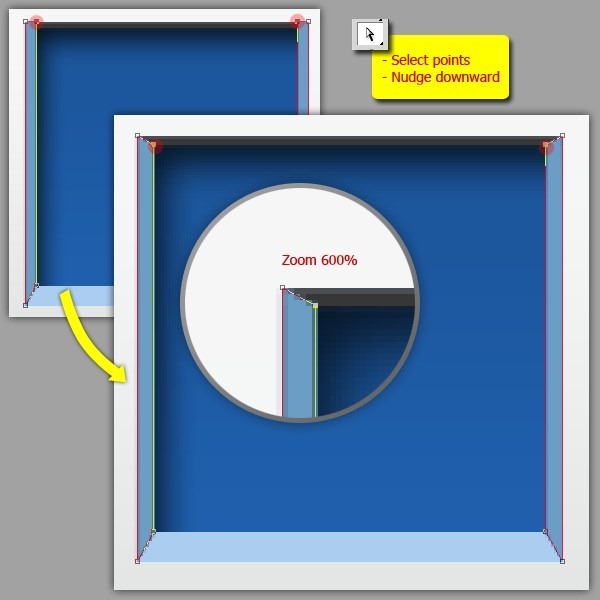
Step 42 - Making Frame - Editing Points.
Use Direct Selection Tool to select points below (shown as red circle). Then nudge upward. See the following picture for reference.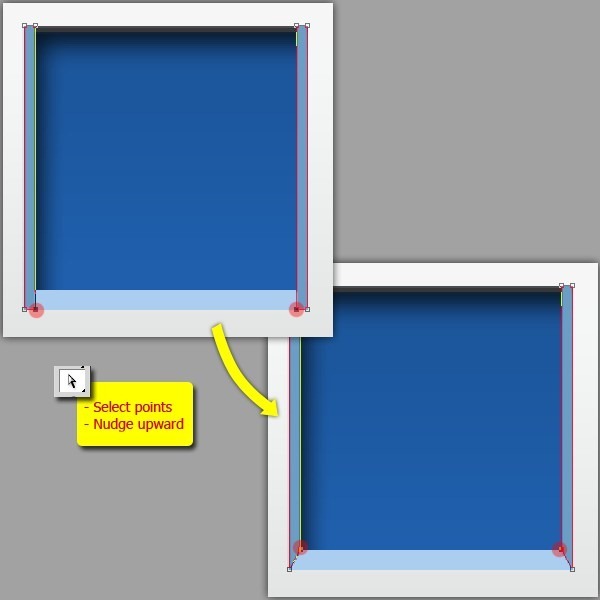
Step 43 - Making Frame - Adding Layer Style.
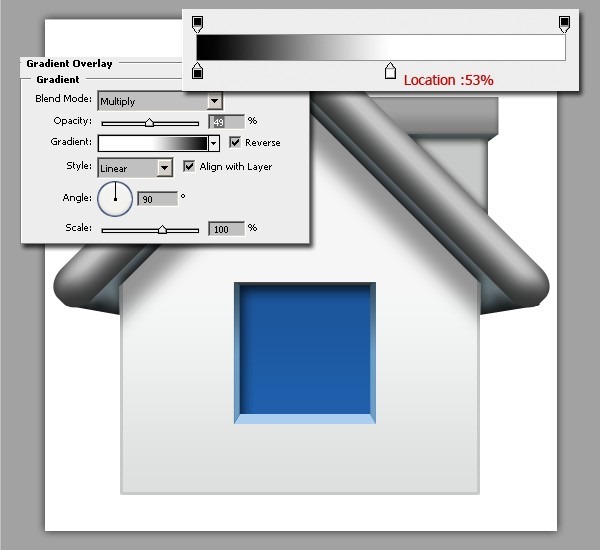
Add layer style with following parameters.Gradient Overlay
- Blend Mode : Multiply
- Opacity : 49%
- Gradient : Black to White (reverse), drag the location of white color stop on 53%.
- Style : Linear
- Angle : 90º
- Scale : 100%
Step 44 - Making Glow - Duplicating.
Duplicate "Shape 7" layer with "Cmd/Ctrl + J". And rename the duplicate copy with "glow". Then change its color, double click on layer thumbnail and set it to #70d2ef. Then remove all layer effects on it. Right click and select clear layer style.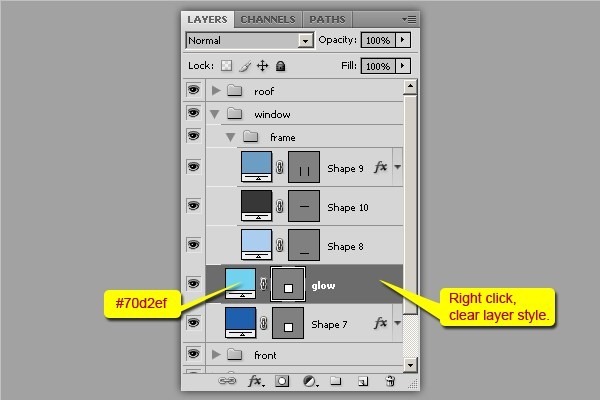
Step 45 - Making Glow - Scaling Down & Rasterizing.
Scale down the "glow" layer. Then rasterize.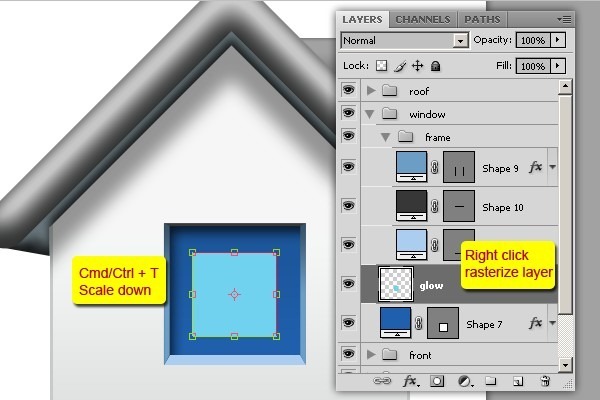
Step 46 - Making Glow - Blurring.
Menu Filter > Blur > Gaussian Blur.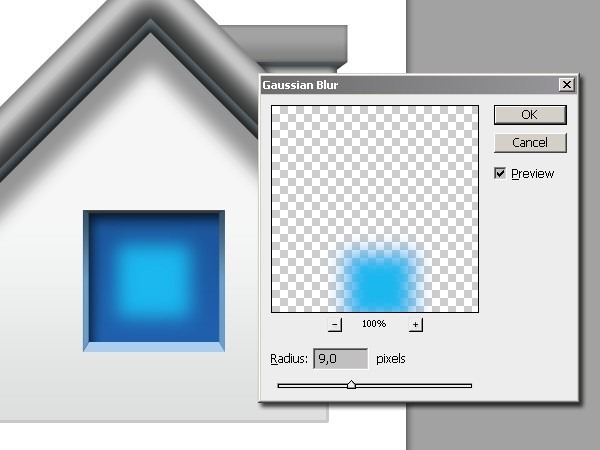
Step 47 - Shape For Highlight.
Above the "glow" layer, use Rectangle Tool to create shape, and then duplicate it by using "Cmd + Opt" / "Ctrl + Alt" and drag. After that activate Direct Selection Tool to edit points. See picture below for reference.Rename the layer with "highlight".
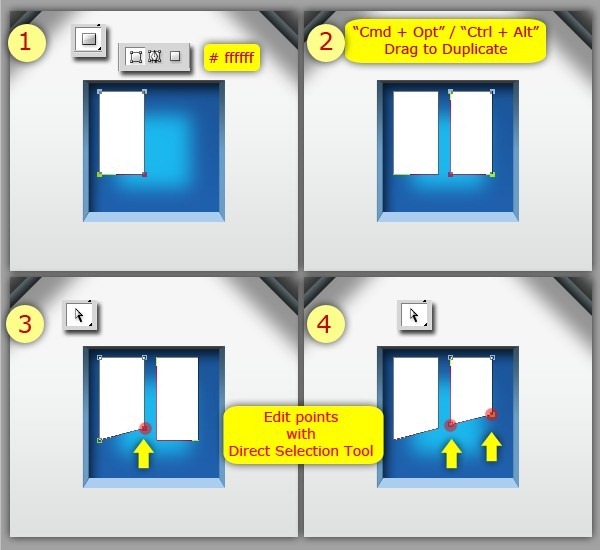
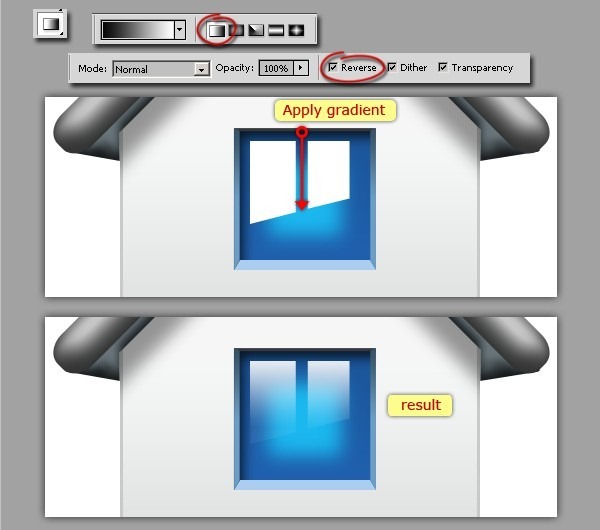
Step 48 - Gradient For Highlight.
First, add layer mask on "highlight" layer by clicking layer mask icon.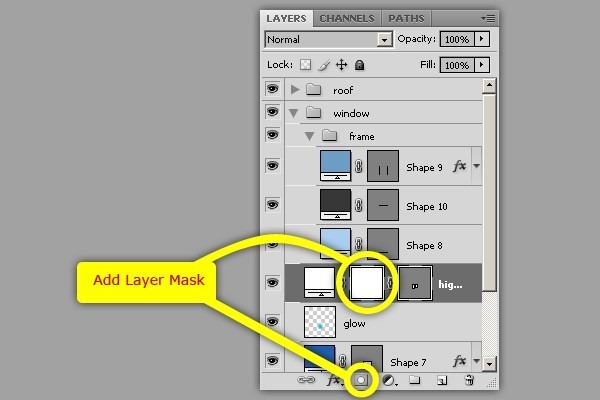
Step 49 - Creating Shadow.
Create new layer above "Background" layer and name it "shadow 1". Then use Elliptical Marquee Tool to make ellipse selection. After that, fill selection with black color and remove selection (deselect) with "Cmd/Ctrl + D". Give Gaussian Blur with radius 9 pixels. And set the opacity layer to 50%.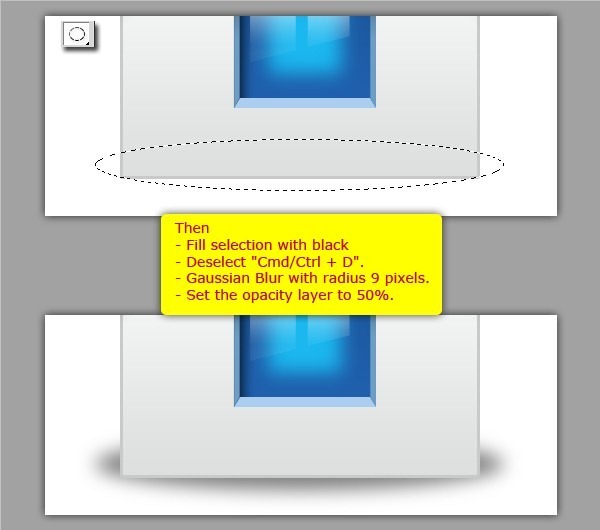
Step 50 - Creating Shadow Again.
Create new layer again above "shadow 1" layer and name it "shadow 2". Then use Rectangular Marquee Tool to make rectangular selection on the bottom of icon. After that, fill selection with black color and remove selection (deselect) with "Cmd/Ctrl + D". Give Gaussian Blur with radius 5 pixels. And set the opacity layer to 80%.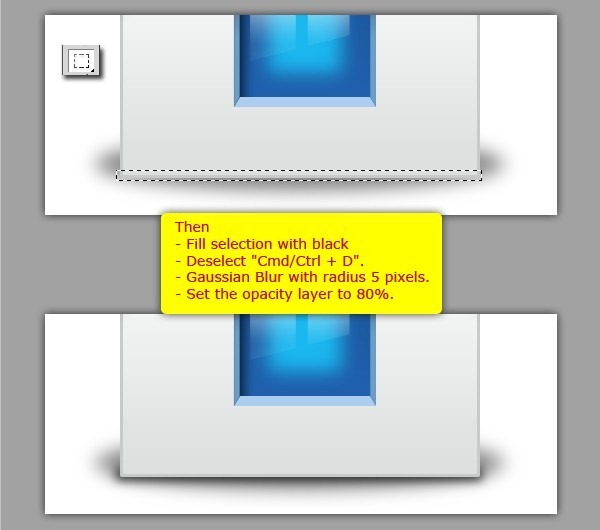
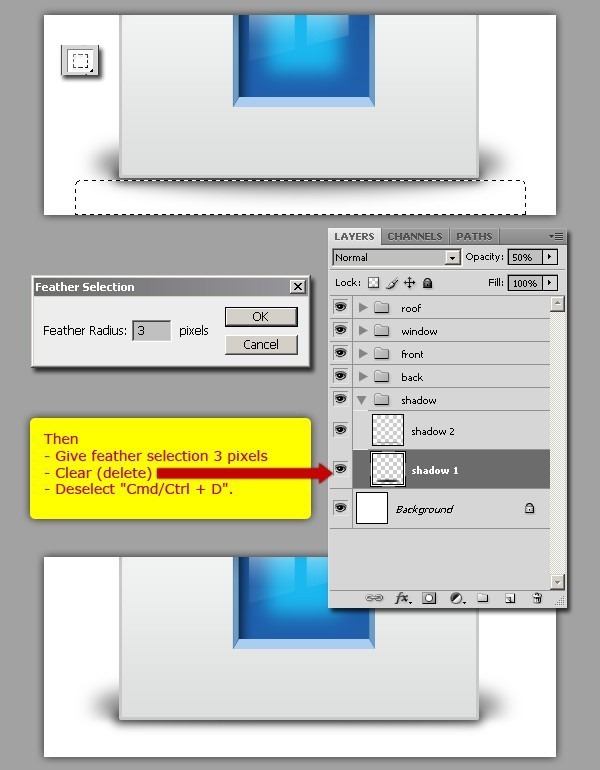
And both "shadow 1" and "shadow 2" layer, group them into "shadow" group.
Keine Kommentare:
Kommentar veröffentlichen