
Creating a realistic character from scratch is a challenge itself which requires a lot of focus on details of character like lights, shadows, reflection, etc. In this tutorial you will learn how to create a funny 3d character in Photoshop from scratch by using few most basic steps and techniques like lights, shadow, brushes, blur, etc.
Preview of Final Results
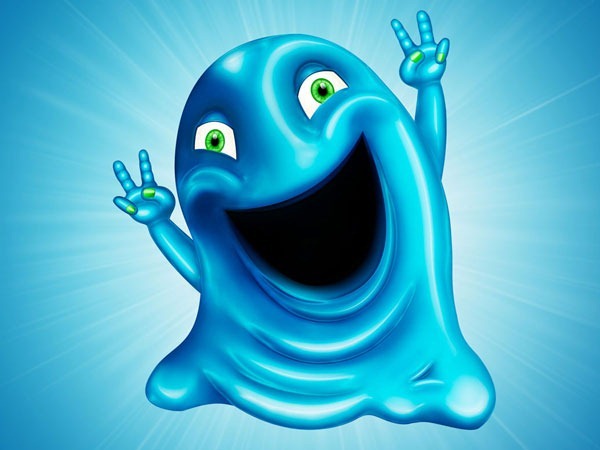
Download the PSD
Cute 3D Character.zip | 22.11 MB
Download from Website
Download from Website
Cute Gooey Blob Photoshop Tutorial
Step 1
Create a new document of size 3000 x 2500 pixels and change its resolution to 300 dpi. Select the pen tool, turn shape layer on and create an outline of character. Name this layer to "Basic Shape" and change its color to #71d0e8.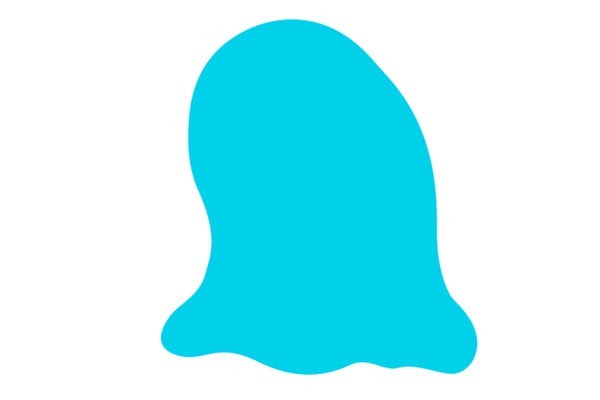
Step 2
Now before going ahead with tutorial, first we will edit layer panel options for this click on top right corner of layer panel and select panel options. A layer panel option window will open then select "Layer Bounds" option in layer content section.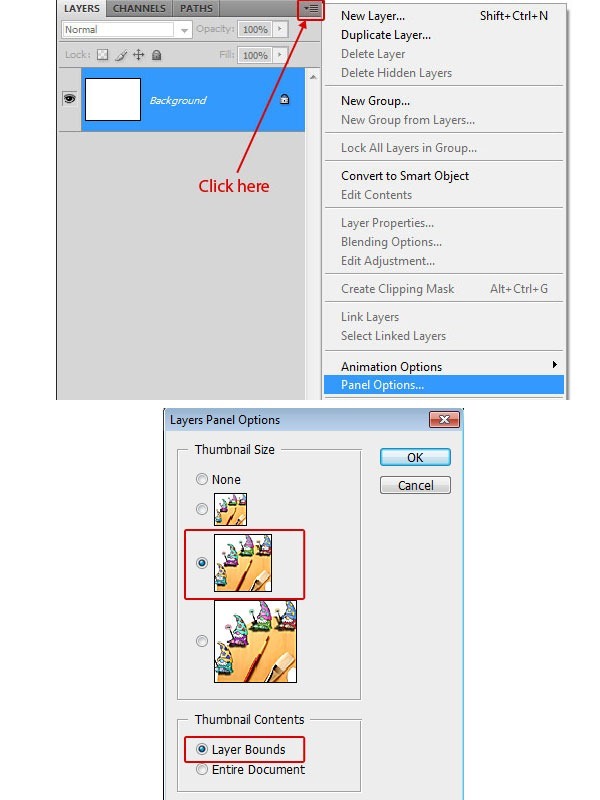
Step 3
Create a new layer, select Ctrl + click on basic shape layer to get its selection. Select a soft brush of color #118ab2 and create shadows on left side of character.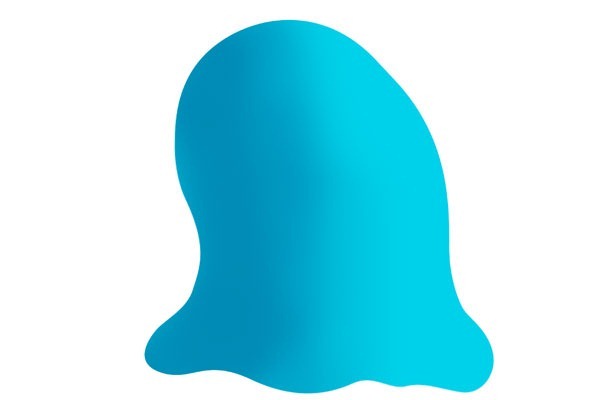
Step 4
Again create a new layer, set foreground color to #1e8cb4 and start creating shadows along edges of basic shape.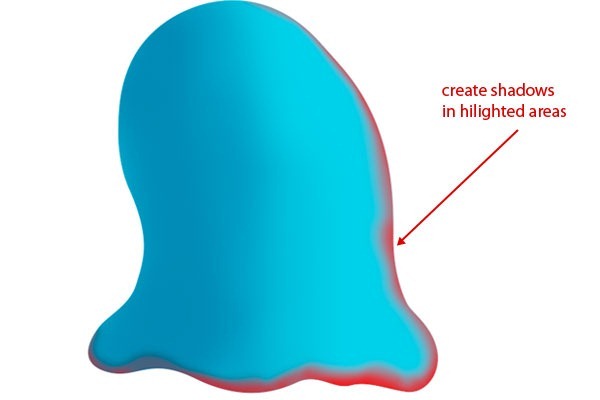
Step 5
Select a soft brush of color #44b3d7 and brush to add some lights to the edges on the left part of character. However, you can use pick tool to select light and dark tone of color, which is a best way when you are using similar shades of a color. I have mentioned colors to save your time, but you can choose colors yourself.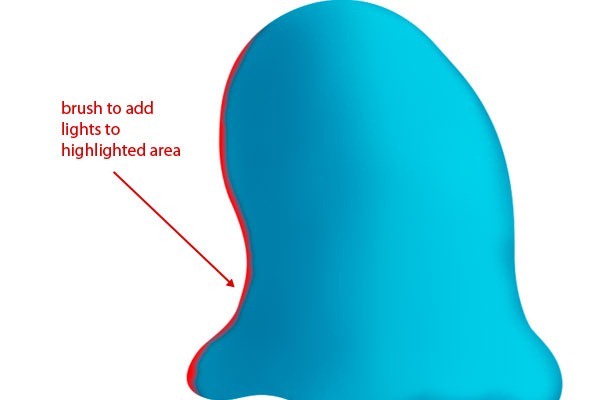
Step 6
Now we will define the main parts of character, to do this, select a soft brush, change its color to #064168 and start outlining mouth.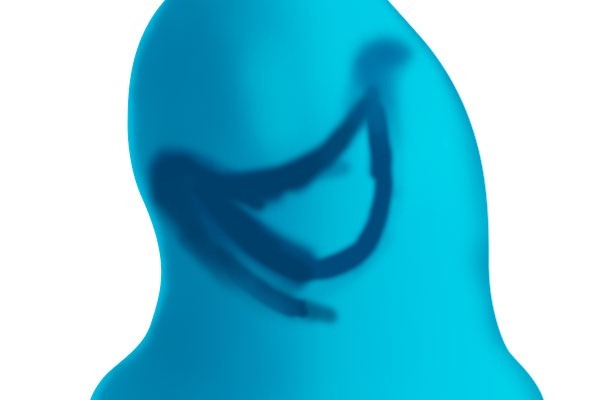
Step 7
Select pen tool, turn shape layer on and create mouth shape and name this shape layer to "mouth". Change its color to black.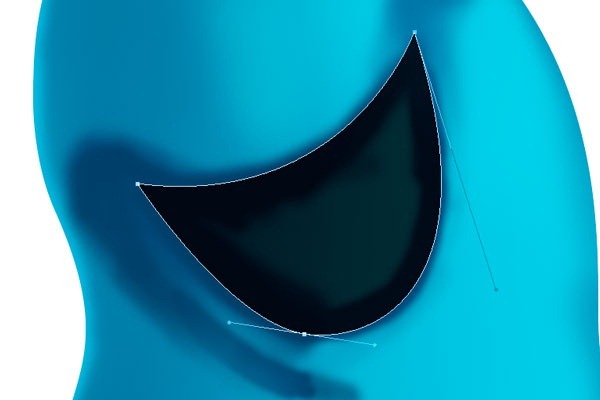
Step 8
Now we have decided mouth position and it's time to create lips of character. To do this create a shape layer, change its color to #00406c and rename this layer to "upper lip". Add some shadows to give it more realism.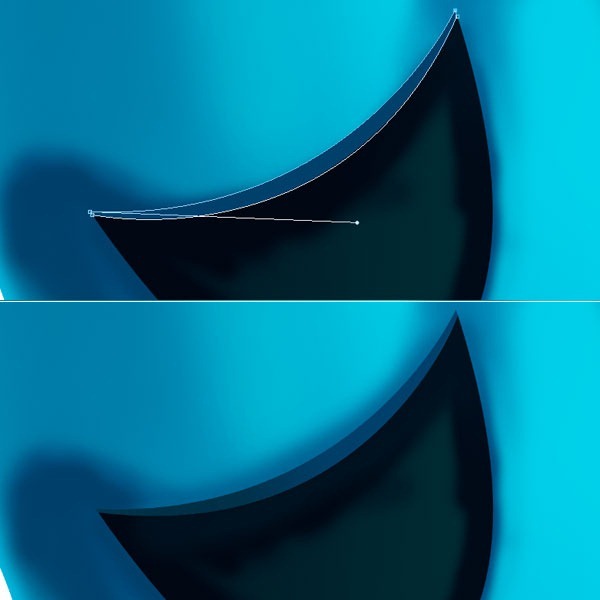
Step 9
Similarly create lower lip with shape layer and change its color to #4aabce. Add some shadows and lights wherever needed to give it depth.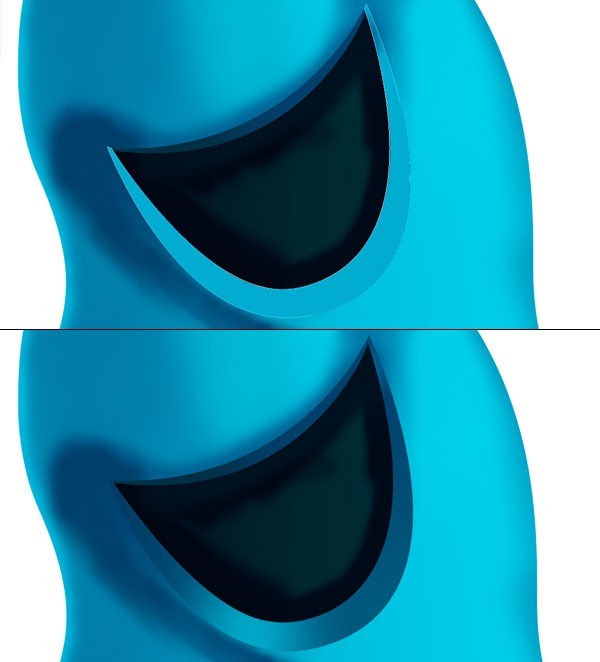
Step 10
Select pen tool, turn path layer on and create lower lip wrinkle. Save this path and rename it to "lower lip". Press Ctrl+Enter to get its selection, select a soft edge brush of color #17749a and paint to the edges of path selection. Add shadows & lights wherever needed. If you did it properly, then result will be like this.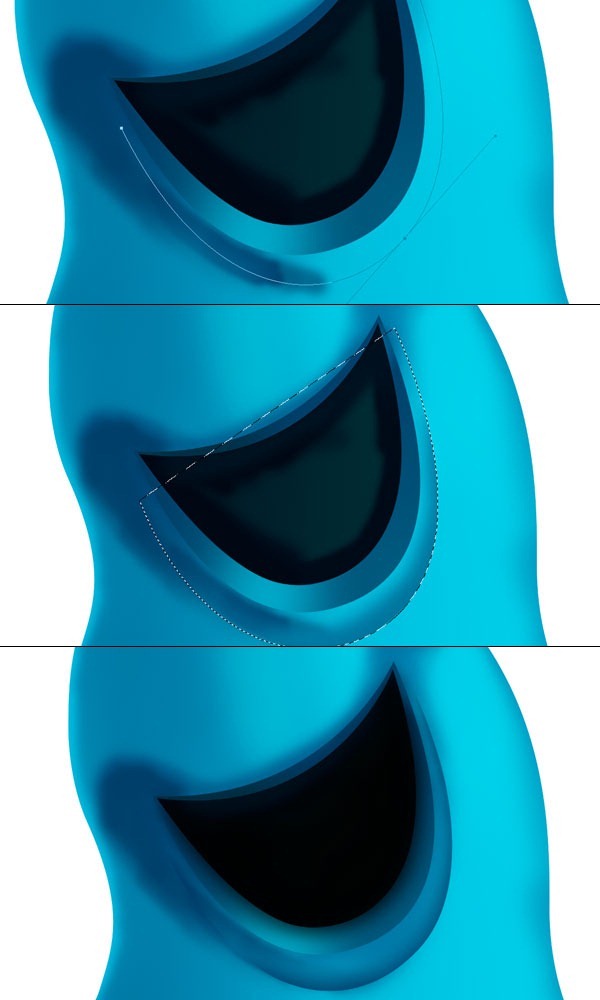
Step 11
Now we will create eyes for this, create an eye shape and fill it with color white. Name this layer to "right eyeball" Press Ctrl+Click on eyeball layer to get its selection, select a soft brush of color #237a9c and create shadows around eye.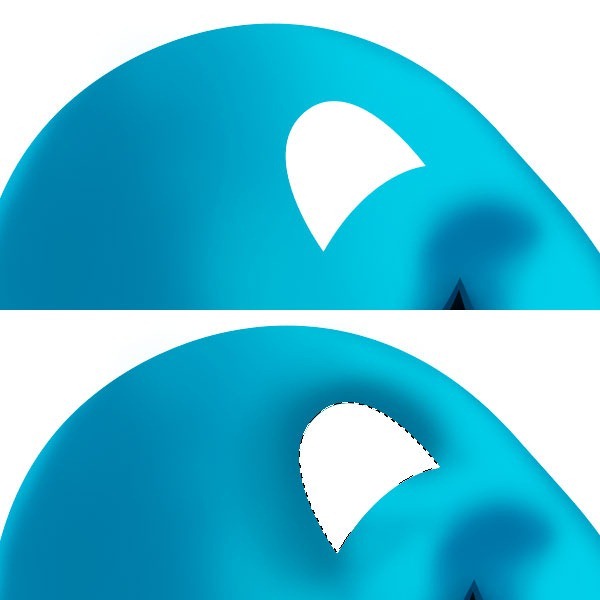
Step 12
Create a new document to create pupil, now press U to select ellipse tool and create an ellipse. Change its color to #4dc9df and apply inner glow layer style with these settings. Name this ellipse to "pupil".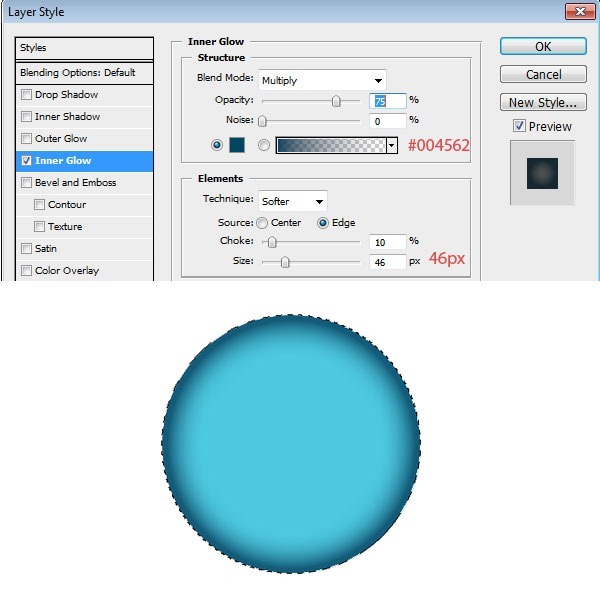
Step 13
Create another small ellipse of color black and align it to centre of "pupil" layer and name it to "cornea". Select brush tool, set foreground color to #006082 then open "SS-light-beams.abr" and create pupil texture. Apply gaussian blur of 2.5 pixels to texture to make it smooth. Select the black ellipse layer and apply gaussian blur of 20 pixels.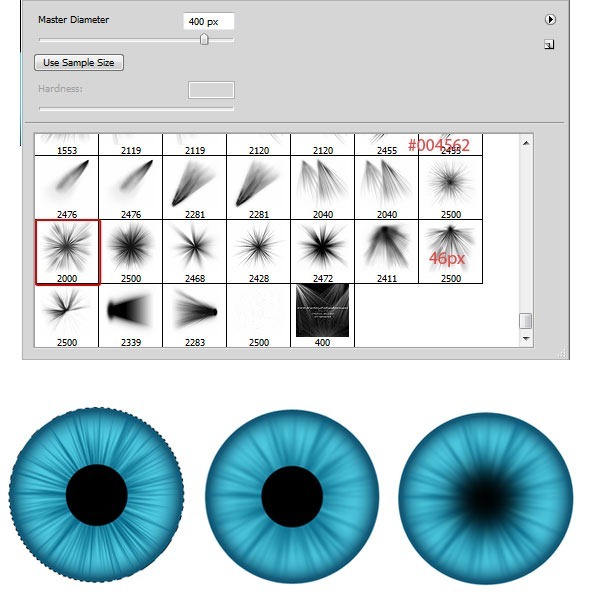
Step 14
Group these layers and import to our main psd. Change foreground color to #e6deb5, select a soft brush and brush around the edges of eyeball to add some yellowness. Select brush tool, change its color to #d8cea6 now open "veins.abr" and create some veins inside eyeball. Name this layer to "vein".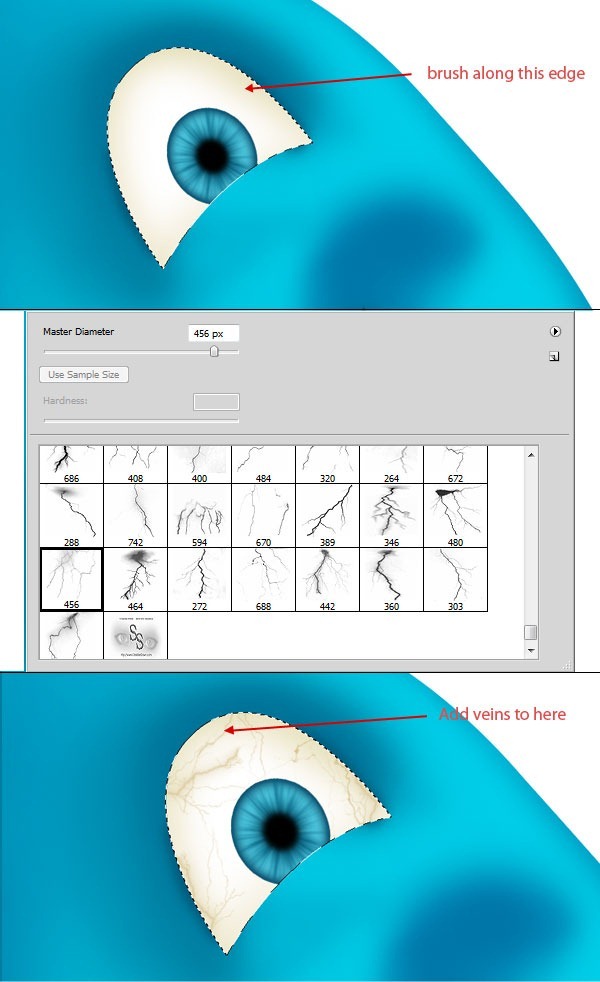
Step 15
Now we will add eyelids to the eye. To do this, create eyelid shape and change its color to #00b7d6. Duplicate the eyelid and change its color to #007da1, now add a layer mask to the layer then select a large soft brush of size 250 px, set foreground color to black and mask centre part of eyelid to reveal lighter part of eyelid.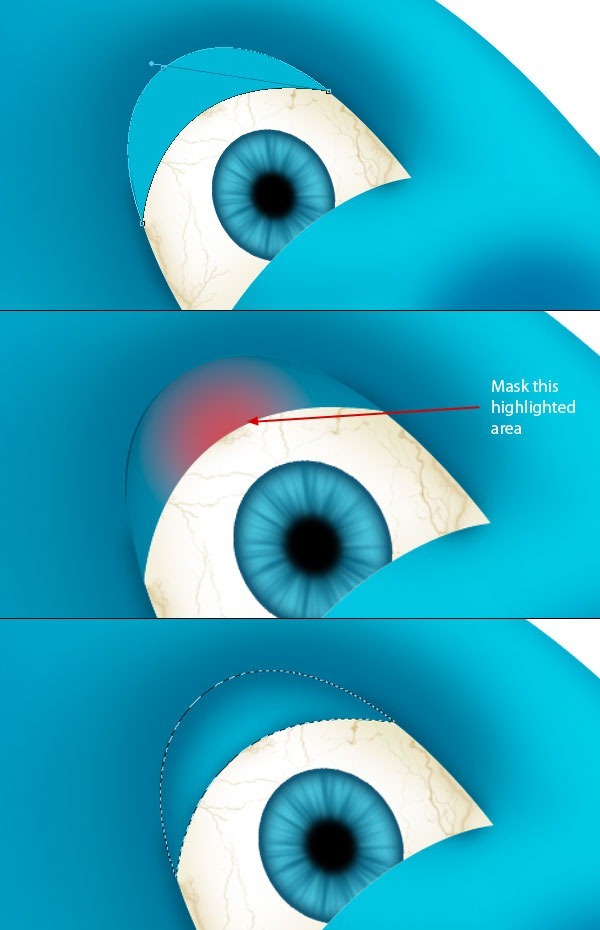
Step 16
Add some more shadows inside and outside eyelid by selecting a soft brush of size 100 pixel and color #0e5a79. Now create the upper lining of upper lid and change its color to #00425d. Next, Ctrl+click on upper lining to get its selection and create a new layer. Create lights on upper lining layer by a soft brush of size 100 pixels and color #236e8b.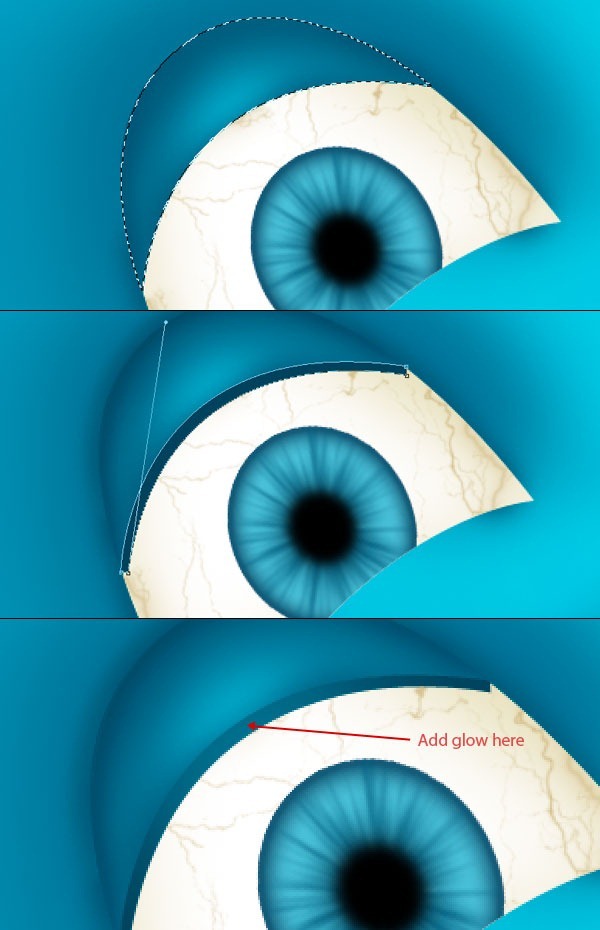
Step 17
Now we will add lights on eyelid lining, to do this, select pen tool and create a shape like this, don't forget to turn path layer on. Next, select a brush of size 2 pixels, color white and hardness 100%. Next, select pen tool, right click and select stroke path. Make sure to turn stimulate pressure option on.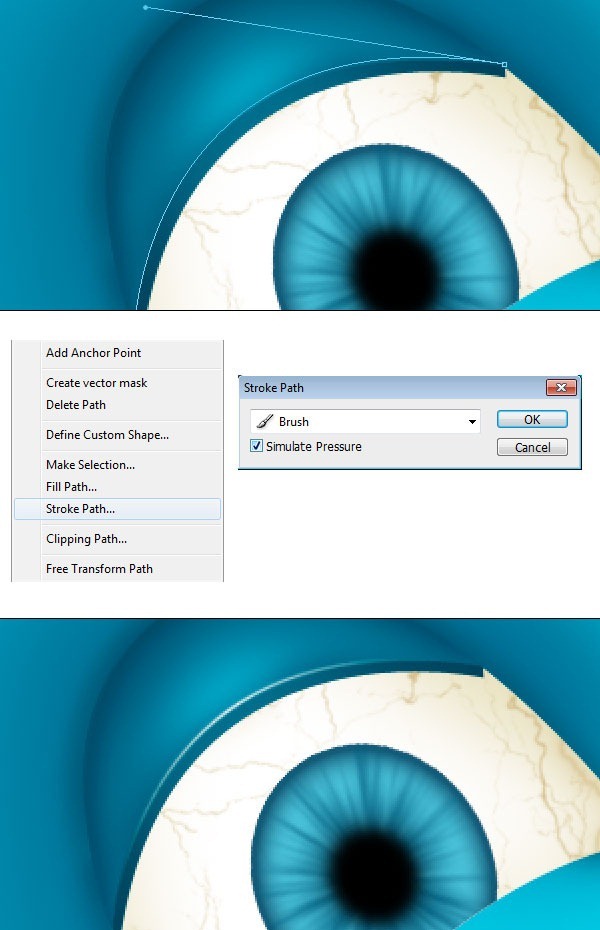
Step 18
Repeat step 16 & 17 to create lower eyelid and name the group "lower eyelid". Select pen tool, turn shape layer on and create eye lining with colors #0b506a & #15698b.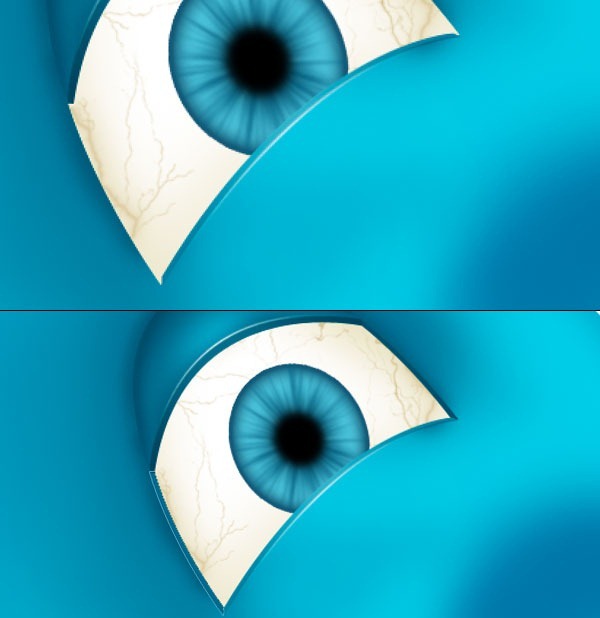
Step 19
Now add some shadows around right eye and repeat step 11 to 18 to create left eye. Add some shadows to left eye, group all layers and name the group to "left eye".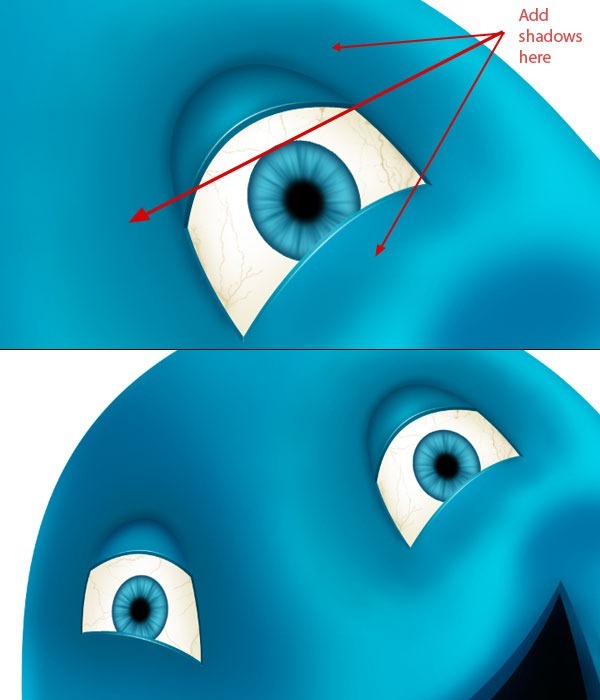
Step 20 - Creating cheek wrinkles.
It's time to create wrinkles in the character, let's start with wrinkles on cheek. Create a shape to add light to cheek area, change its color to #c2e7f1 and apply gaussian blur of radius 17 pixels.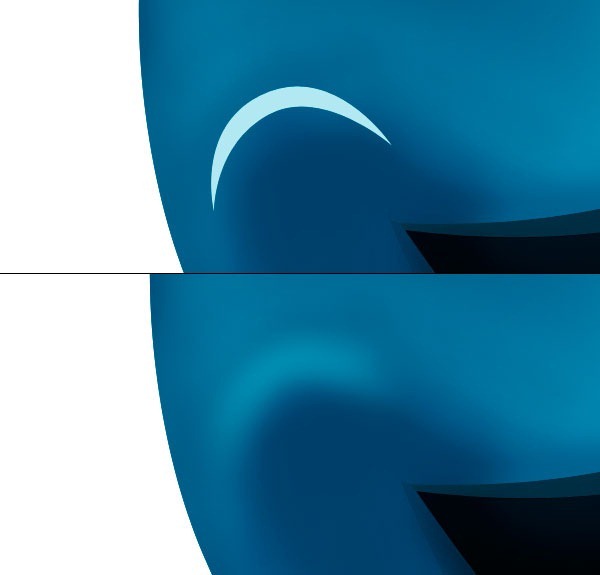
Step 21
Create a selection for wrinkle, select a soft brush of size 100 px &color #004576 and brush around the edges to create wrinkle. Make sure to save selection before deselecting selection then create another shape of color #add8eb and apply gaussian blur of radius 15 pixels.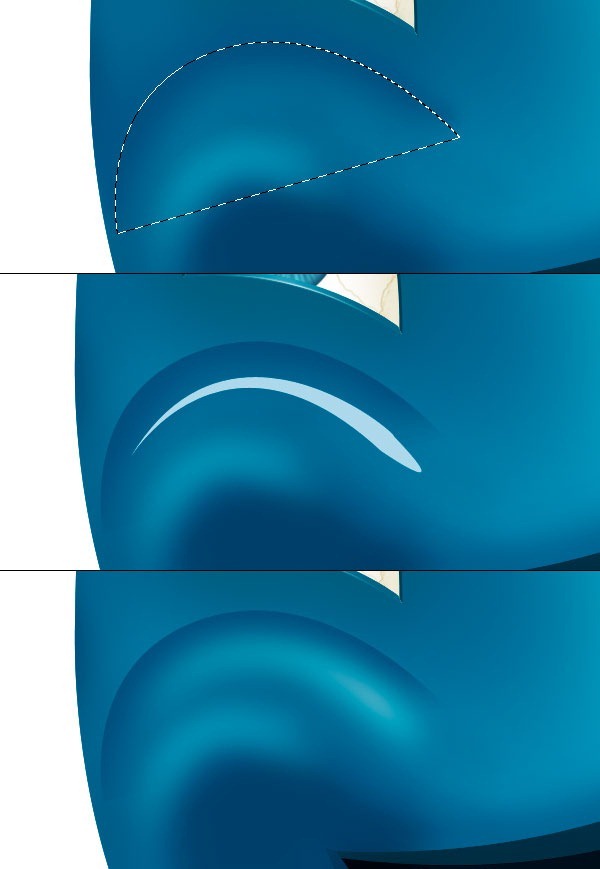
Step 22
Now load the saved selection of wrinkle, press Ctrl + I to invert the selection and add shadows outside the wrinkle by a soft brush of color #0d5983. Group wrinkle layers and name the group "left wrinkle". Similarly, create right side wrinkle with same method by repeating steps 20 & 21.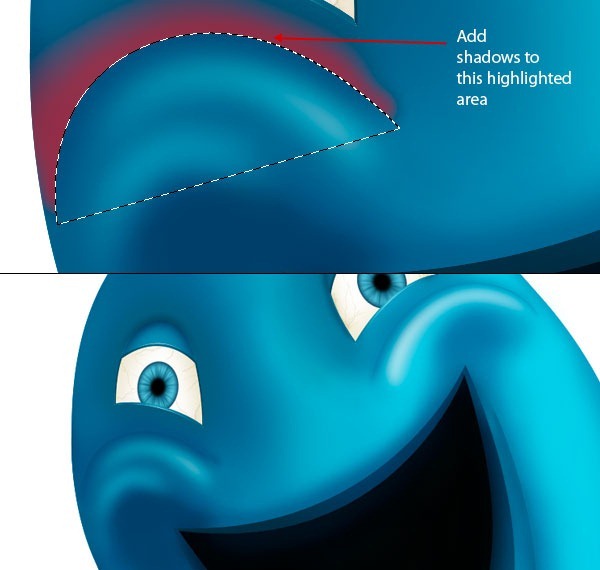
Step 23 - Creating wrinkles on body.
Now we will create wrinkles on lower body of character to do this, select a soft brush of size 175 px, hardness 0% & opacity to 50%. Set the brush color to #0d6897 and start brushing to define wrinkle area.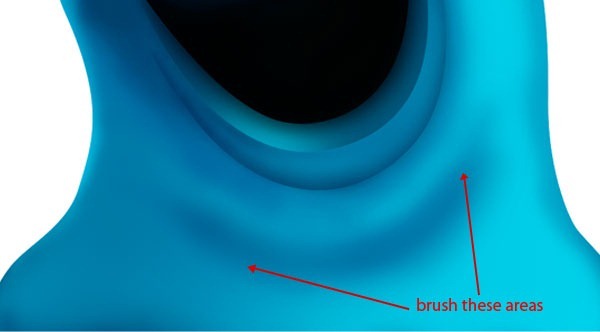
Step 24
Press P to select pen tool, turn path layer on and create the main wrinkle path. Save this path and press Ctrl + Enter to get its selection. Select a soft brush of size 200 px & color #0e547b, invert the selection and start adding shadows to main wrinkle. Change the brush opacity wherever needed.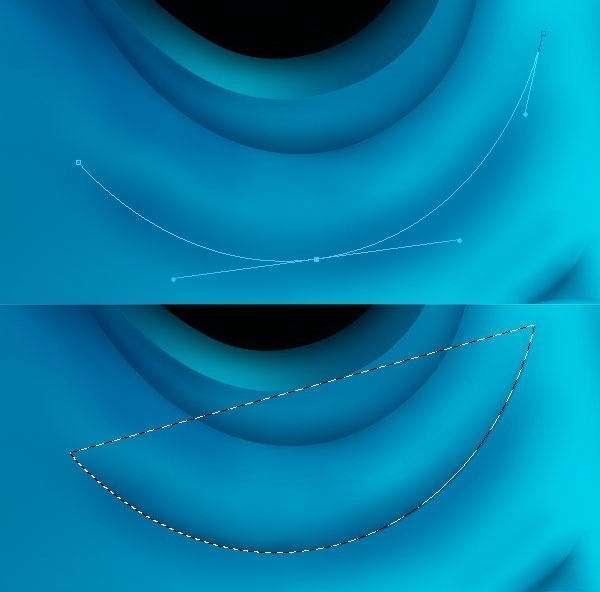
Step 25
Add shadows to lower part of character by a soft brush of color #0a6791. Change the brush color to #0f5b83 to add more shadows.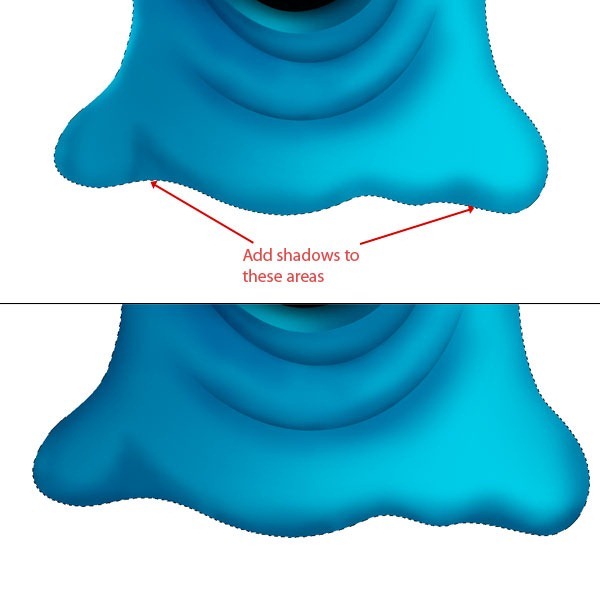
Step 26
Select pen tool and create a path to create lining of lower wrinkle. Next, select a soft brush, change its color to #004e7a and add shadow to the lower wrinkle. Create a selection by pen tool to create lower wrinkle shadow, change the foreground color to #007299, invert the selection and create shadows outside the selection. Similarly add some shadows inside the selection to give wrinkle more realism.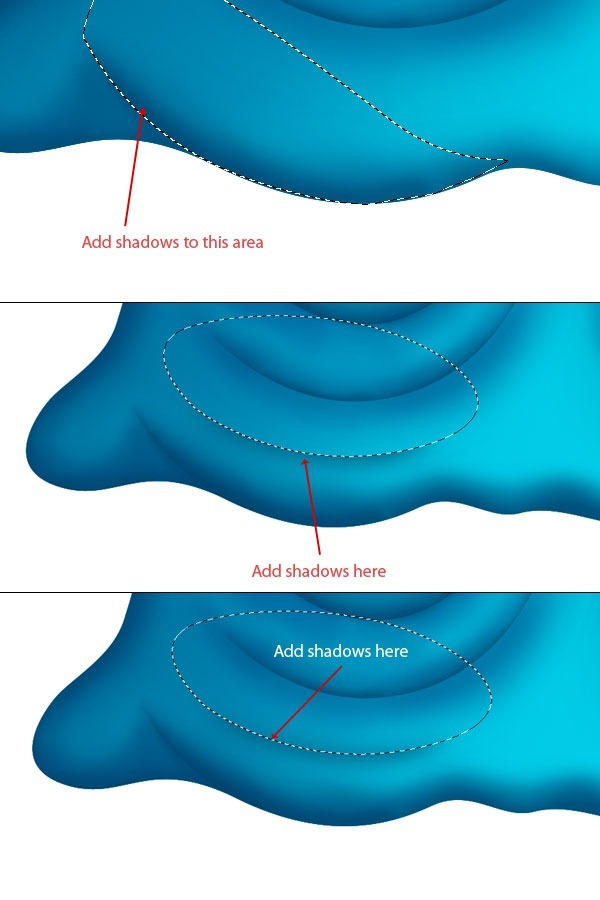
Step 27 - Creating small wrinkles.
To create small wrinkle turn shape layer on, create a shape and press Ctrl + click to get its selection. Select a soft brush of size 200 px & color #0198bd and start creating shadows in small wrinkles.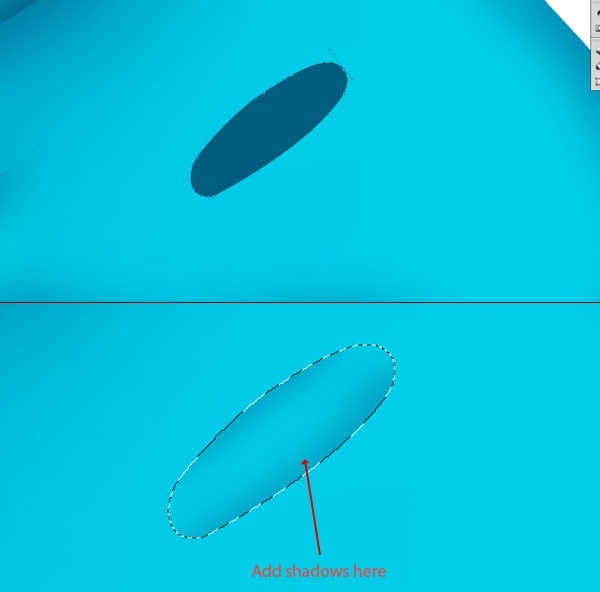
Step 28
Repeat the step-27 and create some more small wrinkles, group wrinkle layers and add layer mask to mask unwanted areas to make wrinkles more prominent.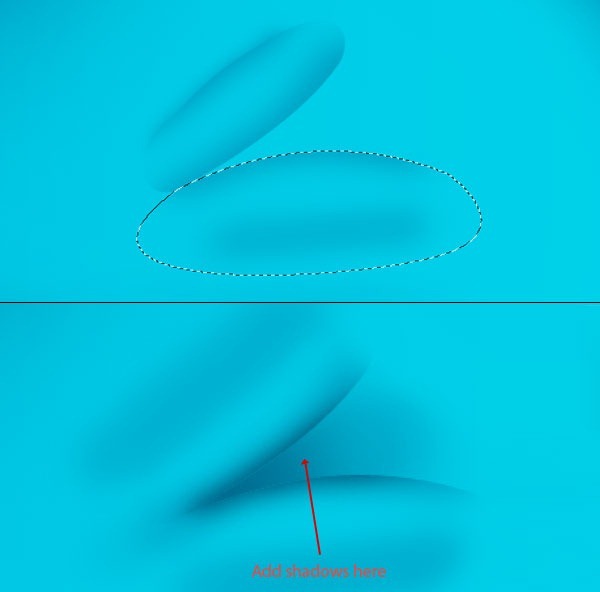
Page 3 of 3
Step 29 - Adding lights.
Now we will add some lights to the character to give it more natural look. Select pen tool and create a shape for main bigger wrinkle, change its color to #ceecf1 and apply gaussian blur of radius 15 px.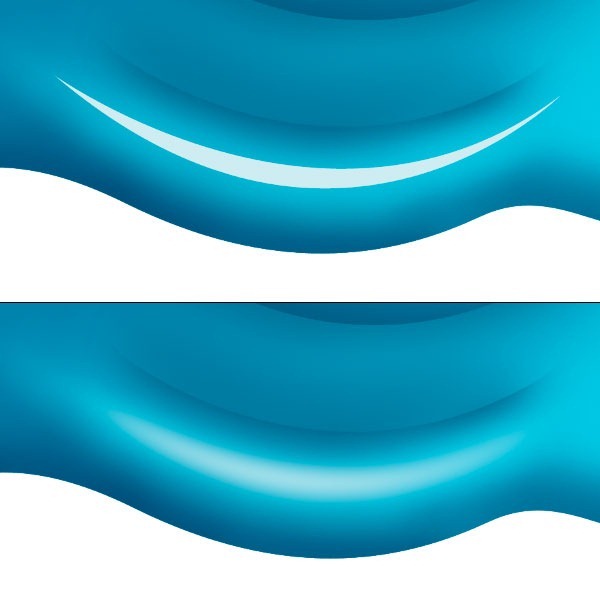
Step 30
Create another shape of color #ceecf1 and add gaussian blur of radius 25 pixels. Next, create a new thinner shape with same color and apply gaussian blur of radius 18 pixels.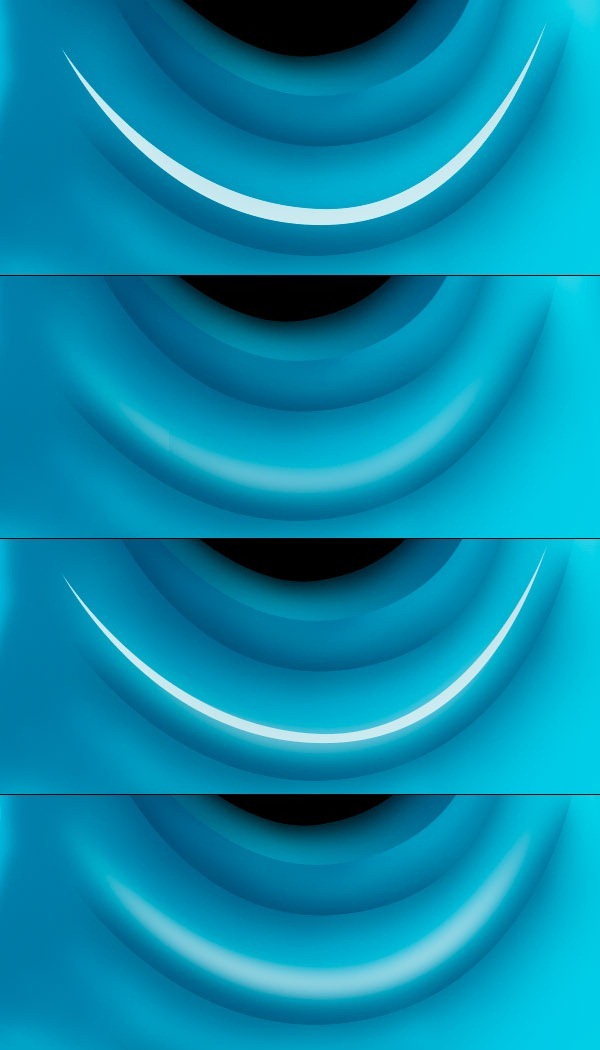
Step 31
Repeat step 29 & 30 to add more lighting to character. Add lights on other wrinkles too, add lighting according to the position of light source.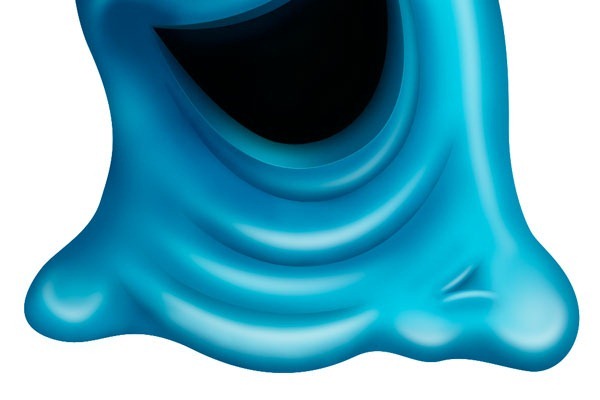
Step 32 - Adding lights to head.
To add light on head, select the pen tool and create a shape of color #ceecf1 then apply a gaussian blur of radius 40 pixels. Next, create another thinner shape around eyes with same color and apply gaussian blur of radius 25 pixels. If everything done properly, then it will look like this.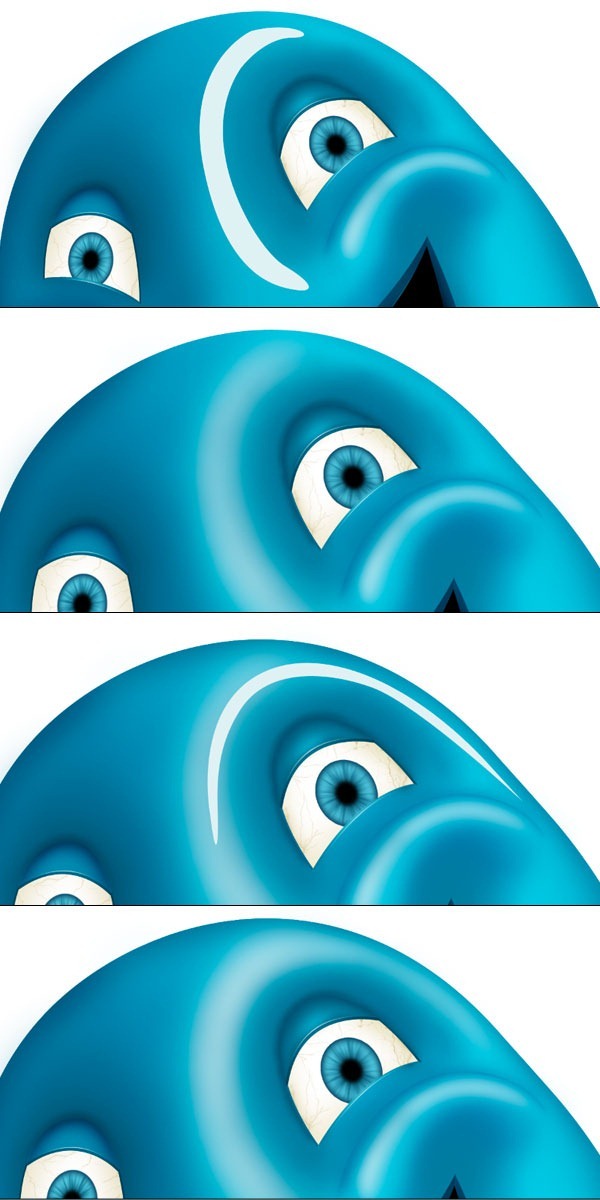
Step 33
Create another shape layer on head of color #ceecf1 and apply a gaussian blur of radius 46 pixels. The result will look like this.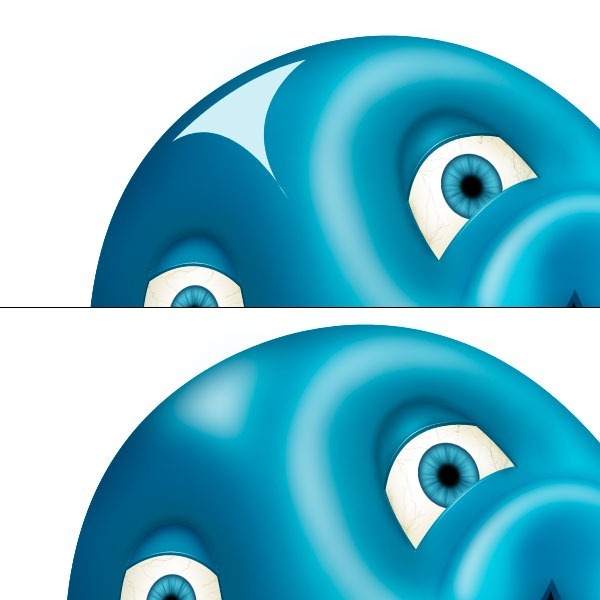
Step 34
Repeat steps 29 & 30 to create lights on the body of character to give character realistic look.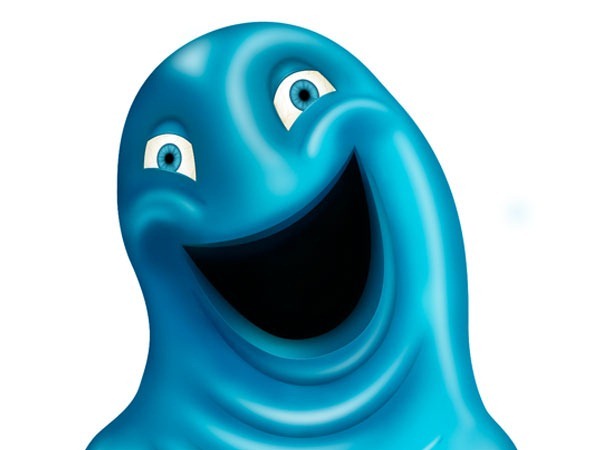
Step 35 - Creating hand.
Create a hand shape with pen tool, don't forget to turn shape layer on. Change its color to #00a4cb, select a soft brush of size 200 px and add shadows to the hand.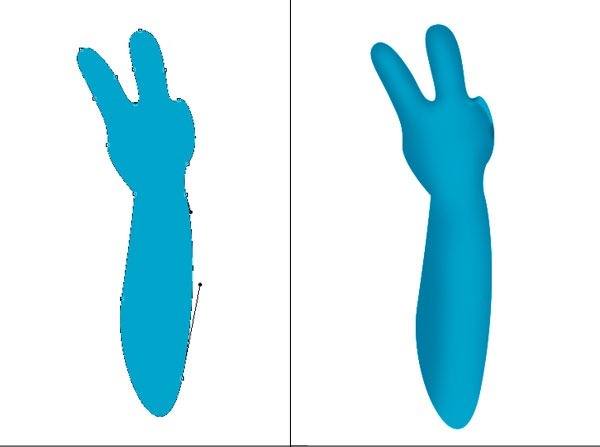
Step 36
Now we will enhance the hand by adding details in it. Starting from index finger, create a divider in index finger with color #006384 and apply gaussian blur of radius 3.5 pixels.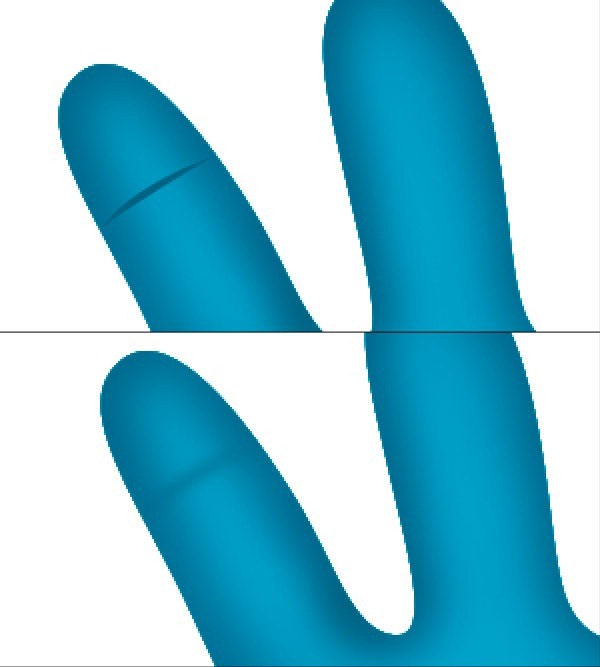
Step 37
Repeat step 36 and create more divisions in both fingers. To add lights on finger, create an ellipse of color #cfebf1 and apply gaussian blur of radius 7.5 pixels.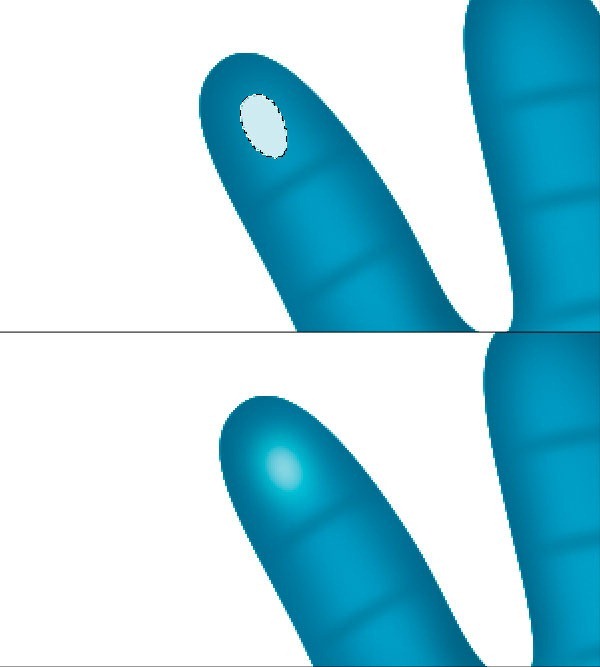
Step 38
Create more lights on finger by repeating step 37 then add lights in the hand wherever needed. Select soft brushes with some opacity to add lights on larger part like elbow.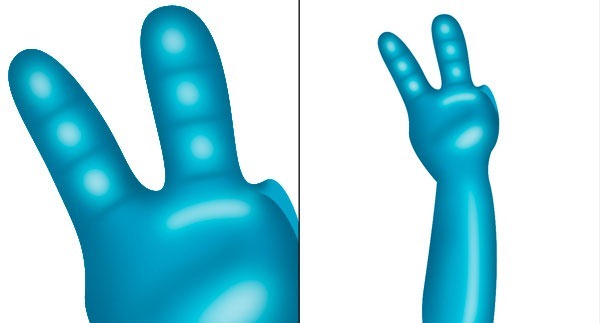
Step 39
Now create thumb by pen tool, change its color to #029fc4 then select a soft brush of color #017798 to add shadows in it. Repeat step 37 to add some lights on thumb.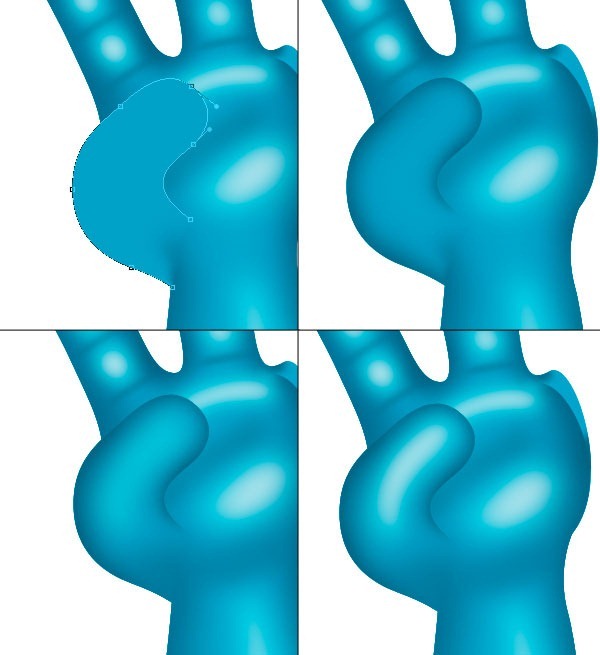
Step 40
Next, we will create nail of thumb for this, create a nail shape and apply gradient layer style with colors #42a51e & #3dd567. Now add stroke layer style and add a stroke of color #008bab and size 2 pixels.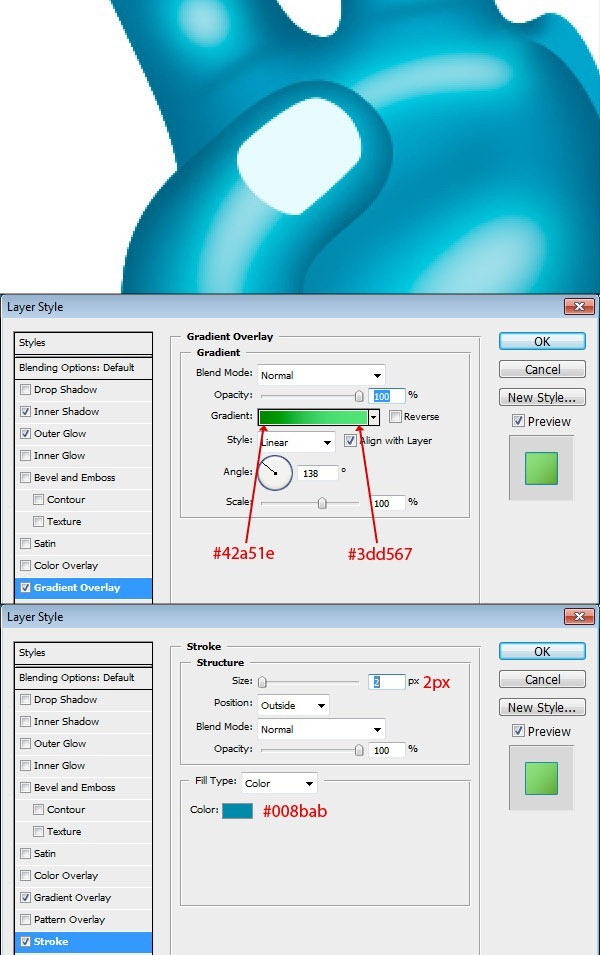
Step 41
The nail look great, now add an outer glow adjustment layer with these settings. Create a new selection, fill it with color #d3fdcd and apply a gaussian blur of radius 4 pixels to add lights on nail. If everything done correctly, then nail would look like this.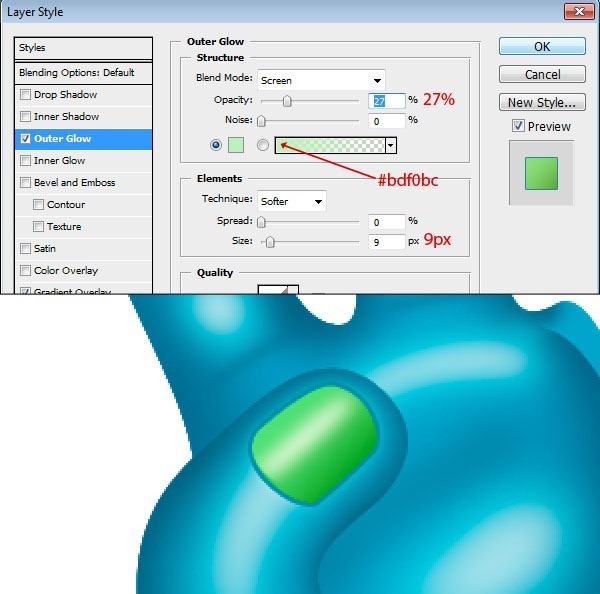
Step 42
Create small finger by repeating step 39 - 41, add lights and shadows wherever needed. Group all hand layers and name it "right hand" then duplicate the group and align it at left side of character. Rename this group to "left hand".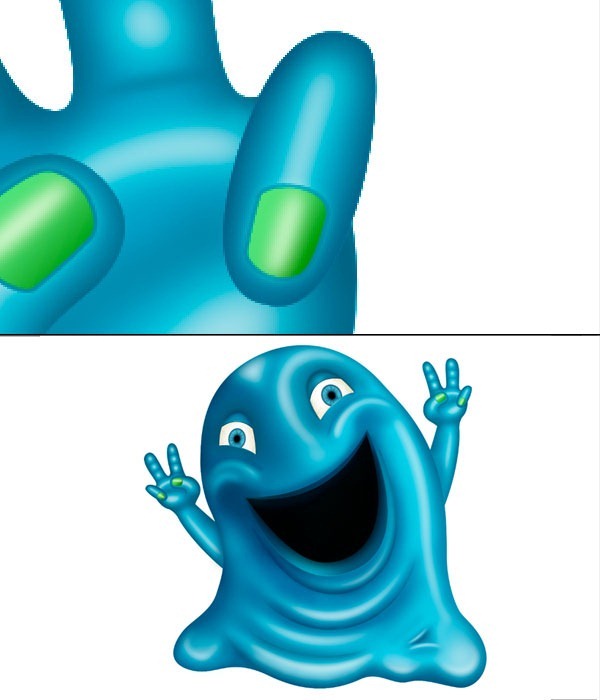
Step 43 - Color enhancement.
It's time for some color adjustment so group all layers and name it "monster", duplicate the group and flatten it. Rename this file to "monster", duplicate this layer and set the blending mode to soft light & opacity 70%.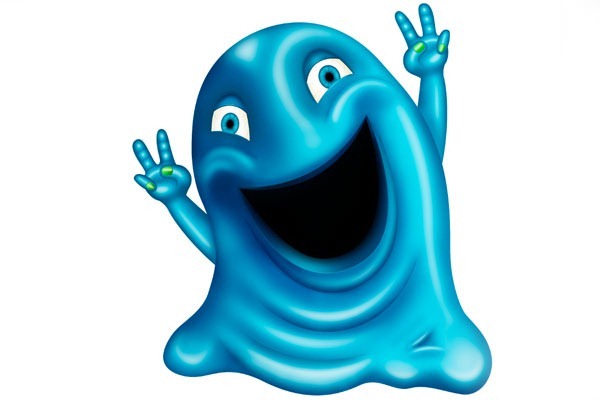
Step 44
Duplicate monster layer, go to filer gallery and apply plastic wrap filter with these settings. Rename this layer to "plastic wrap".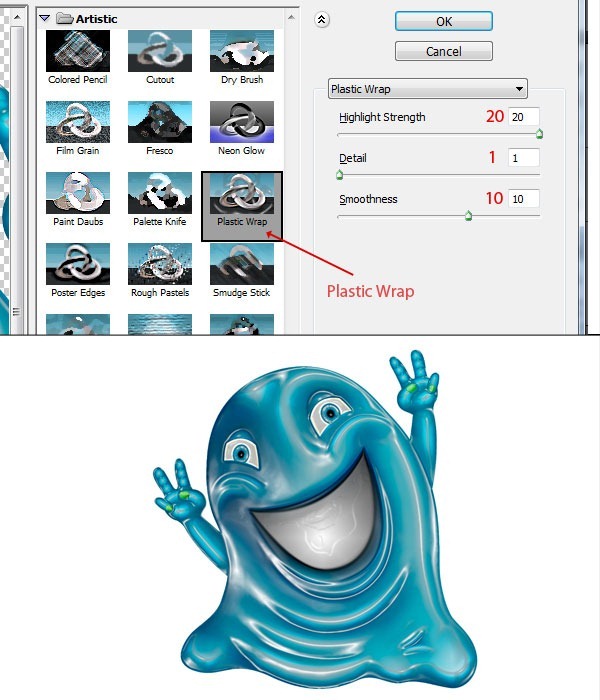
Step 45
Select the plastic wrap layer, change the blending mode to overlay and set the opacity to 60%. This will add awesome reflections to the body of which will give it a realistic look to the character.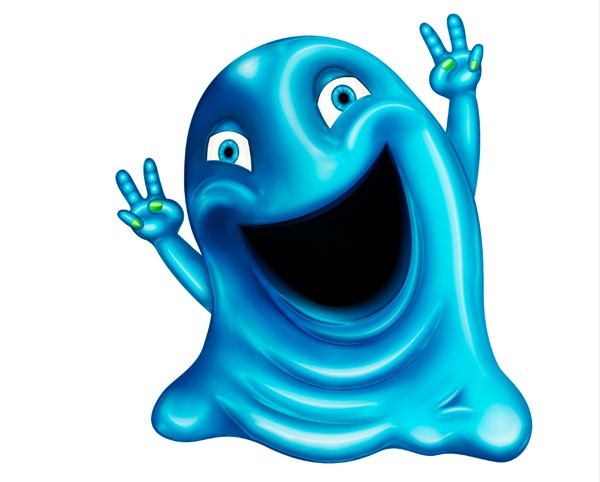
Step 46
We are coming to the end of this tutorial, now we need to change the eye color. To change the eye color, add Hue - Saturation adjustment layer and change hue to -98. Name this layer to "eye coloring".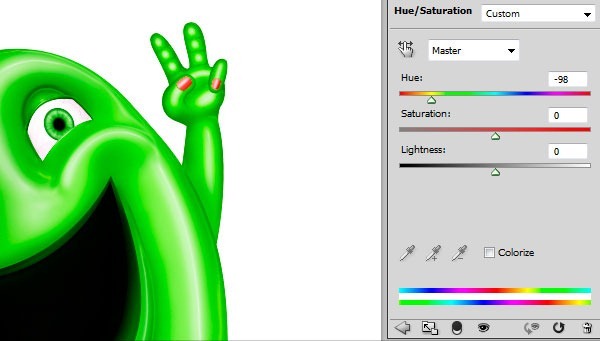
Step 47
Add a vector mask to "eye coloring" adjustment layer, select the mask and fill it with color black to hide everything. Now select a soft brush of color white and reveal the coloring to eyes.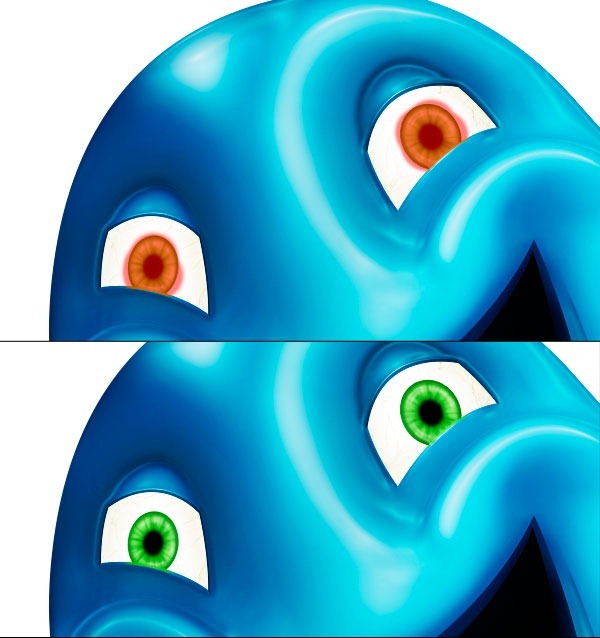
Step 48
We are about to finish this tutorial, now we need to add some finishing touches to enhance our image. First we will add reflection to the eyes to give it natural look. For this, create a white ellipse on eye pupil then add a vector mask to the layer and mask lower part of white ellipse by a soft brush of size 50 pixels.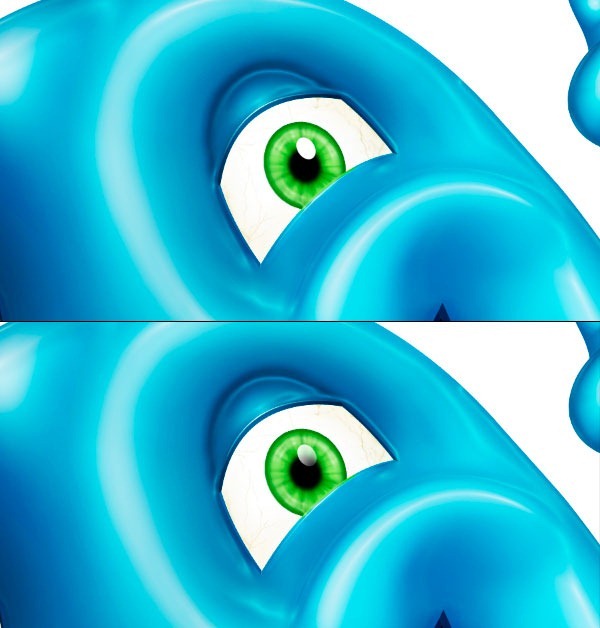
Step 49
After applying plastic wrap filter, you may have noticed that there are some unwanted reflections around the edges of character which we will have to remove to give character natural look.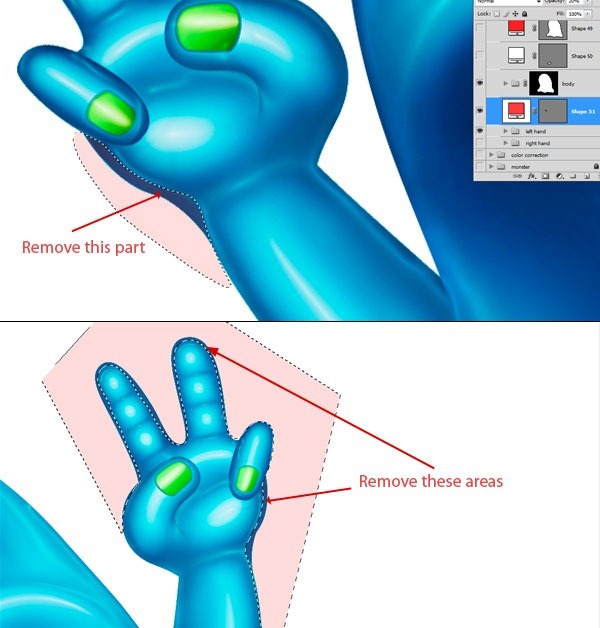
Step 50
Remove all unwanted parts from character, remove useless areas from hand, fingers, body edges give it natural look. If everything done properly, then character will look like this.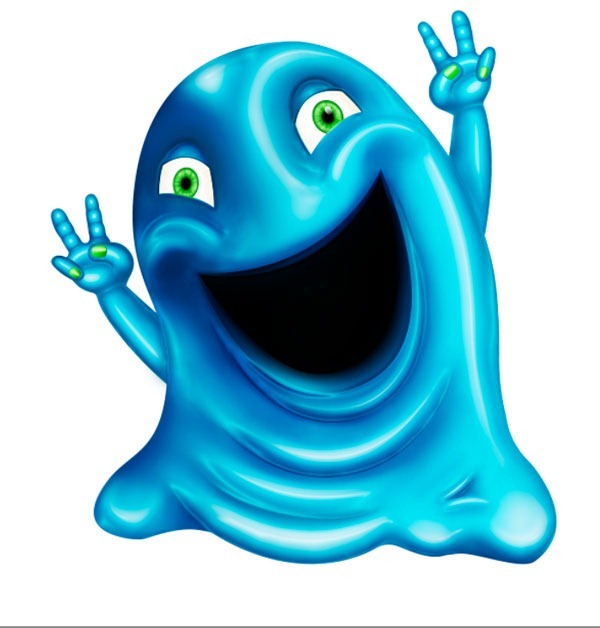
Step 51
This is the last step of this tutorial. Add some background behind character, feel free to add brush strokes to create a nice background. Congratulations! You have finished this tutorial. That's all friends, hope you enjoyed this tutorial. Here is the final result.![final-results[1] final-results[1]](http://photoshoptutorials.ws/images/stories/61e9fd392ec5_1257/final-results1.jpg)
Final Results
![final-results[2] final-results[2]](http://photoshoptutorials.ws/images/stories/61e9fd392ec5_1257/final-results2.jpg)
Keine Kommentare:
Kommentar veröffentlichen