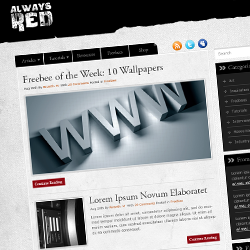
In this tutorial you will see how to create a minimal and clean blog layout using Photoshop. You will also learn some useful methods and practices for creating web layouts in Photoshop.
Preview of Final Results
Download the PSD
Minimalist Blog Layout Photoshop Tutorial
Resources
Step 1 : Preparing the Canvas
Create a new document. The layout is going to be 950 pixels wide.
Add guides to the right and left borders of the document.
The layout is 950 pixels wide. But we need some extra space for us to work comfortably. So increase the width of the document using the Canvas Size dialog box. Press Ctrl+Alt+C (Image > Canvas Size) to load the dialog box and enter the value.
Step 2 : Create and Organize Layer Groups
Often times we end up with several hundred layers scattered across the palette and hard to locate a particular item, especially when designing layouts. So plan ahead and keep things organized. I classified the layout into several groups that will contain the respective elements. Click on the "Create a New Group" button to create a group. Double click on the group the rename.
Step 3 : Designing the Header
Let's begin from the header. We are going to use a paper texture to create the header. Open up the "Paper Texture 1". We need to isolate the paper from the background. Click on the black background with Magic Wand Tool. This will select the background, invert the selection to select the paper. Press
Ctrl+Shift+I (Select > Inverse).
Fine tune the selection using the Refine Edge command to increase the contrast and sharpness of the selection. Press Ctrl+Alt+R (Select > Refine Edge). Adjust the parameters to refine the selection.
Press
Ctrl+J (Layer > New > Layer via Copy) to separate the selection.
Drag and drop the texture in our document. Place it in the "Header" group. Select the layer and go to Edit > Transform > 90 degree CCW. Then on the same menu choose "Flip Horizontal". Place it in the header position. I resized it a bit (about 75%). Perform all transformations in one go.
Press
Ctrl+U to load Hue/Saturation dialog box. Reduce the Lightness all the way to -100. Now we got a nice silhouette of the texture with all its edge details.
Add the logo. The font used is "VTKS Caveirada". You can Download it for free.
Some links on the right side. Create button for the active link using the Magnetic Lasso Tool. Make slightly irregular selection.
Step 4 : Texturing the Background
Let's create the background texture. Drag and drop the "Paper Texture 3" into our file. Reposition it properly. Place it beneath all the other layers in the palette.
Desaturate the texture by hitting
Ctrl+Shift+U. Press
Ctrl+M and adjust brightness and contrast by adjusting the curve.
Step 5 : Defining the Main Content Area
This is a two column layout with sidebar. First we will define the main content area. Click on the "Content" group and select the area using the Marquee Tool. Make sure it is 660 pixels in width. You can use the Info Palette to view the measurements. Fill it with #ffffff.
Apply subtle 1px stroke to the content area.
Now apply another texture to the content area. Open up the Paper Texture 2 and select and copy the middle portion of it.
Paste it above the content area. Resize the texture.
Press
Ctrl+Shift+U to desaturate the texture and adjust brightness using Curves.
Now Ctrl+click on the content box to load selection. Then contract the selection by 3 pixels.
Finally invert the selection and hit "Delete" key. This will create nice contrast on the border.
Add Layer Mask to the texture layer. Pick a black and white gradient and apply to the mask to blend the bottom edge of the texture into the background.
Step 6 : Adding Main Navigation
Select the "Navigation" group. Now create the main navigation above the main content box. Use the Marquee Tool to create the buttons. Fill #000000 for the buttons.
Let's add a nice folded edge to the navigation. Go to the last button in the row. Make a selection on the edge and choose Select > Transform Selection. Rotate the selection by 45 degrees holding Shift key. Then Press enter to confirm the transformation.
Press
Ctrl+Shift+J (Layer > New > Layer Via Cut). This will separate the piece on the edge. Press
Ctrl+T then right click and choose
Rotate 180 Degrees.
Lighten the piece using Hue/Saturation dialog box.
Download the social Icons from the link given above. Use the 32 X 32 size icons .
Step 7 : Adding Content
First add some padding to the content box that will give the content some breathing space. Ctrl+click on the content box thumbnail to load selection. Go to Select > Transform Selection. I want to give 20px padding on each side, a total of 40 pixels. Subtract it from the content box width and enter the value in the Options Panel (660 - 40 = 620px).
Add guides to each side of the selection.
Select the Horizontal Type Tool. Type the article Heading. I used Adobe Garamond Pro. You may substitute another similar font for it. Make sure you are in the "Content" group.
Type Date and author details.
Make a selection like below and fill it with #000000.
Apply Drop Shadow and Stroke to the place holder.
Now we can clip any image to the place holder. Place your image above the placeholder then right click on the layer and choose "Create Clipping Mask". Or Press
Ctrl+Alt+G.
Add Continue button. Fill #8e0a13.
Draw 1px divider using the Pencil Tool.
Create a smaller place holder. Apply the same layer styles as above. To add paragraph select the Horizontal Type Tool, click and drag like we do with the Marquee Tool. This way you can create paragraph text.
Add some more posts.
Create page numbers.
Step 8 : Search Box
Draw the search field with Marquee Tool and fill #ffffff. Keep 20 pixels gap between the content box and the search field.
Apply some Inner Shadow.
Draw the button. Fill color #8e0a13. Give it a folded edge. Add text.
Step 9 : Adding Sidebar Content
Select the Sidebar group. Let's create a content box using the Marquee Tool.
Add title to the box. Select the Custom Shape Tool. Switch to Arrows category. Choose the arrow shape and draw.
Create 20 pixel padding on each side like before and add guides. Type the text. Add divider lines to separate the contents. Use the Pencil Tool with 1px weight.
Create more content boxes.
Step 10 : Footer
Create a new layer in the "Footer" group. Make a horizontal selection at the bottom and fill it with #000000.
The footer is a bit regular looking. Let's give it some appeal. Draw this shape with Magnetic Lasso Tool and fill the footer color.
Add navigation links and copyright info to the footer.
Step 10 : Create and Apply Pattern
One last and final step before we finish the design. We will a tileable pattern using the Pencil Tool. Open a new document and create the below pattern element using the Pencil Tool with 1px weight. Turn off the background and select the pattern and choose Edit > Define Pattern.
Create a new layer above the background layer. Press
Shift+F5. This loads the Fill dialog box. Choose the pattern you just created. And Press "Ok" to apply the pattern.
We need to mix the pattern nicely into the background. Double click on the pattern layer thumbnail. Adjust the Opacity setting. The Blend if section has "This Layer" slider with Black and White handles. Select the Black handle and move it along the ramp towards right. You can see the pattern blending into the background. You can further adjust the smoothness and range of the blending. Press down the "Alt" key then click on the handle and drag away. This will split the handle into two segments. Adjust it until it looks good.
Final Results

![final-results[5] final-results[5]](http://photoshoptutorials.ws/images/stories/ad1d21e18172_103F1/final-results5.png)
![img(1)[3] img(1)[3]](http://photoshoptutorials.ws/images/stories/ad1d21e18172_103F1/img13.png)
![img(2)[3] img(2)[3]](http://photoshoptutorials.ws/images/stories/ad1d21e18172_103F1/img23.png)
![img(3)[3] img(3)[3]](http://photoshoptutorials.ws/images/stories/ad1d21e18172_103F1/img33.png)
![img(4)[3] img(4)[3]](http://photoshoptutorials.ws/images/stories/ad1d21e18172_103F1/img43.png)
![img(5)[3] img(5)[3]](http://photoshoptutorials.ws/images/stories/ad1d21e18172_103F1/img53.png)
![img(6)[3] img(6)[3]](http://photoshoptutorials.ws/images/stories/ad1d21e18172_103F1/img63.png)
![img(7)[3] img(7)[3]](http://photoshoptutorials.ws/images/stories/ad1d21e18172_103F1/img73.png)
![img(8)[3] img(8)[3]](http://photoshoptutorials.ws/images/stories/ad1d21e18172_103F1/img83.png)
![img(9)[3] img(9)[3]](http://photoshoptutorials.ws/images/stories/ad1d21e18172_103F1/img93.png)
![img(10)[3] img(10)[3]](http://photoshoptutorials.ws/images/stories/ad1d21e18172_103F1/img103.png)
![img(11)[3] img(11)[3]](http://photoshoptutorials.ws/images/stories/ad1d21e18172_103F1/img113.png)
![img(12)[3] img(12)[3]](http://photoshoptutorials.ws/images/stories/ad1d21e18172_103F1/img123.png)
![img(13)[3] img(13)[3]](http://photoshoptutorials.ws/images/stories/ad1d21e18172_103F1/img133.png)
![img(14)[3] img(14)[3]](http://photoshoptutorials.ws/images/stories/ad1d21e18172_103F1/img143.png)
![img(15)[3] img(15)[3]](http://photoshoptutorials.ws/images/stories/ad1d21e18172_103F1/img153.png)
![img(16)[3] img(16)[3]](http://photoshoptutorials.ws/images/stories/ad1d21e18172_103F1/img163.png)
![img(17)[3] img(17)[3]](http://photoshoptutorials.ws/images/stories/ad1d21e18172_103F1/img173.png)
![img(18)[3] img(18)[3]](http://photoshoptutorials.ws/images/stories/ad1d21e18172_103F1/img183.png)
![img(19)[3] img(19)[3]](http://photoshoptutorials.ws/images/stories/ad1d21e18172_103F1/img193.png)
![img(20)[3] img(20)[3]](http://photoshoptutorials.ws/images/stories/ad1d21e18172_103F1/img203.png)
![img(21)[3] img(21)[3]](http://photoshoptutorials.ws/images/stories/ad1d21e18172_103F1/img213.png)
![img(22)[3] img(22)[3]](http://photoshoptutorials.ws/images/stories/ad1d21e18172_103F1/img223.png)
![img(23)[3] img(23)[3]](http://photoshoptutorials.ws/images/stories/ad1d21e18172_103F1/img233.png)
![img(24)[3] img(24)[3]](http://photoshoptutorials.ws/images/stories/ad1d21e18172_103F1/img243.png)
![img(25)[3] img(25)[3]](http://photoshoptutorials.ws/images/stories/ad1d21e18172_103F1/img253.png)
![img(26)[3] img(26)[3]](http://photoshoptutorials.ws/images/stories/ad1d21e18172_103F1/img263.png)
![img(27)[3] img(27)[3]](http://photoshoptutorials.ws/images/stories/ad1d21e18172_103F1/img273.png)
![img(28)[3] img(28)[3]](http://photoshoptutorials.ws/images/stories/ad1d21e18172_103F1/img283.png)
![img(29)[3] img(29)[3]](http://photoshoptutorials.ws/images/stories/ad1d21e18172_103F1/img293.png)
![img(30)[3] img(30)[3]](http://photoshoptutorials.ws/images/stories/ad1d21e18172_103F1/img303.png)
![img(31)[3] img(31)[3]](http://photoshoptutorials.ws/images/stories/ad1d21e18172_103F1/img313.png)
![img(32)[3] img(32)[3]](http://photoshoptutorials.ws/images/stories/ad1d21e18172_103F1/img323.png)
![img(33)[3] img(33)[3]](http://photoshoptutorials.ws/images/stories/ad1d21e18172_103F1/img333.png)
![img(34)[3] img(34)[3]](http://photoshoptutorials.ws/images/stories/ad1d21e18172_103F1/img343.png)
![img(35)[3] img(35)[3]](http://photoshoptutorials.ws/images/stories/ad1d21e18172_103F1/img353.png)
![img(36)[3] img(36)[3]](http://photoshoptutorials.ws/images/stories/ad1d21e18172_103F1/img363.png)
![img(37)[3] img(37)[3]](http://photoshoptutorials.ws/images/stories/ad1d21e18172_103F1/img373.png)
![img(38)[3] img(38)[3]](http://photoshoptutorials.ws/images/stories/ad1d21e18172_103F1/img383.png)
![img(39)[3] img(39)[3]](http://photoshoptutorials.ws/images/stories/ad1d21e18172_103F1/img393.png)
![img(40)[3] img(40)[3]](http://photoshoptutorials.ws/images/stories/ad1d21e18172_103F1/img403.png)
![img(41)[3] img(41)[3]](http://photoshoptutorials.ws/images/stories/ad1d21e18172_103F1/img413.png)
![img(42)[3] img(42)[3]](http://photoshoptutorials.ws/images/stories/ad1d21e18172_103F1/img423.png)
![img(43)[3] img(43)[3]](http://photoshoptutorials.ws/images/stories/ad1d21e18172_103F1/img433.png)
![img(44)[3] img(44)[3]](http://photoshoptutorials.ws/images/stories/ad1d21e18172_103F1/img443.png)
![img(45)[3] img(45)[3]](http://photoshoptutorials.ws/images/stories/ad1d21e18172_103F1/img453.png)
![img(46)[3] img(46)[3]](http://photoshoptutorials.ws/images/stories/ad1d21e18172_103F1/img463.png)
![img(47)[3] img(47)[3]](http://photoshoptutorials.ws/images/stories/ad1d21e18172_103F1/img473.png)
![img(48)[3] img(48)[3]](http://photoshoptutorials.ws/images/stories/ad1d21e18172_103F1/img483.png)
![img(49)[3] img(49)[3]](http://photoshoptutorials.ws/images/stories/ad1d21e18172_103F1/img493.png)
![img(50)[3] img(50)[3]](http://photoshoptutorials.ws/images/stories/ad1d21e18172_103F1/img503.png)
![img(51)[3] img(51)[3]](http://photoshoptutorials.ws/images/stories/ad1d21e18172_103F1/img513.png)
![img(52)[3] img(52)[3]](http://photoshoptutorials.ws/images/stories/ad1d21e18172_103F1/img523.png)
![img(53)[3] img(53)[3]](http://photoshoptutorials.ws/images/stories/ad1d21e18172_103F1/img533.png)
![img(54)[3] img(54)[3]](http://photoshoptutorials.ws/images/stories/ad1d21e18172_103F1/img543.png)
![final-results[6] final-results[6]](http://photoshoptutorials.ws/images/stories/ad1d21e18172_103F1/final-results6.png)
Keine Kommentare:
Kommentar veröffentlichen