
This Photoshop tutorial will show you how to create a robotic horse by combining photos together. You’ll learn how to use stock photos of metal parts and overlay them on top of the horse. This technique can be used to make other types of robotic animals!
Preview of Final Results
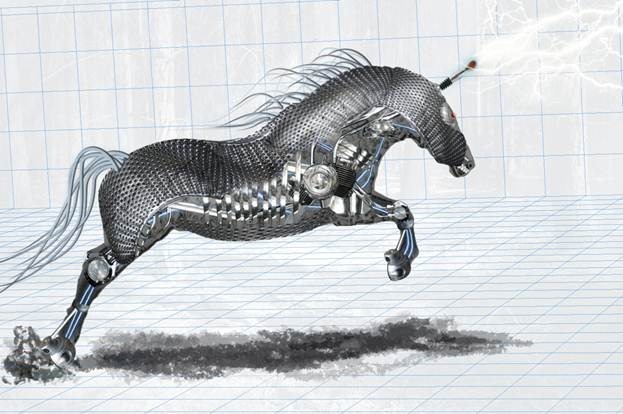
Create an Amazing Mechanical Horse in Photoshop
Resources
- Hot Rods 2
- Moto 2
- Two Cylinder
- Fat boy 2
- Trumpeted 1
- Doing the laundry 1
- Chrome jet engine
- Flying Horses 3
- Wine Stopper
- Magical forest at night
- Lightning Brush Set 1
Step 1
Open file “Flying horses 3”. This is a low resolution picture so we want to increase it’s resolution. Press Ctrl+Alt+I to open Image Size window and choose 1800 for width and 1200 for height.
Step 2
Select the horse using your favourite selection tools. I used Pen tool and Quick Mask for the hairs. Press Ctrl+J to move horse selection to a new layer. Use Clone Stamp Tool to clone over the white bar. Name this new layer “Horse”.
Step 3
Choose Ctrl+T to transform the horse layer then right click and choose Flip Horizontal. I also used the Smudge Tool to make hair look right but this step is optional.
Step 4
We will use our horse as reference for our metallic horse. We will cut different metallic parts from different photos then fit these parts on our horse. You can use the same photos as I did but feel free to use your own photos of engines and pipes as long as they are shiny and don’t have a strong color cast.Step 5
Open file “Trumpeted 1”. Use a selection tool to select a pipe then press Ctrl+J to move it on a new layer. Ctrl+click the layer to select opaque pixels, Ctrl+C to copy and Ctrl+V to paste the layer in our horse document.
Step 6
Make as many duplicates of this layer as needed then use Free Transform ( Ctrl+T ) and Warp to make them look like in the image shown below. Select all pipes layers and press Ctrl+G to group them. Name this group “Pipes”.
Step 7
Alt + Click the eyeball icon next to “Pipes” group to turn off the visibility off all layers except this group. Press Ctrl+Alt+E to make a new layer from all the opaque pixels. We will use this layer to add some glow to our pipes. Alt+Click the eyeball again to restore the visibility of the other layers. Double click the new layer the enter advanced blending mode and use the settings shown below. Name this new layer “Pipes Glow”.
Step 8
Open file “Moto 2”. Make a selection like shown below then press Ctrl+J to make a new layer from selection. Copy and paste this layer into our horse document. Make a duplicate of this layer then using Free Transform position these layers like shown below. Group the two layers and name the group “Hooves”.
Step 9
Go back to “Moto 2” and make another 2 selections like shown below. Move each selection on a new layer using Ctrl+J. Copy these layers then paste them into our horse document. Position them like shown below. Group these layers and name the group “Leg Pistons”. Apply a “Bevel and Emboss” effect to each of the pistons.
Step 10
Open file “Fat Boy 2” and make a selection like shown below. Move this selection on a new layer then copy and paste it in our horse document. Make a duplicate then position the layers like shown below. Group them and name the group “Joints”.
Step 11
Open file “2 Cylinder“ and make a selection like shown below. Make a new layer from selection than copy and paste the layer into our horse document. Make another 3 duplicates then sing Free Transform and Warp position them like shown in the image below. Group them and name this group “Ribs-Neck”.
Step 12
Open file “ Moto 2” and make a selection like shown below. Press Ctrl+J to make a new layer from selection. Copy and paste this layer into our horse document. Make a duplicate of this layer then using Free Transform and warp position these layers like shown below. Group these layers and name the group “Leg Pipes”.
Step 13
Select one “rib” from “Ribs-Neck” group and duplicate it than move it on top of all layers. Use Free transform and warp to make it look like shown below than make another 2 duplicates. Group this layers and name them “Ribs-Leg”.
Step 14
Open file “Fat boy 2” and make a selection like shown below. Make a new layer from selection than copy and paste into our horse document. Open file “2 Cylinder” and make a selection like shown below. Make a new layer from selection than copy and paste this layer into horse document. Make a duplicate and erase the dark part. Now Free Transform these 3 layers until they look like shown in the image below. Group them and name the group “Main Frame”.
Step 15
Select one layer from group “Leg Pipes” and press Ctrl+Shift+] to send the layer on top. Use Free Transform to position the layer like shown below. Name this layer “Head Pipes”.
Step 16
Open file “ Two Cylinder” and make a selection like shown below. Press Ctrl+J to make a new layer from selection. Copy and paste this layer into our horse document. Using Free Transform and warp position this layer like shown below. Name this layer “Belly Metal”.
Step 17
Open file “ Two Cylinder” and make a selection like shown below. Press Ctrl+J to make a new layer from selection. Copy and paste this layer into our horse document. Using Free Transform position this layer like shown below. Name this layer “Engine1”.Open file “ Fat Boy 2” and make a selection like shown below. Press Ctrl+J to make a new layer from selection. Copy and paste this layer into our horse document. Using Free Transform position this layerlike shown below. Name this layer “Engine 2”.
Group these layers and name the group “Engines”.

Step 18
Open file “ Two Cylinder” and make a selection like shown below. Press Ctrl+J to make a new layer from selection. Copy and paste this layer into our horse document. Using Free Transform and warp position this layer like shown below. Name this layer “Neck Metal”.
Step 19
Open file “ Two Cylinder” and make a selection like shown below. Press Ctrl+J to make a new layer from selection. Copy and paste this layer into our horse document. Using Free Transform and warp position this layer like shown below. Name this layer “Brain”.
Step 20
Take one “rib” from the group “Ribs Neck” and send it on top of all layers ( Ctrl+Shift+] ). Using Free Transform and warp position this layerlike shown below. Make another 9 duplicates then group them and name the group “Ribs Big”.
Step 21
Open file “ Two Cylinder” and make a selection like shown below. Press Ctrl+J to make a new layer from selection. Copy and paste this layer into our horse document. Using Free Transform and warp position this layer like shown below. Make another 3 duplicates and apply a apply a Bevel and Emboss effect to each of them. Group these layers and name the group “Teeth”.
Step 22
Open file “ Doing the laundry 1” and make a selection like shown below. Press Ctrl+J to make a new layer from selection. Copy and paste this layer into our horse document. Using Free Transform and warp position this layer like shown below. Use the Eraser Tool (E) to erase the area where the eyes are. You can also use a layer mask.
Step 23
Open file “ Doing the laundry 1” and make a selection like shown below. Press Ctrl+J to make a new layer from selection. Copy and paste this layer into our horse document. Using Free Transform and warp position this layer like shown below. Add a layer mask or erase the shiny metal border like in the image below. Add a clipped curves adjustment layer and use the settings shown below. Add a layer mask, press Ctrl+I to invert then paint with a brush set to 50% opacity with white to match the lighting.
Step 24
Open file “ Doing the laundry 1” and make a selection like shown below. Press Ctrl+J to make a new layer from selection. Copy and paste this layer into our horse document. Using Free Transform and warp position this layer like shown below.
Step 25
Open file “ Doing the laundry 1” and make a selection like shown below. Press Ctrl+J to make a new layer from selection. Copy and paste this layer into our horse document. Using Free Transform and warp position this layer like shown below. Add a layer mask and hide all the unwanted parts .
Step 26
Open file “ Doing the laundry 1” and make a selection like shown below. Press Ctrl+J to make a new layer from selection. Copy and paste this layer into our horse document. Using Free Transform and warp position this layer like shown below. Add a layer mask and hide all the unwanted parts . You can use on layer mask a brush with 20% opacity to partially hide this layer in the areas where it meets other metallic plates so they blend together seamlessly.
Step 27
Make a group from all the layers from file “Doing the laundry 1” and name the group “Plates”. You can add a layer mask this group and hide the unwanted parts.
Step 28
Make a selection like shown below and fill with black. Double click to enter advanced blending mode and use the settings shown below. Name this layer “Eyes glow”.
Step 29
Open file “Wine Stopper” and select the object. Make a new layer from selection than copy and paste it into our horse document. Use Free Transform to position the layer like shown below.
Step 30
Use a light grey brush to brush inside our object then double click the layer to enter advanced blending mode and use the settings shown below. Group these 2 layers and name the group “Horn”.
Step 31
Add a layer mask to “Horn” group and mask away the horn until it looks like in the image below.
Step 32
For the next steps a Wacom tablet is very helpful but you can also do a good job without it. To make the brush strokes look good we will use the Pen Tool (P) to make paths than we will select the Brush Tool (B) and press Enter to stroke the paths with the current brush ( you can also right click the path with the pen tool selected and choose “Stroke Path”). To control the way our path is stroked we will have to open Window > Brush , select Shape Dynamics, change Control to Fade and tweak the amount until our strokes look good.
Step 33
Make 3 new layers and using the technique described above make some “metallic hair”. On the firs layer the hair should be longer, on the second shorter, and on the third medium. You can vary the thickness for a better effect. Add some layer effects to the upper 2 layers like shown below.
Step 34
Add a curves adjustment layer and use the settings shown below. Add a hue/saturation adjustment layer and use the settings show below. Select the 3 “hair” layers and these 2 adjustment layers and make a group. Name this group “Hair1” and change the blend mode from Pass Through to Normal.
Step 35
For the tail make 7 new layers and make a “metallic hair” on each. Apply the effects shown below to each layer.
Step 36
Add a curves adjustment layer and use the settings shown below. Add a hue/saturation adjustment layer and use the settings show below. Select the 3 “hair” layers and these 2 adjustment layers and make a group. Name this group “Hair2” and change the blend mode from Pass Through to Normal.
Step 37
Select “Horse” layer and make a duplicate.Choose Filter > Artistic > Plastic Wrap. Press Ctrl+I to invert. Choose Filter > Stylize > Find Edges. Lower the opacity to 35 % . Group the horse layer and the duplicate layer and name this group “Horse”. Add a layer mask and mask away the hair.
Step 38
Our mechanic horse is ready. Now let’s place him on some proper background. Open file “magical forest at night”. Add a Hue/Saturation adjustment layer and use the settings shown below. This step will fade out the details and leave us with the background we want.
Step 39
Open our horse document and select the upper group. Press Ctrl+Alt+E to make a new layer from all visible layers. Ctrl+click the layer to select opaque pixels, Ctrl+C to copy than paste it in our background document. You can close the horse document. Resize the horse layer to look like in the image below.
Step 40
Add a new layer below the horse layer and using a chalk brush ( or any other hard brush ) paint the shadow with black.
Step 41
Add a new blank layer and choose Filter > Vanishing Point. Make it look like in the image below than choose Render Grids to Photoshop from the options menu and press Ok. Double click the layer to enter advanced blending options and use the settings shown below. Move this layer below our horse layer. Add a layer mask and mask away the shadow area.
Step 42
Let’s add some lightning. Make a new layer and using lightning brushes from “Lightning Brush set 1” make some white lightning bolts. Double click the layer to enter advanced blending mode and use the settings shown below.
Step 43
Add a new layer and using the lightning brushes add some black cracks to make our metallic horse more genuine. Add a layer mask and mask away everything but the horse.
Step 44
Add a curves adjustment layer and use the settings shown below. Add a layer mask and fill it with black. Brush with white on layer mask to improve the general lighting.
Final Results

Author’s Comment

In this tutorial we used some basic Photoshop tools and one very advanced tool of our own – imagination- to create a mechanical horse. I must admit that I did not foreseen this result when I first started working on this, but I rather improvised along the way so the final result surprised me in a pleasant way. The lesson I learned while working on this was that you have to be flexible and try new things, even if they not seem to work first time.
You can see some of my other art deviations here . Have fun photoshoping!!
Adrian Scheff
Keine Kommentare:
Kommentar veröffentlichen